Spring Cloud-Stream
Spring Cloud Stream
引言
为什么要引入Spring Cloud Stream?
如今市场上有着4大流行的 MQ (消息中间件)如:ActiveMQ、RabbitMQ、RocketMQ、Kafka。在不同系统中可能使用的消息中间件不同,这就需要程序员对每种的消息中间件去掌握,如果每一种消息中间件都去掌握的话,是一件费时又费力的事情,而且还要涉及到消息中间件的切换,维护,和开发。
有没有一种新的技术诞生?
让我们不再关注具体 MQ 的细节,我们只需要用一种适配绑定的方式,自动的给我们在各种 MQ 内切换。(类似于JDBC)
Spring Cloud Stream 响应诞生,它是屏蔽底层消息中间件的差异,降低切换成本,统一消息的编程模型。
简介
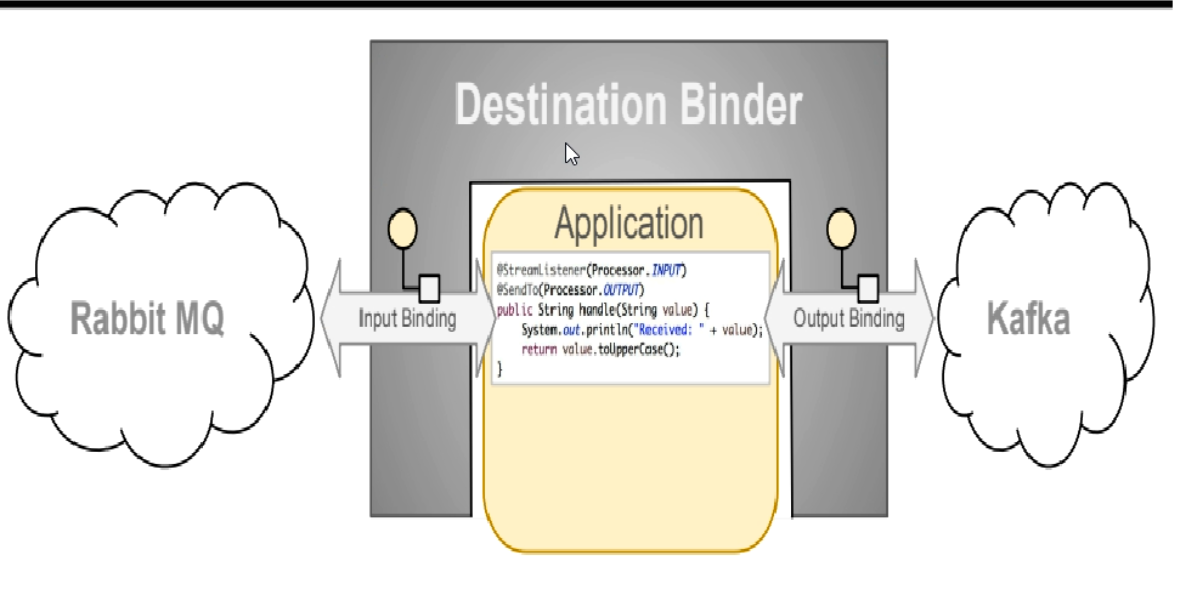
官方定义 Spring Cloud Stream 是一个构建消息驱动微服务的框架。
应用程序通过 inputs 或者 outputs 来与 Spring Cloud Stream 中 binder 对象交互。
通过我们配置来binding(绑定),而Spring Cloud Stream 的 binder 对象负责于消息中间件交互。
所以,我们只需要搞清楚如何于 Spring Cloud Stream 交互就可以方便使用消息驱动方式。
通过使用 Spring Integration来连接消息代理中间件以实现消息事件驱动。
Spring Cloud Stream 为一些供应商的消息中间件产品提供了个性化的自动化配置实现,引用了发布-订阅、消费组、分区的三个概念
目前官方只支持 RabbitMQ、Kafka
Spring Cloud Stream 官方地址:Spring Cloud Stream-Spring.io
Spring Cloud Stream 中文指导手册:Spring Cloud Stream 中文指导手册
设计思想
标准 MQ
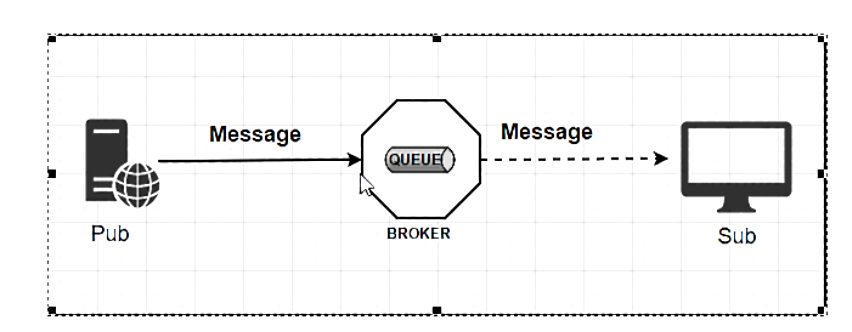
标准的 MQ 中 生产者/消费者之间靠Message(消息)媒介传递信息内容
消息必须走特定的通道–消息通道MessageChannel
消息通道里的消息由MessageChannel的子接口SubscribableChannel转发,由MessageHandler消息处理器订阅消费
为什么使用Spring Cloud Stream?
假如说我们用到了RabbitMQ和Kafka,由于这两个消息中间件的架构上的不同,像RabbitMQ由exchange,kafka由Topic和Partitions分区。
这些中间件的差异性导致我们实际项目开发给我们造成了一定的困扰,我们如果用两个消息队列的其中一种,后面的业务需求,我们向往另外一种消息队列进行迁移,这时无疑就是一个灾难性的,一大堆东西都要重新推倒重新做,因为它更我们的系统耦合了,这时候Spring Cloud Stream给我们提供了一种解耦合的方式。
为什么Spring Cloud Stream可以统一底层差异
在没有绑定器这个概念的请款下,我们的Spring Boot应用要直接与消息中间件进行信息交互的时候,由于各消息中间件构建的初衷不同,他们的实现细节上会有较大的差异性
通过定义绑定器作为中间层,完美地实现了应用程序与消息中间件细节之间的隔离。
通过定义绑定器Binder作为中间层,实现了应用程序与消息中间件细节之间的隔离。
Binder
在没有绑定器这个概念的情况下,完美的Spring Boot应用要直接与消息中间件进行消息交互的时候,由于各个消息中间件构建的初衷哦那个不同,它们的实现细节上会有较大的差异性。通过定义绑定器作为中间层,完美地实现了应用程序与消息中间件细节之间的隔离。Stream对消息中间件的进一步封装,可以做到代码层面对中间件的无感知,甚至于动态的动态的切换中间件(rabbitMQ切换为Kafka),使得微服务开发的高度解耦,服务可以关注更多自己的业务流程。
通过定义绑定器Binder作为中间层,实现了应用程序与消息中间件细节之间的隔离。
INPUT对应于消费者
OUTPUT对应于生产者
Spring Cloud Stream中的消息通信遵循了发布-订阅模式,使用Topic(主题)进行广播,主题这个概念在Kafka中就是Topic,在RabbitMQ中就是Exchange(交换机)
Spring Cloud Stream 标准流程
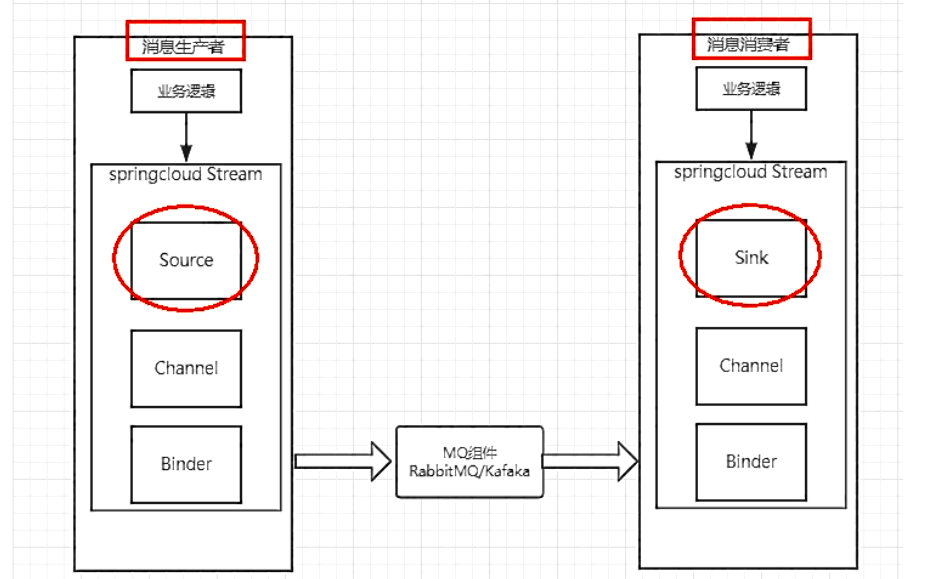
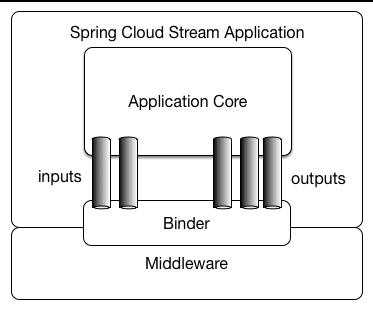
上述中展示了4种Spring Cloud Stream的组件,分别是Binder、Channel、Source和Sink。
作用
Binder:很方便的连接中间件,屏蔽差异
Channel:通道,是队列Queue的一种抽象,在消息通讯系统中就是实现存储和转发的媒介,通过对Channel对队列进行配置
Source和Sink:简单的可理解为参照对象是Spring Cloud Stream自身,从Stream发布消息就是输出,接受消息就是输入
RabbitMQ Binder 配置
依赖
要使用 RabbitMQ binder,您可以使用以下 Maven 坐标将其添加到 Spring Cloud Stream 应用程序中:
<dependency> |
或者,您可以使用 Spring Cloud Stream RabbitMQ Starter,如下所示:
<dependency> |
配置选项
RabbitMQ Binder属性
默认情况下,RabbitMQ binder 使用 Spring Boot 的ConnectionFactory. 因此,它支持 RabbitMQ 的所有 Spring Boot 配置选项(RabbitMQ)。RabbitMQ 配置选项使用spring.rabbitmq前缀。
除了 Spring Boot 选项之外,RabbitMQ binder 还支持以下属性:
| 属性 | 说明 | 默认值 |
|---|---|---|
| spring.cloud.stream.rabbit.binder.adminAddresses | 空 | |
| spring.cloud.stream.rabbit.binder.nodes | 空 | |
| spring.cloud.stream.rabbit.binder.compressionLevel | 压缩绑定的压缩级别。 | 1(BEST_LEVEL) |
| spring.cloud.stream.binder.connection-name-prefix | 连接名称前缀,用于命名此绑定器创建的连接。名称是此前缀后跟#n,n每次打开新连接时都会递增。 |
无(Spring AMQP 默认值) |
RabbitMQ 消费者属性
以下属性仅适用于 Rabbit 消费者,并且必须以 spring.cloud.stream.rabbit.bindings.<channelName>.consumer. 为前缀
但是,如果需要将同一组属性应用于大多数绑定,为避免重复,Spring Cloud Stream 支持为所有通道设置值,格式为spring.cloud.stream.rabbit.default.<property>=<value>.
另外,请记住,绑定特定属性将在默认情况下覆盖为其配置的全局属性。
| 属性 | 说明 | 默认值 |
|---|---|---|
| acknowledgeMode | 消费者端的ACK模式 |
AUTO |
| anonymousGroupPrefix | 当绑定没有group属性时,一个匿名且自动删除的队列被绑定到目标交换机上,此类队列会由默认命名策略生成一个名为anonymous.<base64 representation of a UUID>的属性值。设置此属性可将前缀更改为默认值以外的值。 |
anonymous. |
| autoBindDlq | 是否自动声明 DLQ(死信队列) 并将其绑定到 binder DLX(死信交换机)。 | false |
| bindingRoutingKey | 将队列绑定到交换器的路由键(如果bindQueue是true)。可以是多个键 - 请参阅bindingRoutingKeyDelimiter。对于分区目标,-<instanceIndex>附加到每个键。 |
# |
| bindingRoutingKeyDelimiter | 当该属性不为空时,bindingRoutingKey 被认为是由该值分隔的键列表;通常使用逗号。 |
null |
| bindQueue | 是否声明队列并将其绑定到目标交换机。如果您已经设置了自己的基础架构并且之前已经创建并绑定了队列,请将其设置为false。 |
true |
| consumerTagPrefix | 用于创建消费者标签;将添加每个消费者创建的#n增量n。 示例:${spring.application.name}-${spring.cloud.stream.bindings.input.group}-${spring.cloud.stream.instance-index}。 |
无 - 代理将生成随机消费者标签 |
| containerType | 选择要使用的侦听器容器的类型。 | simple |
| deadLetterQueueName | DLQ(死信队列) 的名称 | prefix+destination.dlq |
| deadLetterExchange | 分配给队列的 DLX(死信交换机)。仅当autoBindDlq是true时才相关。 |
prefix+DLX |
| deadLetterExchangeType | 要分配给队列的 DLX 的类型。仅当autoBindDlq是true时才相关。 |
direct |
| deadLetterRoutingKey | 绑定交换机的死信路由键,仅当autoBindDlq为true才相关。 |
destination |
| declareDlx | 是否为指定destination声明 DLX,仅当autoBindDlq是true时才相关。如果你有与配置的 DLX 请设置为 false |
true |
| declareExchange | 是否为指定destination声明交换机 |
true |
| delayedExchange | 是否为指定destination声明Delayed Message Exchagne(延迟交换机)。需要在broker上安装Delayed Message Exchagne 插件。将参数 exchageType 设置为 x-delayed-type。 |
false |
| dlqBindingArguments | 将 dlq 绑定到死信交换时应用的参数;用于headers deadLetterExchangeType指定要匹配的标头。例如…dlqBindingArguments.x-match=any,…dlqBindingArguments.someHeader=someValue。 |
空 |
| dlqDeadLetterExchange | 如果声明了 DLQ,则分配给该队列一个 DLX。 | 无 |
| dlqDeadLetterRoutingKey | 如果一个 DLQ 被声明了,会分配给该队列一个死信路由key | 无 |
| dlqExpires | 一个死信队列超过多长时间后被删除。 | 不过期 |
| dlqLazy | 声明一个带有x-queue-mode=lazy参数的死信队列(即 惰性死信队列),考虑使用策略而不是此设置,因为使用策略允许在不删除队列的情况下更改设置。 |
false |
| dlqMaxLength | 死信队列中的可存储最大消息数。 | 不限制 |
| dlqMaxLengthBytes | 死信队列中所有消息的最大总字节数和。 | 不限制 |
| dlqMaxPriority | 死信队列中消息的最大优先级 | 无 |
| dlqOverflowBehavior | 超过dlqMaxLength或dlqMaxLengthBytes时采取的行动;由drop-head和reject-publish两种 |
无 |
| dlqQuorum.deliveryLimit | 当quorum.enabled=true时,设置投递限制,超过该限制后,邮件将被丢弃或死信。 |
无 - 将应用代理默认值。 |
| dlqQuorum.enabled | 如果为 true,则创建仲裁死信队列而不是普通队列。 | false |
| dlqQuorum.initialQuorumSize | 当quorum.enabled=true时,设置初始仲裁队列大小。 |
无 - 将应用代理默认值。 |
| dlqSingleActiveConsumer | 设置为 true 将x-single-active-consumer队列属性设置为 true,即单一活动消费者。 |
false |
| dlqTtl | 声明时应用于死信队列的默认生存时间(以毫秒为单位)。 | 不限制 |
| durableSubscription | 订阅是否应该是持久的。仅当group也设置时才有效。 |
true |
| exchangeAutoDelete | 如果declareExchange为true,则交换机会被自动删除(即在最后一个队列被删除后删除)。 |
true |
| exchangeDurable | 如果declareExchange为true,则交换机是持久的(即,它在broker重启后仍然存在)。 |
true |
| exchangeType | 交换类型:direct, fanout,headers或topic用于非分区destination和direct, 标头或topic用于分区destination。 |
topic |
| exclusive | 是否创建单一活动的消费者,如果该属性值为true,则最大消费者数为1。多个消费者同时监听同一个队列,同一时间只能有一个消费者去消费消息,其他的消费者都处于等待状态,当该消费者失败或者关闭时,另一个消费者才将成为“活跃”消费者并恢复消费。(原理参阅请参阅recoveryInterval,它控制备用实例尝试使用的频率。)在使用 RabbitMQ 3.8 或更高版本时考虑使用singleActiveConsumer。 |
false |
| expires | 队列未使用被删除的时间(存活时间) | 不过期 |
| failedDeclarationRetryInterval | 如果队列丢失,重试消费的时间间隔 | 5000 |
| frameMaxHeadroom | 将堆栈跟踪添加到 DLQ 消息标头时为其他标头保留的字节数。所有标头必须适合frame_max代理上配置的大小。堆栈跟踪可能很大;如果大小加上此属性超过frame_max,则堆栈跟踪将被截断。将写入 WARN 日志;考虑frame_max通过捕获异常并抛出具有较小堆栈跟踪的异常来增加或减少堆栈跟踪。 |
20000 |
| headerPatterns | 标头模式 | ``[‘*’]所有标题 |
| lazy | 是否用参数声明队列x-queue-mode=lazy,惰性队列,考虑使用策略而不是此设置,因为使用策略允许在不删除队列的情况下更改设置。 |
false |
| maxConcurrency | 最大消费者数。containerType是direct时不支持。 |
1 |
| maxLength | 普通队列中的最大消息数。 | 不限制 |
| maxLengthBytes | 普通队列中所有消息的最大总字节数。 | 不限制 |
| maxPriority | 普通队列中消息的最大优先级 (0-255) | 无 |
| missingQueuesFatal | 当找不到队列时,是否将条件视为致命并停止监听听器容器。默认为false使容器不断尝试从队列中消费 |
false |
| overflowBehavior | maxLength超过或超过时采取的行动maxLengthBytes;目前有drop-head或reject-publish两种 |
无 |
| prefetch | 每个消费者可以处理的未确认消息的最大数量 | 1 |
| prefix | 要添加到destination和 队列名称的前缀。 |
”” |
| queueBindingArguments | 将队列绑定到交换器时应用的参数;用于headers exchangeType指定要匹配的标头。例如…queueBindingArguments.x-match=any,…queueBindingArguments.someHeader=someValue。 |
空 |
| queueDeclarationRetries | 如果队列丢失,则重试从队列消费的次数。仅当missingQueuesFatal是true时才相关。否则,容器会无限期地重试。containerType是direct时不支持。 |
3 |
| queueNameGroupOnly | 如果为 true,则从名称等于 group 的队列中消费。否则从队列名称为 destination.group 队列中消费。 |
false |
| quorum.deliveryLimit | 当quorum.enabled=true时,设置投递限制,超过该限制后,消息将被丢弃或死信。 |
无 - 将应用代理默认值。 |
| quorum.enabled | 如果为 true,则创建仲裁队列而不是普通队列。 | false |
| quorum.initialQuorumSize | 当quorum.enabled=true时,设置初始仲裁队列大小。 |
无 - 将应用代理默认值。 |
| recoveryInterval | 连接恢复尝试之间的间隔,以毫秒为单位。 | 5000 |
| requeueRejected | 当消息消费失败重试机制被关闭或者republishToDlq 为 false时,重新入队失败后是否还应该重新入队, |
false |
| republishDeliveryMode | 当republishToDlq 为 false时,指定重新发布消息的传递模式。 |
DeliveryMode.PERSISTENT |
| republishToDlq | 默认情况下,重试次数用尽后失败的消息将被拒绝。如果配置了死信队列 (DLQ),RabbitMQ 会将失败的消息(未更改)路由到 DLQ。 | true |
| singleActiveConsumer | 设置为 true 将x-single-active-consumer队列属性设置为 true。称为单一活动消费者。 |
false |
| transacted | 是否使用channel-transacted,即是否在消息中使用事务 | false |
| ttl | 声明时应用到队列的默认生存时间(以毫秒为单位)。 | 无限制 |
| txSize | 设置transaction-size的数量,当acknowledgeMode为AUTO时,容器会在处理txSize数目消息之后才开始应答,containerType是 direct 时不支持。 |
1 |
RabbitMQ 生产者属性
以下属性仅适用于 Rabbit 生产者,并且必须以spring.cloud.stream.rabbit.bindings.<channelName>.producer.作为前缀。
如果需要将同一组属性应用于大多数绑定,为避免重复,Spring Cloud Stream 支持为所有通道设置值,格式为spring.cloud.stream.rabbit.default.<property>=<value>.
另外,请记住,绑定特定属性将在默认情况下覆盖其全局配置属性。
| 属性 | 说明 | 默认值 |
|---|---|---|
| autoBindDlq | 是否自动声明 DLQ(死信队列) 并将其绑定到 binder DLX(死信交换机)。 | false |
| batchingEnabled | 是否启用生产者的消息批处理。消息根据以下属性(在此列表的下三个条目中描述)被批处理为一条消息:batchSize batchBufferLimit、 和batchTimeout。 |
false |
| batchSize | 启用批处理时要缓冲的消息数。 | 100 |
| batchBufferLimit | 启用批处理时的最大缓冲区大小。 | 10000 |
| batchTimeout | 启用批处理时的批处理超时。 | 5000 |
| bindingRoutingKey | 将队列绑定到交换器的路由键(如果bindQueue是true)。可以是多个键 - 请参阅bindingRoutingKeyDelimiter。对于分区目标,-<instanceIndex>附加到每个键。 |
# |
| bindingRoutingKeyDelimiter | 当该属性不为空时,bindingRoutingKey 被认为是由该值分隔的键列表;通常使用逗号。 |
null |
| bindQueue | 是否声明队列并将其绑定到目标交换机。如果您已经设置了自己的基础架构并且之前已经创建并绑定了队列,请将其设置为false。仅在requiredGroups提供时适用,然后仅适用于这些组。 |
true |
| compress | 发送时是否应压缩数据。 | false |
| confirmAckChannel | 当 errorChannelEnabled为true时,向其发送肯定的交付确认(又名发布者确认)的通道。如果通道不存在,则DirectChannel使用此名称注册。连接工厂必须配置为publisher confirms为 true |
nullChannel(acks are discarded) |
| deadLetterQueueName | DLQ(死信队列) 的名称仅在requiredGroups提供时适用,然后仅适用于这些组。 |
prefix+destination.dlq |
| deadLetterExchange | 分配给队列的 DLX。仅当autoBindDlq是true时才相关。仅在requiredGroups提供时适用,然后仅适用于这些组。 |
prefix+DLX |
| deadLetterExchangeType | 分配给队列的 DLX。仅当autoBindDlq是true时才相关。仅在requiredGroups提供时适用,然后仅适用于这些组。 |
direct |
| deadLetterRoutingKey | 分配给队列的死信路由键。仅当autoBindDlq是true时才相关。仅在requiredGroups提供时适用,然后仅适用于这些组。 |
destination |
| declareDlx | 是否为destination申报死信交换机。仅当autoBindDlq是true时才相关。如果您有预配置的 DLX,请设置为false。仅在requiredGroups提供时适用,然后仅适用于这些组。 |
true |
| declareExchange | 是否为destination申报交换机 |
true |
| delayExpression | 一个 SpEL 表达式,用于评估应用于消息(x-delay标头)的延迟。如果交换机不是延迟消息交换机,则无效。 |
不设置x-delay标头 |
| delayedExchange | 是否将交易所声明为Delayed Message Exchange. 需要broker上安装延迟消息交换插件。将参数 exchageType 设置为 x-delayed-type。 |
false |
| deliveryMode | 消息持久化 | PERSISTENT |
| dlqBindingArguments | 将 dlq 绑定到死信交换时应用的参数;用于headers deadLetterExchangeType指定要匹配的标头。例如…dlqBindingArguments.x-match=any,…dlqBindingArguments.someHeader=someValue。仅在requiredGroups提供时适用,然后仅适用于这些组。 |
空 |
| dlqDeadLetterExchange | 声明 DLQ 时,分配给该队列的 DLX。仅在requiredGroups提供时适用,然后仅适用于这些组。 |
无 |
| dlqDeadLetterRoutingKey | 声明 DLQ 时,分配给该队列的死信路由键。仅在requiredGroups提供时适用,然后仅适用于这些组。 |
无 |
| dlqExpires | 删除超过该事件的未使用的死信队列(以毫秒为单位)。仅在requiredGroups提供时适用,然后仅适用于这些组。 |
不过期 |
| dlqLazy | 声明一个带有x-queue-mode=lazy参数的死信队列(即 惰性死信队列),考虑使用策略而不是此设置,因为使用策略允许在不删除队列的情况下更改设置。仅在requiredGroups提供时适用,然后仅适用于这些组。 |
false |
| dlqMaxLength | 死信队列中的最大消息数。仅在requiredGroups提供时适用,然后仅适用于这些组。 |
无限制 |
| dlqMaxLengthBytes | 所有消息的死信队列中的最大总字节数。仅在requiredGroups提供时适用,然后仅适用于这些组。 |
无限制 |
| dlqMaxPriority | 死信队列中消息的最大优先级 (0-255) 仅在requiredGroups提供时适用,然后仅适用于那些组。 |
无 |
| dlqQuorum.deliveryLimit | 当quorum.enabled=true时,设置投递限制,超过该限制后,邮件将被丢弃或死信。仅在requiredGroups提供时适用,然后仅适用于这些组。 |
无 - 将应用代理默认值 |
| dlqQuorum.enabled | 如果为 true,则创建仲裁死信队列而不是普通队列。仅在requiredGroups提供时适用,然后仅适用于这些组。 |
false |
| dlqQuorum.initialQuorumSize | 当quorum.enabled=true时,设置初始仲裁队列大小。仅在requiredGroups提供时适用,然后仅适用于这些组。 |
无 - 将应用代理默认值 |
| dlqSingleActiveConsumer | 设置为 true 将x-single-active-consumer队列属性设置为 true,即单一活动消费者。仅在requiredGroups提供时适用,然后仅适用于这些组。 |
false |
| dlqTtl | 声明时应用于死信队列的默认生存时间(以毫秒为单位)。仅在requiredGroups提供时适用,然后仅适用于这些组。 |
无限制 |
| exchangeAutoDelete | 如果declareExchange为true,则交换机会被自动删除(即在最后一个队列被删除后删除)。 |
true |
| exchangeDurable | 如果declareExchange为true,则交换机是持久的(即,它在broker重启后仍然存在)。 |
true |
| exchangeType | 交换类型:direct, fanout,headers或topic用于非分区destination和direct, 标头或topic用于分区destination。 |
topic |
| expires | 队列未使用被删除的时间(存活时间) | 不过期 |
| headerPatterns | 标头模式 | ['*']所有标题 |
| lazy | 是否用参数声明队列x-queue-mode=lazy,惰性队列,考虑使用策略而不是此设置,因为使用策略允许在不删除队列的情况下更改设置。仅在requiredGroups提供时适用,然后仅适用于这些组。 |
false |
| maxLength | 普通队列中的最大消息数。仅在requiredGroups提供时适用,然后仅适用于这些组。 |
无限制 |
| maxLengthBytes | 普通队列中所有消息的最大总字节数。仅在requiredGroups提供时适用,然后仅适用于这些组。 |
无限制 |
| maxPriority | 普通队列中消息的最大优先级 (0-255)。仅在requiredGroups提供时适用,然后仅适用于这些组。 |
无 |
| prefix | 要添加到destination交换机所名称的前缀。 |
”” |
| queueBindingArguments | 将队列绑定到交换器时应用的参数;用于headers exchangeType指定要匹配的标头。例如…queueBindingArguments.x-match=any,…queueBindingArguments.someHeader=someValue。仅在requiredGroups提供时适用,然后仅适用于这些组。 |
空 |
| queueNameGroupOnly | 如果为 true,则从名称等于 group 的队列中消费。否则从队列名称为 destination.group 队列中消费。仅在requiredGroups提供时适用,然后仅适用于这些组。 |
false |
| quorum.deliveryLimit | 当quorum.enabled=true时,设置投递限制,超过该限制后,消息将被丢弃或死信。仅在requiredGroups提供时适用,然后仅适用于这些组。 |
无 - 将应用代理默认值 |
| quorum.enabled | 如果为 true,则创建仲裁队列而不是普通队列。仅在requiredGroups提供时适用,然后仅适用于这些组。 |
false |
| quorum.initialQuorumSize | 仅在requiredGroups提供时适用,然后仅适用于这些组。 |
无 - 将应用代理默认值。 |
| routingKeyExpression | 一个 SpEL 表达式,用于确定发布消息时要使用的路由键。对于固定路由键,请使用routingKey. |
destination或destination-<partition>用于分区目标。 |
| routingKey | 定义发布消息时使用的固定路由键的字符串。 | 见routingKeyExpression |
| singleActiveConsumer | 设置为 true 将x-single-active-consumer队列属性设置为 true。称为单一活动消费者。仅在requiredGroups提供时适用,然后仅适用于这些组。 |
false |
| transacted | 是否使用channel-transacted,即是否在消息中使用事务 | false |
| ttl | 声明时应用到队列的默认生存时间(以毫秒为单位)。仅在requiredGroups提供时适用,然后仅适用于这些组。 |
无限制 |
| useConfirmHeader | 详情查看 Publisher Confirms. 与 confirmAckChannel 互斥。 |
Publisher Confirms
有两种机制可以获取发布消息的结果;在每种情况下,连接工厂都必须publisherConfirmType设置ConfirmType.CORRELATED。 “legacy” 机制是将 confirmAckChannel 设置为以消息通道为名称的bean。您可以从中异步检索确认;否定确认被发送到错误通道(如果启用)
3.1 版中添加的preferred机制是使用correlation data header并通过其属性 Future<Confirm> 等待结果。这对于批处理监听器特别有用,因为您可以在等待结果之前发送多条消息。要使用此技术,请将useConfirmHeader属性设置为 true。以下简单应用程序是使用此技术的示例:
spring.cloud.stream.bindings.input-in-0.group=someGroup |
|
correlation data必须具有唯一
id性,以便框架可以执行关联。
你不能同时设置useConfirmHeader 和confirmAckChannel,但是当useConfirmHeader为true时仍然可以在错误通道中接收返回的消息,但是使用correlation header更方便。
接收批量消息的配置
使用 RabbitMQ binder,有两种类型的批处理由消费者 bindings 处理:
生产者创建的批处理消息
通常,如果生产者 bindings 具有batch-enabled=true,或者BatchingRabbitTemplate创建一条消息,批次元素将作为一个对监听器方法的单独调用返回。从RabbitMQ3.0开始,如果spring.cloud.stream.bindings.<name>.consumer.batch-mode 为 true 则任何此类批次消息都将以List<?>的形式传递到监听方法中,
消费端批处理
从3.1版本开始,将消费者可以配置为将多个入站消息组装成一个批处理,该批处理作为List<?>转换后的有效负载呈现给应用程序。以下简单的应用程序演示了如何使用此技术:
spring.cloud.stream.bindings.input-in-0.group=someGroup |
|
Received 2 |
批处理中的消息数量由batch-size和receive-timeout属性指定;如果receive-timeout过去没有新消息,则发送“短”批次。
仅使用
container-type=simple(默认)才支持消费者端批处理。
如果您想检查消费者端批处理消息的Headers,您应该使用Message<List<?>>;
使用现有队列/交换机
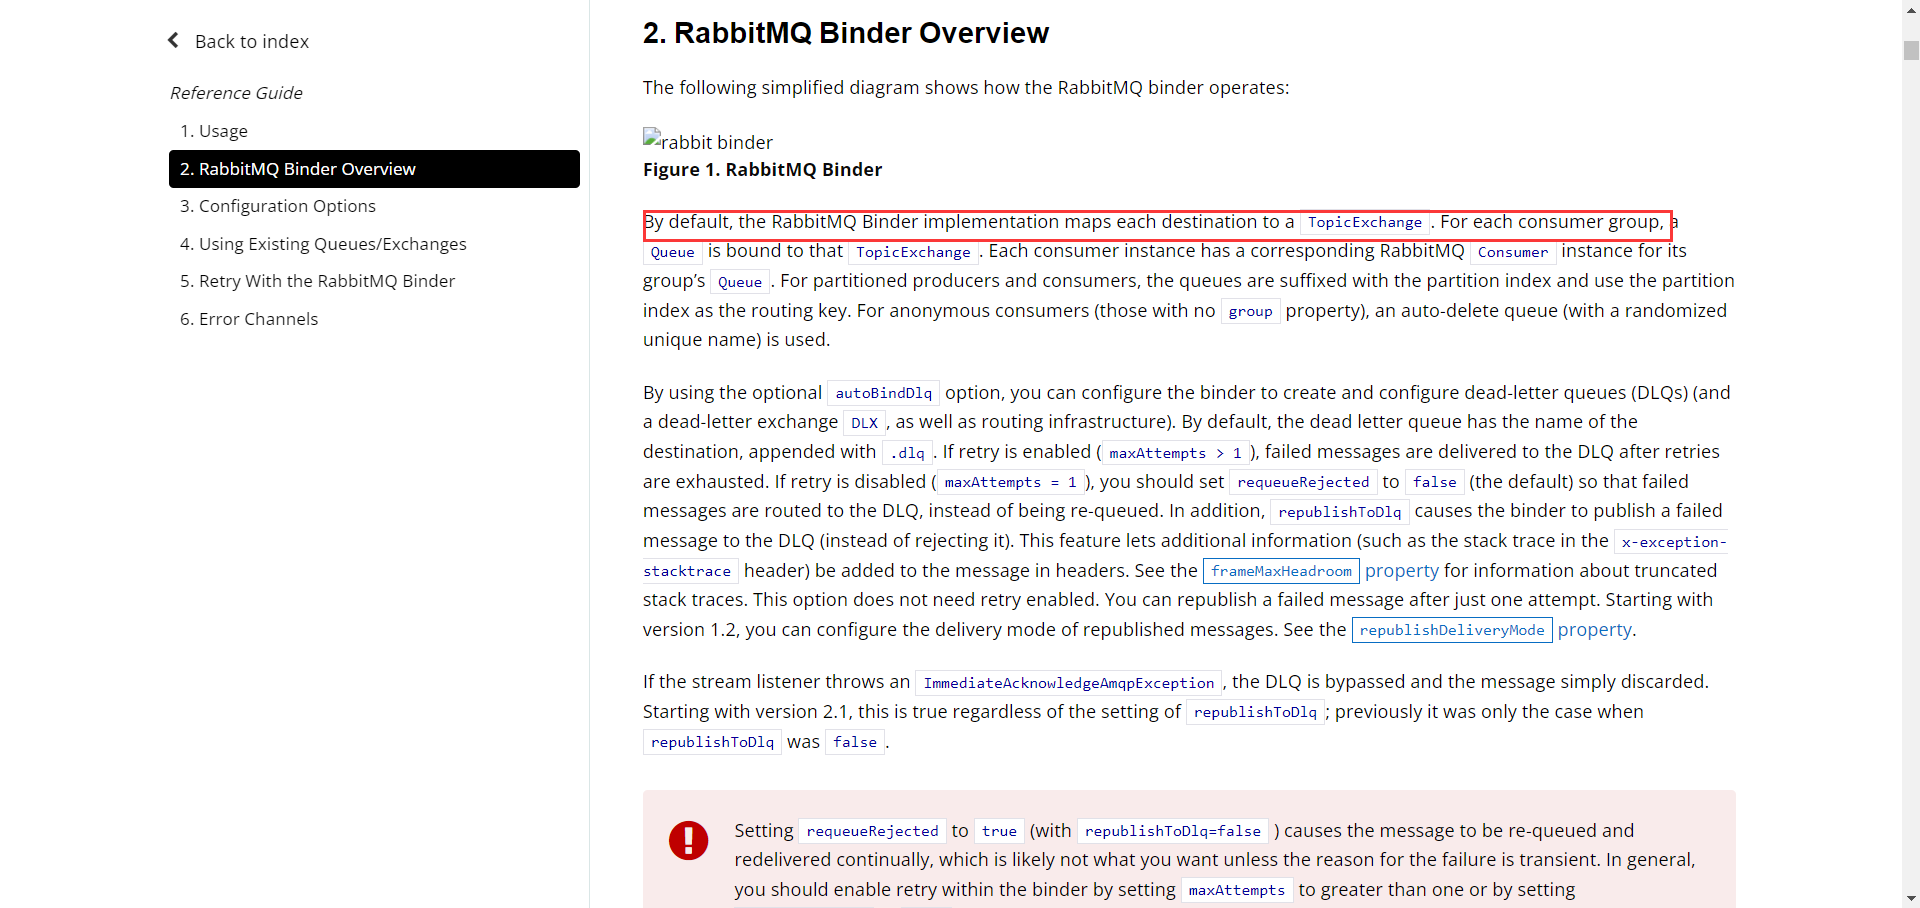
默认情况下,绑定器将自动提供一个主题交换,其名称源自目标绑定属性的值<prefix><destination>。如果未提供,则destination默认为 bindings 名称。绑定消费者时,将自动为队列提供名称<prefix><destination>.<group>(如果group指定了绑定属性),或者为一个匿名名称(没有指定group的匿名队列会被自动删除)。对于非分区绑定或分区绑定,队列将使用“match-all”通配符路由键 ( # ) 绑定到交换机<destination>-<instanceIndex>。前缀默认为空字符串。如果使用 requiredGroups 指定了输出绑定,将为每个组提供一个队列/绑定。
有许多特定于 rabbit 的绑定属性允许您修改此默认行为。
如果你想要使用现有交换/队列,你可以完全禁用自动配置,假设交换机被命名myExchange并且队列被命名myQueue:
myQueue:
spring.cloud.stream.bindings.<binding name>.destination=myExhangespring.cloud.stream.bindings.<binding name>.group=myQueuespring.cloud.stream.rabbit.bindings.<binding name>.consumer.bindQueue=falsespring.cloud.stream.rabbit.bindings.<binding name>.consumer.declareExchange=falsespring.cloud.stream.rabbit.bindings.<binding name>.consumer.queueNameGroupOnly=true
如果您希望binder提供 队列/交换机,但您想使用此处讨论的默认值以外的其他内容来执行此操作,请使用以下属性。
spring.cloud.stream.rabbit.bindings.<binding name>.consumer.bindingRoutingKey=myRoutingKeyspring.cloud.stream.rabbit.bindings.<binding name>.consumer.exchangeType=<type>spring.cloud.stream.rabbit.bindings.<binding name>.producer.routingKeyExpression='myRoutingKey'
当 autoBindDlq为 true时,在声明死信交换/队列时使用了类似的属性。
使用 RabbitMQ Binder 重试
在 Binder 中启用重试后,监听器容器线程将在配置的周期的任何期间内暂停。当需要对单一消费者进行严格排序时,这时非常重要的。但是,对于其他用例,它会阻止在该线程上处理其他消息。
使用 Binder 重试的另一种方法是在死信队列 (DLQ) 上设置死信,以及在 DLQ 本身上设置死信配置。
- 设置
autoBindDlq为true。binder 创建一个 DLQ。或者,您可以在deadLetterQueueName中指定名称。 - 设置
dlqTtl为重试等待时间。 - 将
dlqDeadLetterExchange设置为默认交换。来自 DLQ 的过期消息被路由到原来的队列,因为默认deadLetterRoutingKey是队列名称 (destination.group)。设置为默认交换机是通过将属性设置为无值来实现的,如下例所示。
要强制消息为死信,请抛出一个AmqpRejectAndDontRequeueException或设置requeueRejected为false(默认值)并抛出任何异常。
循环无止境地继续,这对于暂时性问题很好,但您可能希望在尝试多次后放弃。幸运的是,RabbitMQ 提供了x-death标头,可以让您确定发生了多少个周期。
要在放弃后确认消息,请抛出ImmediateAcknowledgeAmqpException。
编码案例
注意:在进行编码时至少需要完成RabbitMQ和Kafka种任意一个消息中间件的环境搭建
这里我们演示Spring Cloud Stream RabbitMQ Binder 的案例
父工程
首先创建父工程
Cloud-09-Streampom.xml
<project xmlns="http://maven.apache.org/POM/4.0.0"
xmlns:xsi="http://www.w3.org/2001/XMLSchema-instance"
xsi:schemaLocation="http://maven.apache.org/POM/4.0.0 http://maven.apache.org/xsd/maven-4.0.0.xsd">
<modelVersion>4.0.0</modelVersion>
<groupId>top.devildyw.Stream</groupId>
<artifactId>Cloud-09-Stream</artifactId>
<version>1.0-SNAPSHOT</version>
<properties>
<maven.compiler.source>8</maven.compiler.source>
<maven.compiler.target>8</maven.compiler.target>
<project.build.sourceEncoding>UTF-8</project.build.sourceEncoding>
<junit.version>4.12</junit.version>
<lombok.version>1.18.10</lombok.version>
<log4j.version>1.2.17</log4j.version>
<mysql.version>8.0.28</mysql.version>
<druid.version>1.2.11</druid.version>
<mybatis.spring.boot.version>2.1.1</mybatis.spring.boot.version>
<mybatis-plus>3.5.2</mybatis-plus>
</properties>
<!--子模块继承之后,提供作用:锁定版本+子module不用谢groupId和version-->
<dependencyManagement>
<dependencies>
<dependency>
<groupId>org.apache.maven.plugins</groupId>
<artifactId>maven-project-info-reports-plugin</artifactId>
<version>3.2.2</version>
</dependency>
<!--spring boot 2.2.2-->
<dependency>
<groupId>org.springframework.boot</groupId>
<artifactId>spring-boot-dependencies</artifactId>
<version>2.6.8</version>
<type>pom</type>
<scope>import</scope>
</dependency>
<!--spring cloud Hoxton.SR1-->
<dependency>
<groupId>org.springframework.cloud</groupId>
<artifactId>spring-cloud-dependencies</artifactId>
<version>2021.0.3</version>
<type>pom</type>
<scope>import</scope>
</dependency>
<!--spring cloud 阿里巴巴-->
<dependency>
<groupId>com.alibaba.cloud</groupId>
<artifactId>spring-cloud-alibaba-dependencies</artifactId>
<version>2021.1</version>
<type>pom</type>
<scope>import</scope>
</dependency>
<!--mysql-->
<dependency>
<groupId>mysql</groupId>
<artifactId>mysql-connector-java</artifactId>
<version>${mysql.version}</version>
<scope>runtime</scope>
</dependency>
<!-- druid-->
<dependency>
<groupId>com.alibaba</groupId>
<artifactId>druid-spring-boot-starter</artifactId>
<version>${druid.version}</version>
</dependency>
<!--mybatis-->
<dependency>
<groupId>org.mybatis.spring.boot</groupId>
<artifactId>mybatis-spring-boot-starter</artifactId>
<version>${mybatis.spring.boot.version}</version>
</dependency>
<dependency>
<groupId>com.baomidou</groupId>
<artifactId>mybatis-plus-boot-starter</artifactId>
<version>${mybatis-plus}</version>
</dependency>
<!--junit-->
<dependency>
<groupId>org.springframework.boot</groupId>
<artifactId>spring-boot-starter-test</artifactId>
<version>2.6.8</version>
</dependency>
<!--log4j-->
<dependency>
<groupId>log4j</groupId>
<artifactId>log4j</artifactId>
<version>${log4j.version}</version>
</dependency>
</dependencies>
</dependencyManagement>
<build>
<finalName>SpringCloud-Hello-01</finalName>
<plugins>
<plugin>
<groupId>org.springframework.boot</groupId>
<artifactId>spring-boot-maven-plugin</artifactId>
<configuration>
<fork>true</fork>
<addResources>true</addResources>
</configuration>
</plugin>
</plugins>
</build>
</project>
子工程-消息驱动之生产者
创建工程
Cloud-09-stream-rabbitMQ-provider8801pom.xml
<project xmlns="http://maven.apache.org/POM/4.0.0"
xmlns:xsi="http://www.w3.org/2001/XMLSchema-instance"
xsi:schemaLocation="http://maven.apache.org/POM/4.0.0 http://maven.apache.org/xsd/maven-4.0.0.xsd">
<parent>
<artifactId>Cloud-09-Stream</artifactId>
<groupId>top.devildyw.Stream</groupId>
<version>1.0-SNAPSHOT</version>
</parent>
<modelVersion>4.0.0</modelVersion>
<artifactId>Cloud-09-stream-rabbitMQ-provider8801</artifactId>
<properties>
<maven.compiler.source>8</maven.compiler.source>
<maven.compiler.target>8</maven.compiler.target>
<project.build.sourceEncoding>UTF-8</project.build.sourceEncoding>
</properties>
<dependencies>
<!--Spring Cloud Stream RabbitMQ Binder-->
<dependency>
  <groupId>org.springframework.cloud</groupId>
  <artifactId>spring-cloud-starter-stream-rabbit</artifactId>
</dependency>
<!-- https://mvnrepository.com/artifact/org.springframework.cloud/spring-cloud-starter-eureka-server -->
<dependency>
<groupId>org.springframework.cloud</groupId>
<artifactId>spring-cloud-starter-netflix-eureka-client</artifactId>
</dependency>
<dependency>
<groupId>com.dyw</groupId>
<artifactId>Cloud-api-commons</artifactId>
<version>1.0-SNAPSHOT</version>
</dependency>
<!-- https://mvnrepository.com/artifact/org.springframework.boot/spring-boot-starter-web -->
<dependency>
<groupId>org.springframework.boot</groupId>
<artifactId>spring-boot-starter-web</artifactId>
</dependency>
<!-- https://mvnrepository.com/artifact/org.springframework.boot/spring-boot-starter-web -->
<dependency>
<groupId>org.springframework.boot</groupId>
<artifactId>spring-boot-starter-actuator</artifactId>
</dependency>
<!-- https://mvnrepository.com/artifact/org.springframework.boot/spring-boot-devtools -->
<dependency>
<groupId>org.springframework.boot</groupId>
<artifactId>spring-boot-devtools</artifactId>
<scope>runtime</scope>
<optional>true</optional>
</dependency>
<!-- https://mvnrepository.com/artifact/org.projectlombok/lombok -->
<dependency>
<groupId>org.projectlombok</groupId>
<artifactId>lombok</artifactId>
<optional>true</optional>
</dependency>
<!-- https://mvnrepository.com/artifact/org.springframework.boot/spring-boot-starter-test -->
<dependency>
<groupId>org.springframework.boot</groupId>
<artifactId>spring-boot-starter-test</artifactId>
<scope>test</scope>
</dependency>
</dependencies>
</project>application.ymlserver:
port: 8801
spring:
application:
name: cloud-stream-provider
rabbitmq:
host: 36.137.128.27
port: 8071
username: admin
password: admin
virtual-host: /
cloud:
stream:
binders: # 在此处配置要绑定的rabbitmq的服务信息;
defaultRabbit: # 表示定义的名称,用于于binding整合
type: rabbit # 消息组件类型
bindings: # 服务的整合处理
myChannel-out-0: # 这个名字是一个通道的名称
destination: studyExchange # 表示要使用的Exchange名称定义
content-type: application/json # 设置消息类型,本次为json,文本则设置“text/plain”
binder: defaultRabbit # 设置要绑定的消息服务的具体设置
eureka:
client: # 客户端进行Eureka注册的配置
service-url:
defaultZone: http://localhost:7001/eureka
instance:
lease-renewal-interval-in-seconds: 2 # 设置心跳的时间间隔(默认是30秒)
lease-expiration-duration-in-seconds: 5 # 如果现在超过了5秒的间隔(默认是90秒)
instance-id: send-8801.com # 在信息列表时显示主机名称
prefer-ip-address: true # 访问的路径变为IP地址注意
bingdings集合中的key由 通道名-out/in-数字组成主启动类
业务类
消息发送接口
package top.devildyw.springcloud.serivce;
/**
* @author Devil
* @since 2022-08-10-19:32
*/
public interface IMessageProvider {
String send();
}实现类
public class IMessageProviderImpl implements IMessageProvider {
private StreamBridge streamBridge;
public String send() {
String serial = UUID.randomUUID().toString(); //发送的消息
streamBridge.send("output", serial);
log.debug("发送消息:"+serial);
return null;
}
}使用
@Resource注入StreamBride,StreamBridge的send方法第一个参数是binding的key名字,第二个参数是想要发送的消息控制器类
import org.springframework.web.bind.annotation.GetMapping;
import org.springframework.web.bind.annotation.RestController;
import top.devildyw.springcloud.serivce.IMessageProvider;
import javax.annotation.Resource;
public class SendMessageController {
private IMessageProvider messageProvider;
public String sendMessage() {
return messageProvider.send();
}
}
子工程-消息驱动之消费者
创建工程
Cloud-09-stream-rabbitMQ-consumer8802pom.xml
<project xmlns="http://maven.apache.org/POM/4.0.0"
xmlns:xsi="http://www.w3.org/2001/XMLSchema-instance"
xsi:schemaLocation="http://maven.apache.org/POM/4.0.0 http://maven.apache.org/xsd/maven-4.0.0.xsd">
<parent>
<artifactId>Cloud-09-Stream</artifactId>
<groupId>top.devildyw.Stream</groupId>
<version>1.0-SNAPSHOT</version>
</parent>
<modelVersion>4.0.0</modelVersion>
<artifactId>Cloud-09-stream-rabbitMQ-consumer8802</artifactId>
<properties>
<maven.compiler.source>8</maven.compiler.source>
<maven.compiler.target>8</maven.compiler.target>
<project.build.sourceEncoding>UTF-8</project.build.sourceEncoding>
</properties>
<dependencies>
<!--Spring Cloud Stream RabbitMQ Binder-->
<dependency>
  <groupId>org.springframework.cloud</groupId>
  <artifactId>spring-cloud-starter-stream-rabbit</artifactId>
</dependency>
<!-- https://mvnrepository.com/artifact/org.springframework.cloud/spring-cloud-starter-eureka-server -->
<dependency>
<groupId>org.springframework.cloud</groupId>
<artifactId>spring-cloud-starter-netflix-eureka-client</artifactId>
</dependency>
<dependency>
<groupId>com.dyw</groupId>
<artifactId>Cloud-api-commons</artifactId>
<version>1.0-SNAPSHOT</version>
</dependency>
<!-- https://mvnrepository.com/artifact/org.springframework.boot/spring-boot-starter-web -->
<dependency>
<groupId>org.springframework.boot</groupId>
<artifactId>spring-boot-starter-web</artifactId>
</dependency>
<!-- https://mvnrepository.com/artifact/org.springframework.boot/spring-boot-starter-web -->
<dependency>
<groupId>org.springframework.boot</groupId>
<artifactId>spring-boot-starter-actuator</artifactId>
</dependency>
<!-- https://mvnrepository.com/artifact/org.springframework.boot/spring-boot-devtools -->
<dependency>
<groupId>org.springframework.boot</groupId>
<artifactId>spring-boot-devtools</artifactId>
<scope>runtime</scope>
<optional>true</optional>
</dependency>
<!-- https://mvnrepository.com/artifact/org.projectlombok/lombok -->
<dependency>
<groupId>org.projectlombok</groupId>
<artifactId>lombok</artifactId>
<optional>true</optional>
</dependency>
<!-- https://mvnrepository.com/artifact/org.springframework.boot/spring-boot-starter-test -->
<dependency>
<groupId>org.springframework.boot</groupId>
<artifactId>spring-boot-starter-test</artifactId>
<scope>test</scope>
</dependency>
</dependencies>
</project>application.ymlserver:
port: 8803
spring:
application:
name: cloud-stream-consumer
rabbitmq:
host: 36.137.128.27
port: 8071
username: admin
password: admin
cloud:
stream:
bindings: #服务的整合处理
myChannel-in-0: #这个名字是一个通道的名字
destination: studyExchange #表示要使用Exchange名称定义
contentType: application/json #设置消息类型,本次为json,文本则设置为“text/plain”
eureka:
client: # 客户端进行Eureka注册的配置
service-url:
defaultZone: http://localhost:7001/eureka
instance:
lease-renewal-interval-in-seconds: 2 # 设置心跳的时间间隔(默认是30秒)
lease-expiration-duration-in-seconds: 5 # 如果现在超过了5秒的间隔(默认是90秒)
instance-id: receive-8803.com # 在信息列表时显示主机名称
prefer-ip-address: true # 访问的路径变为IP地址主启动类
业务类
import lombok.extern.slf4j.Slf4j;
import org.springframework.context.annotation.Bean;
import org.springframework.stereotype.Service;
import java.util.function.Consumer;
public class StreamConsumerService {
public Consumer<String> myChannel() {
return new Consumer<String>() {
public void accept(String message) {
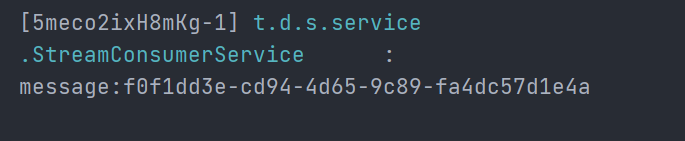
log.info("message:{}",message);
}
};
}
}上述代码的方法名(即Consumer的bean实例名)需要是
yml配置中的通道名,应用程序启动后会自动接收生产者发送的消息
启动测试
启动eureka注册中心、生产者、消费者(8802)
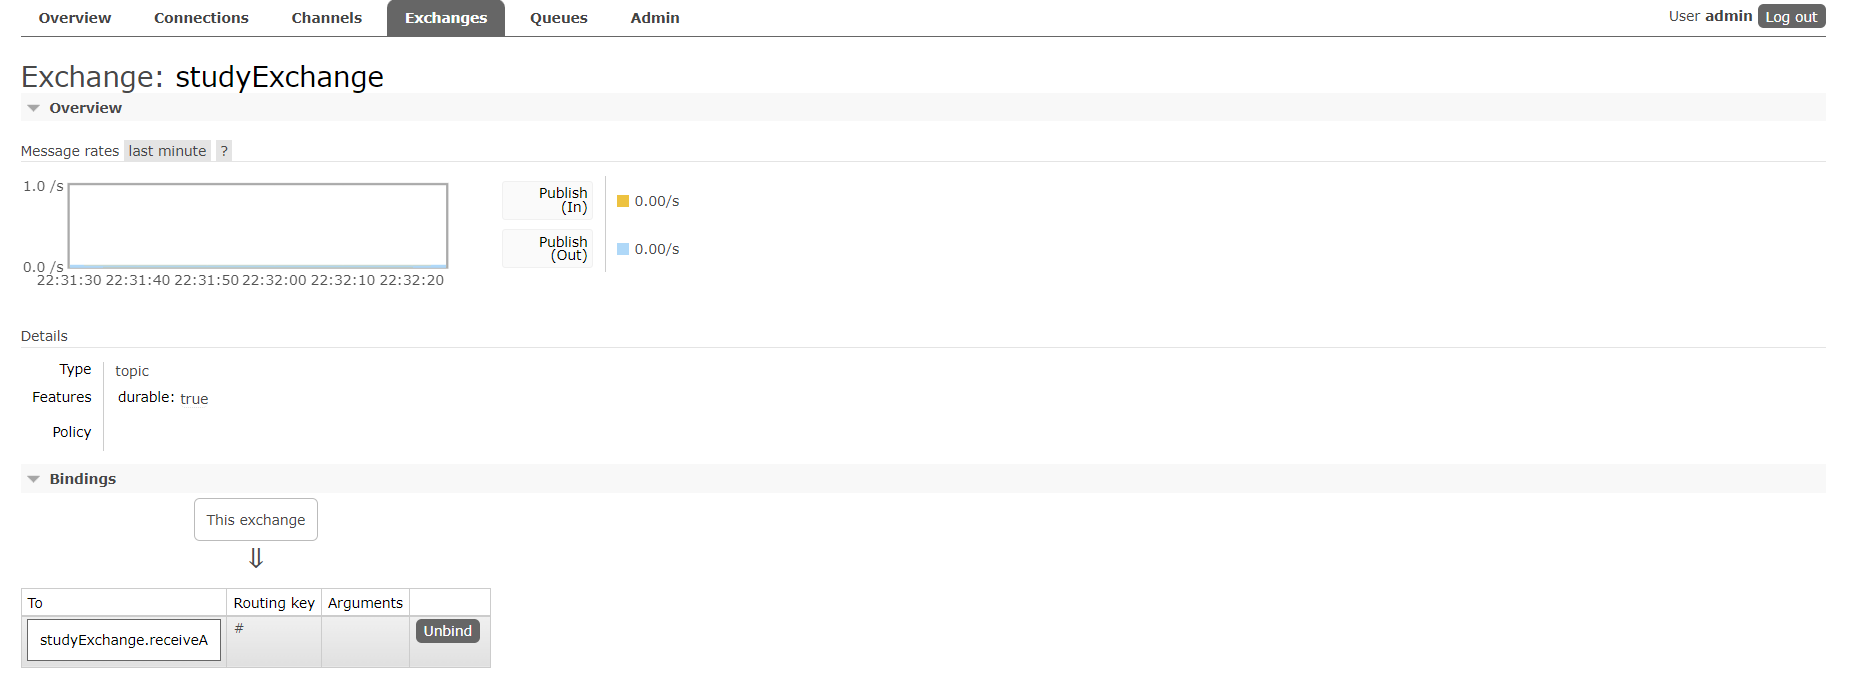
RabbitMQ图形控制界面新增了一个交换机,这个交换机也就是我们所设置的bindings 的 myChannel 的 destination ,在 RabbitMQ 中该 destination 值就是交换机
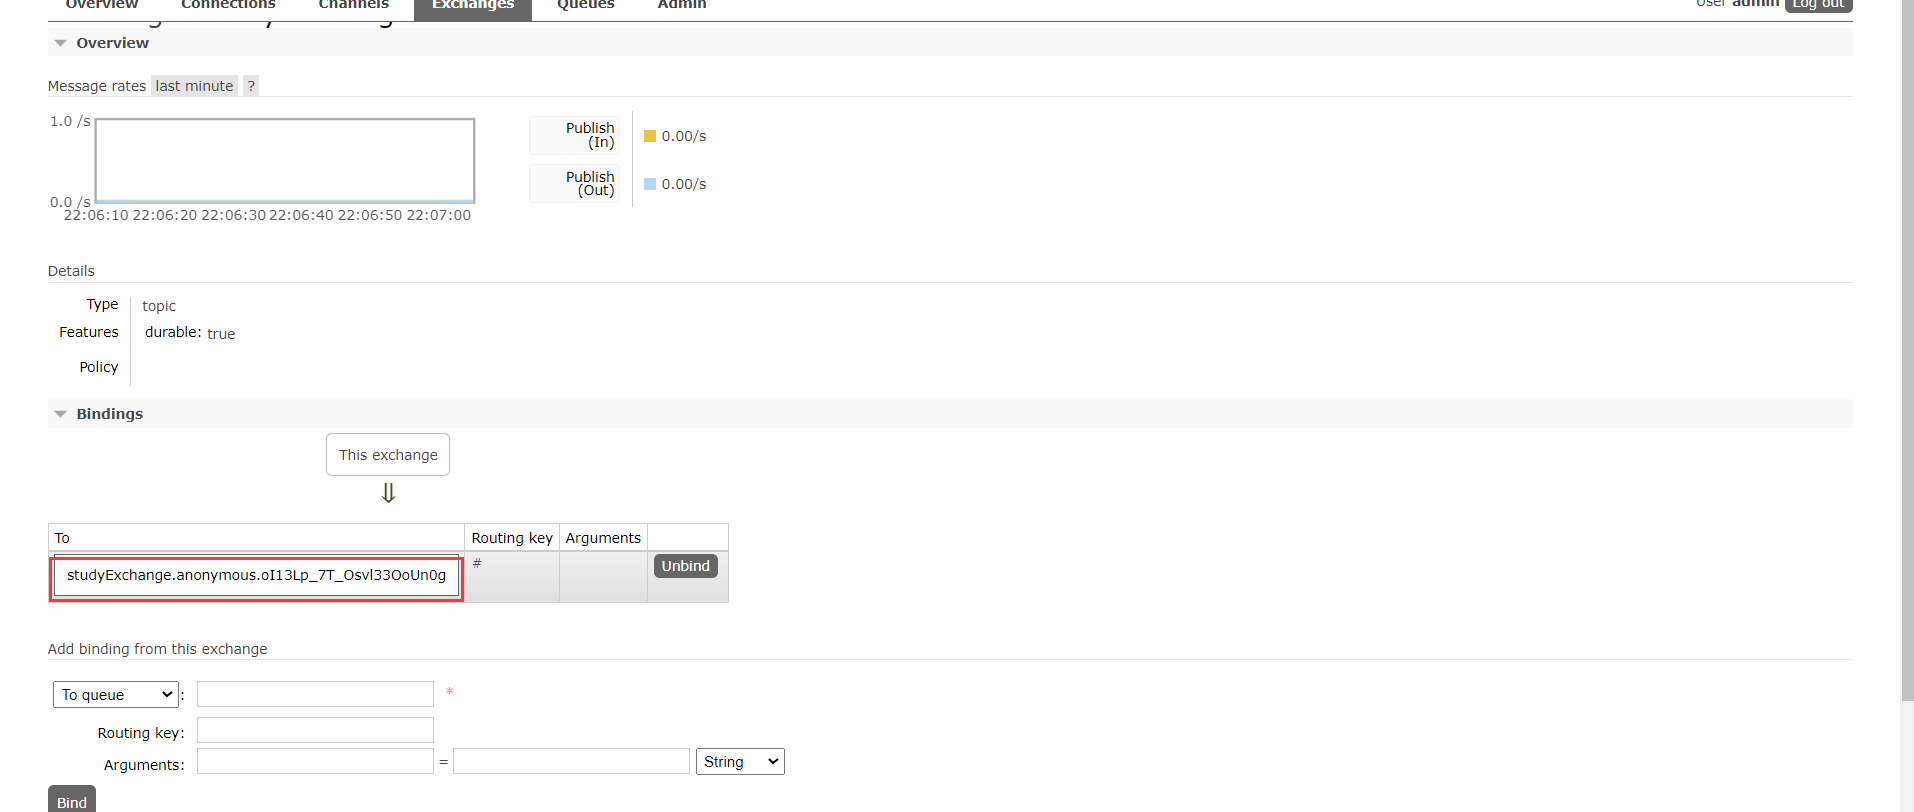
进入交换机查看详细信息,可以发现该交换机绑定了一个个队列,这个队列也就是我们消费者所监听的队列。

调用接口get: http://localhost:8801/sendMessage发送消息
消费者控制台:

消息重复消费问题
将8802拷贝改名成为新的消费者8803,配置与业务类与8802完全相同
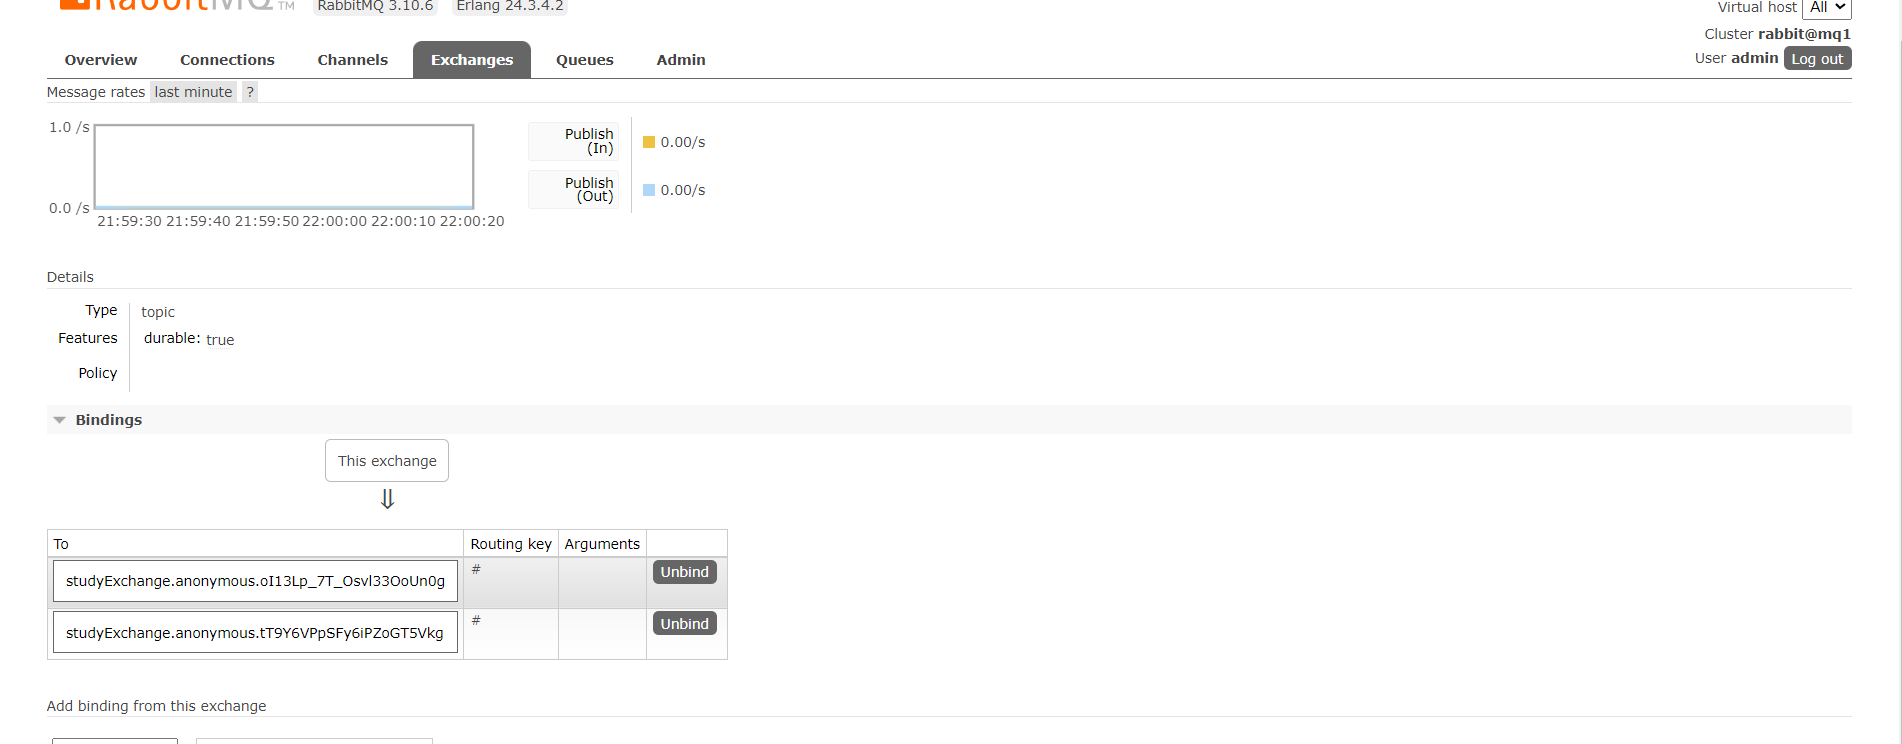
启动eureka注册中心、生产者、消费者(8802、8803)
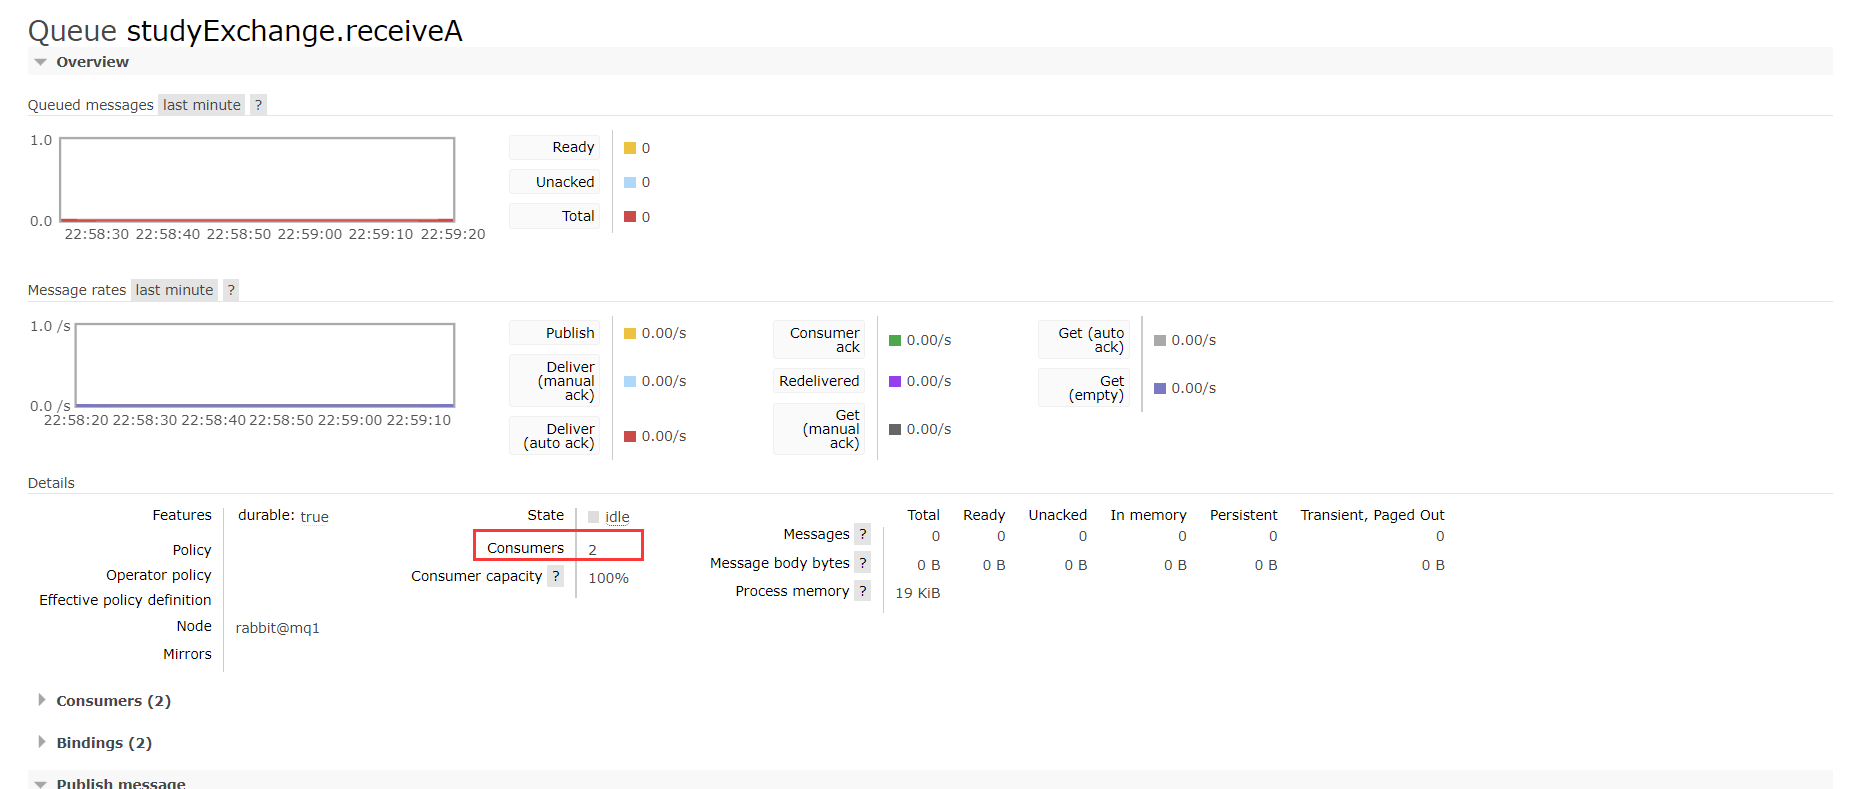
可以看到交换机现在绑定了两个队列了,这两个队列就是我们消费者所监听的队列
调用接口get: http://localhost:8801/sendMessage发送消息
消费者控制台:

我们会发现同一条消息被两个消费者同时消费了,这样的情况在某些场景下是毁灭级别的。
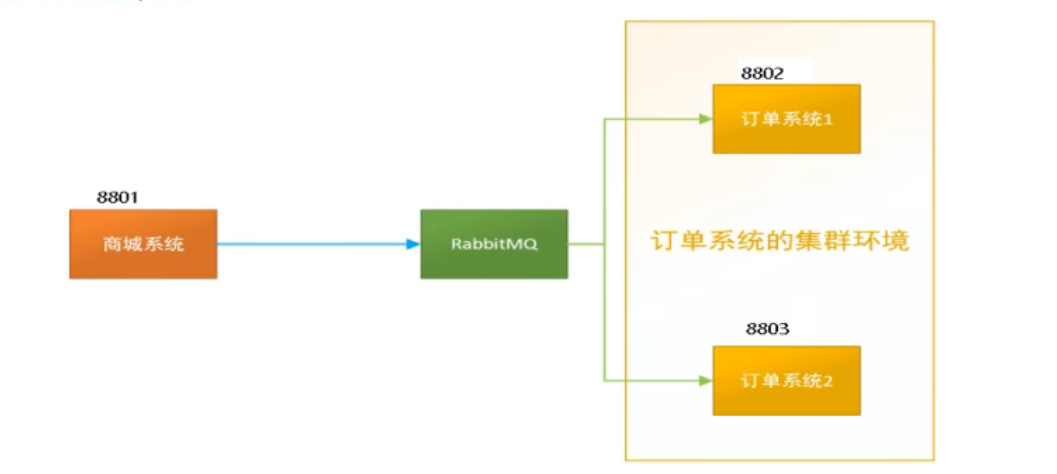
比如在如下场景下,订单系统我们坐集群部署,都会从RabbitMQ中获取订单信息,那如果一个订单同时被两个服务获取到,那么就会造成数据错误,我们得避免这种情况。
这时我们就可以使用Stream中的消息分组来解决
注意在Stream中处于同一个group中的多个消费者是竞争关系,就能够保证消息只会被其中一个应用消费一次。
不同组是可以全面消费的(重复消费)。
同一组内会发生竞争关系,只有其中一个可以消费。
导致重复消费的原因
默认分组group是不同的,组流水号不一样,被认为不同组,(不同组)可以消费同一条消息(广播)。
解决方案
微服务应用放置于同一个group中,就能够保证消息只会被其中一个应用消费一次。不同的组是可以消费的,同一个组内会发生竞争关系,只有其中一个可以消费。
Stream概念中的group,对应在
RabbitMQ中就是队列的含义,交换机默认创建是Topic类型,而消费者创建的队列默认routingKey为 #,在RabbitMQ中我们学过 # 可以匹配一个或多个词,所以基本上交换机会将消息转发到所有于其相连的队列上。
Stream在我们没有配置group时,为我们创建一个随机的唯一的group名称这样的消费者我们称为匿名消费者,它所监听的队列也会在消费者关闭时被删除。如果想要将多个消费者分为一组,就需要手动指定了。
为每个消费者设置group,同一组的消费者group名称要相同。
...... |
配置完成后,重新启动消费者
RabbitMQ图形界面可以发现交换机只绑定了一个队列,并且该队列的后缀就是我们所设置的组名。
调用接口get: http://localhost:8801/sendMessage发送消息
消费者控制台:

这次只有8803接收到了,尝试多次后只有一个消费者能够接收。说明重复消费问题解决。
我们也可以主动配置交换机和队列,交换机的名称就是
destination的值,而队列的名称则是交换机名称.group即destinnation.group可以自己手动配置队列和交换机的属性,前提是你了解不同的消息中间件
消息持久化
因为 RabbitMQ 的消息都是默认持久化的,生产者发送的消息会率先到达交换机,交换机转发到队列中,此时的消息会存放在 RabbitMQ 虽在主机的内存中,持久化的目的就是防止消息的丢失。
但是消息持久化的前提是队列也要持久化,否则队列都没了还谈什么消息呢?
将 exchange、queue 和 message 都进行持久化操作后,也不能保证消息一定不会丢失,消息存入RabbitMQ 之后,还需要一段时间才能存入硬盘。RabbitMQ 并不会为每条消息都进行同步存盘,如果在这段时间,服务器宕机或者重启,消息还没来得及保存到磁盘当中,就会丢失。