Spring Cloud-Bus
Spring Cloud-Bus
前言
由Spring Cloud Config我们知道单单靠它之能实现手动的分布式微服务配置的动态刷新,但这依然够大部分项目的使用。如果想要提高灵活度,让配置更加方便的更新就需要引入我们的消息总线了—–Spring Cloud Bus
简介
Spring Cloud Bus 配合 Spring Cloud Config使用可以真正意义上实现分布式微服务配置的自动动态刷新。
Spring Cloud-Bus 支持两种消息代理:RibbitMQ和Kafka
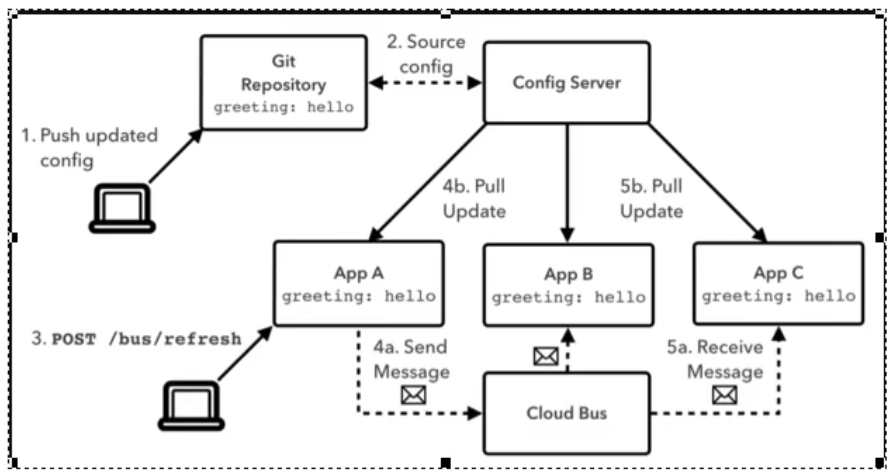
利用消息总线触发一个客户端 /busrefresh ,而刷新所有的
Config客户端的配置,如下图:
Spring Cloud Bus是用来将分布式系统的节点与轻量级消息系统链接起来的框架,它整合了Java的事件处理机制和消息中间件的功能。Spring Cloud Bus目前支持RabbitMQ和Kafka。
能干什么?
Spring Cloud Bus能管理和传播分布式系统间的消息,就像一个分布式执行器,可用于广播状态更改、事件推送等,也可以当作微服务间的通信通道。
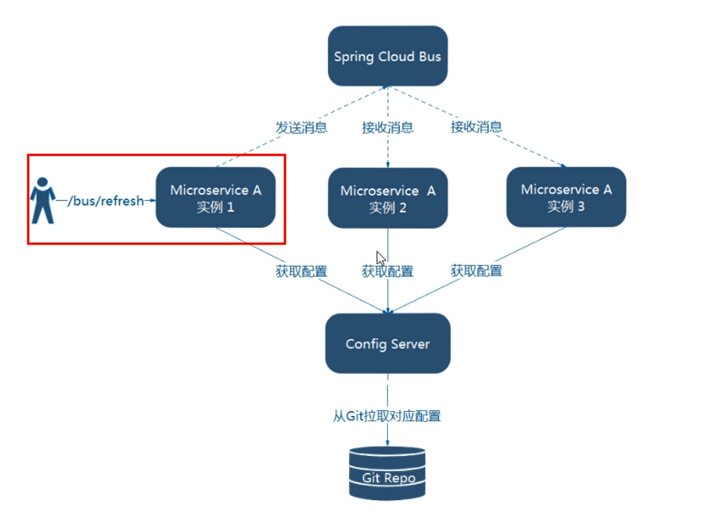
利用消息总线触发一个服务端
ConfigServer 的 /busrefresh ,而刷新所有的Config客户端的配置,如下:

为什么被称作总线
什么是总线
在微服务架构的系统中,通常会使用轻量级的消息代理来构建一个共用的消息主题,并让系统中所有微服务示例都连接上来。由于该主题中产生的消息会被所有实例监听和消费,所以称它为消息总线。在总线上的各个实例,都可以方便地广播一些需要让其他连接在该主题上的实例都知道的消息。
基本原理
ConfigClient实例都监听MQ中同一个topic(默认是Spring Cloud Bus)。当一个服务刷新数据的时候,他会把这个信息放入到Topic中,这样其它监听统一Topic的服务就能得到通知,然后去更新自身的配置。
RabbitMQ 环境配置
Docker搭建RabbitMQ环境:RabbitMQ环境搭建
Spring Cloud Bus 动态刷新全局广播
Spring Cloud Bus 提供了两个端点,
/actuator/busrefresh分别/actuator/busenv对应于 Spring Cloud Commons 中的各个执行器/actuator/refresh端点/actuator/env。
为了演示广播效果,以Spring Cloud Config 的客户端为准,再创建一个客户端Cloud-config-client3366
创建工程
Cloud-config-client3366pom.xml
<project xmlns="http://maven.apache.org/POM/4.0.0"
xmlns:xsi="http://www.w3.org/2001/XMLSchema-instance"
xsi:schemaLocation="http://maven.apache.org/POM/4.0.0 http://maven.apache.org/xsd/maven-4.0.0.xsd">
<parent>
<artifactId>Cloud-08-Config</artifactId>
<groupId>top.devildyw</groupId>
<version>1.0-SNAPSHOT</version>
</parent>
<modelVersion>4.0.0</modelVersion>
<artifactId>Cloud-config-client3355</artifactId>
<properties>
<maven.compiler.source>8</maven.compiler.source>
<maven.compiler.target>8</maven.compiler.target>
<project.build.sourceEncoding>UTF-8</project.build.sourceEncoding>
</properties>
<dependencies>
<dependency>
<groupId>org.springframework.cloud</groupId>
<artifactId>spring-cloud-starter-config</artifactId>
</dependency>
<dependency>
<groupId>org.springframework.cloud</groupId>
<artifactId>spring-cloud-starter-netflix-eureka-client</artifactId>
</dependency>
<!--bootstrap-->
<dependency>
<groupId>org.springframework.cloud</groupId>
<artifactId>spring-cloud-starter-bootstrap</artifactId>
<version>3.1.3</version>
</dependency>
<dependency>
<groupId>com.dyw</groupId>
<artifactId>Cloud-api-commons</artifactId>
<version>1.0-SNAPSHOT</version>
</dependency>
<dependency>
<groupId>org.springframework.boot</groupId>
<artifactId>spring-boot-starter-web</artifactId>
</dependency>
<dependency>
<groupId>org.springframework.boot</groupId>
<artifactId>spring-boot-starter-actuator</artifactId>
</dependency>
<dependency>
<groupId>org.springframework.boot</groupId>
<artifactId>spring-boot-devtools</artifactId>
<scope>runtime</scope>
<optional>true</optional>
</dependency>
<dependency>
<groupId>org.projectlombok</groupId>
<artifactId>lombok</artifactId>
<optional>true</optional>
</dependency>
<dependency>
<groupId>org.springframework.boot</groupId>
<artifactId>spring-boot-starter-test</artifactId>
<scope>test</scope>
</dependency>
</dependencies>
</project>application.ymlserver:
port: 3366
spring:
application:
name: config-client
cloud:
config:
label: master #分支名称
name: application #配置文件名称
profile: dev #读取后缀名称 上述三个综合:master分支上application-dev.yml的配置文件被
uri: http://localhost:3344 #配置中心地址k 上述综合 == http://localhost:3344/master/application-dev.yml
#rabbitmq配置
rabbitmq:
host: 36.137.128.27
port: 8071
username: admin
password: admin
virtual-host: /
#服务注册到eureka地址
eureka:
client:
service-url:
defaultZone: http://localhost:7001/eureka
#暴露监控端点
management:
endpoints:
web:
exposure:
include: "*"启动类以及控制器类都与3355一致。
设计思想
有两种设计思想
利用消息总线触发一个客户端/busrefresh,而刷新所有客户端的配置
利用消息总线**触发一个服务端
ConfigServer**的/busrefresh端点,而刷新所有客户端的配置(更加推荐)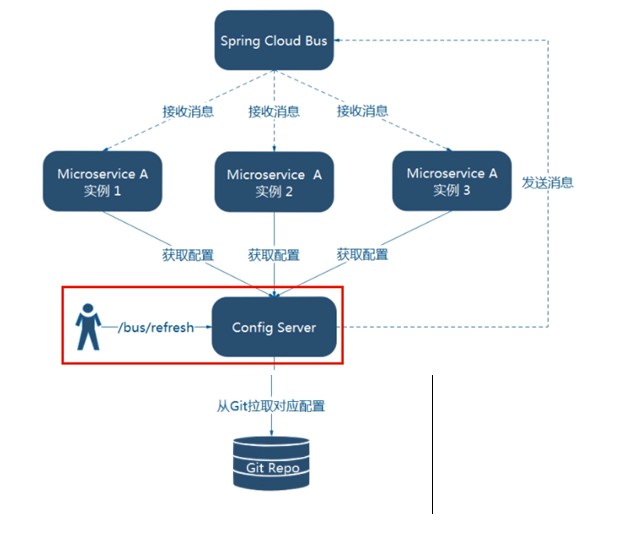
第二种架构显然更加合适,第一种不合适的原因如下:
- 打破了微服务的职责单一性,因为微服务本身是业务模块,它本不应该承担配置刷新职责
- 破坏了微服务各节点的对等性
- 有一定的局限性。例如,微服务在迁移时,它的网络地址常常会发生变化,此时如果想要做到自动刷新,那就会增加更多的修改
配置
配置中心添加消息总线支持
pom.xml添加依赖spring-boot-starter-amqp<dependency>
<groupId>org.springframework.boot</groupId>
<artifactId>spring-cloud-starter-bus-amqp</artifactId>
</dependency>application.yml添加rabbitmq相关配置#rabbitmq配置
spring:
rabbitmq:
host: 36.137.128.27
port: 8071
username: admin
password: admin
virtual-host: /
#rabbitmq相关配置 暴露bus刷新配置的端点
management:
endpoints: #暴露bus刷新配置的端点
web:
exposure:
include: busrefresh
3355客户端添加消息总线的支持
pom.xml添加依赖spring-boot-starter-amqp<dependency>
<groupId>org.springframework.boot</groupId>
<artifactId>spring-cloud-starter-bus-amqp</artifactId>
</dependency>application.yml添加rabbitmq相关配置#rabbitmq配置
spring:
rabbitmq:
host: 36.137.128.27
port: 8071
username: admin
password: admin
virtual-host: /
3366客户端添加消息总线的支持
pom.xml添加依赖spring-boot-starter-amqp<dependency>
<groupId>org.springframework.boot</groupId>
<artifactId>spring-cloud-starter-bus-amqp</artifactId>
</dependency>application.yml添加rabbitmq相关配置#rabbitmq配置
spring:
rabbitmq:
host: 36.137.128.27
port: 8071
username: admin
password: admin
virtual-host: /
测试
启动注册中心,配置中心,客户端(3355、3366)


测试当前未修改值,客户端是否都能拿到配置文件信息
get:http://localhost:3366/configInfo
get:http://localhost:3355/configInfo
结果
master branch,springcloud-config/config-dev.yml version=4 |
修改Github上配置文件增加版本号到5
调用接口post:http://localhost:3344/actuator/busrefresh刷新配置
再次测试
get:http://localhost:3366/configInfo
get:http://localhost:3355/configInfo
master branch,springcloud-config/config-dev.yml version=5 |
通过调用调用接口http://localhost:3344/actuator/busrefresh接口,成功的刷新了配置中心下所有的服务的配置文件。一次发送,处处生效
Spring Cloud Bus 动态刷新定点通知
指定具体某一个实例生效而不是全部,对个别微服务进行差异化配置。
应用程序的每个实例都有一个服务 ID,它的值可以设置, spring.cloud.bus.id并且它的值应该是一个以冒号分隔的标识符列表,从最不具体到最具体。默认值是从环境构造的spring.application.name和 server.port(或spring.application.index,如果设置)的组合。ID 的默认值以 的形式构造app:index:id,其中:
app是vcap.application.name(如果它存在),或者spring.application.nameindex是vcap.application.instance_index( 如果存在),spring.application.index,local.server.port,server.port, 或0(按顺序)。id是vcap.application.instance_id(如果存在)或随机值。
Spring Cloud Bus 的 HTTP restful接口 接受“目标”路径参数,例如 /busrefresh/customers:9000,其中destination是服务 ID。如果 ID 由总线上的一个实例拥有,它会处理该消息,而所有其他实例都会忽略它。依次做到配置的差异化处理
测试
获取3355、3366初始的配置信息
get: http://localhost:3355/configInfo
master branch,springcloud-config/config-dev.yml version=6 |
get: http://localhost:3366/configInfo
master branch,springcloud-config/config-dev.yml version=6 |
修改github中配置文件的版本号
我们这里只修改3366客户端的配置文件,与3355做对比;调用Spring Cloud Bus提供的RestFul接口 post:http://localhost:3344/actuator/busrefresh/config-client:3366对3366客户端做差异化更新配置。
这里的
destination由${spring.application.name}:ip组成
更新完成后再次获取3355、3366配置信息
get: http://localhost:3355/configInfo
master branch,springcloud-config/config-dev.yml version=6 |
get: http://localhost:3366/configInfo
master branch,springcloud-config/config-dev.yml version=7 |
成功完成动态更新定点通知
小结

代码地址
github示例代码地址:https://github.com/Devildyw/SpringCloud-demo/tree/master/Cloud-08-Config