Mybatis/Mybatis-Plus
MyBatis
第一章(ssm = spring + springmvc + mybatis)
- 三层架构
界面层: 和用户打交道的, 接收用户的请求参数, 显示处理结果的。(jsp ,html ,servlet)
业务逻辑层: 接收了界面层传递的数据,计算逻辑,调用数据库,获取数据
数据访问层: 就是访问数据库, 执行对数据的查询,修改,删除等等的。
三层对应的包 |
 三层中类的交互
   用户使用界面层--> 业务逻辑层--->数据访问层(持久层)-->数据库(mysql)
三层对应的处理框架
界面层—servlet—springmvc(框架)
业务逻辑层—service类–spring(框架)
数据访问层—dao类–mybatis(框架)
2.框架
框架是一个舞台, 一个模版
模版:
1. 规定了好一些条款,内容。
2. 加入自己的东西
框架是一个模块
1.框架中定义好了一些功能。这些功能是可用的。
2.可以加入项目中自己的功能, 这些功能可以利用框架中写好的功能。
框架是一个软件,半成品的软件,定义好了一些基础功能, 需要加入你的功能就是完整的。
基础功能是可重复使用的,可升级的。
框架特点:
1. 框架一般不是全能的, 不能做所有事情
2. 框架是针对某一个领域有效。 特长在某一个方面,比如mybatis做数据库操作强,但是他不能做其它的。
3. 框架是一个软件
mybatis框架
一个框架,早期叫做ibatis, 代码在github。
mybatis是 MyBatis SQL Mapper Framework for Java (sql映射框架)
1)sql mapper :sql映射
可以把数据库表中的一行数据 映射为 一个java对象。
一行数据可以看做是一个java对象。操作这个对象,就相当于操作表中的数据
2) Data Access Objects(DAOs) : 数据访问 , 对数据库执行增删改查。
mybatis提供了哪些功能:
- 提供了创建Connection ,Statement, ResultSet的能力 ,不用开发人员创建这些对象了
- 提供了执行sql语句的能力, 不用你执行sql
- 提供了循环sql, 把sql的结果转为java对象, List集合的能力
while (rs.next()) {
Student stu = new Student();
stu.setId(rs.getInt(“id”));
stu.setName(rs.getString(“name”));
stu.setAge(rs.getInt(“age”));
//从数据库取出数据转为 Student 对象,封装到 List 集合
stuList.add(stu);
}
4.提供了关闭资源的能力,不用你关闭Connection, Statement, ResultSet
开发人员做的是: 提供sql语句
最后是: 开发人员提供sql语句–mybatis处理sql—开发人员得到List集合或java对象(表中的数据)
总结:
mybatis是一个sql映射框架,提供的数据库的操作能力。增强的JDBC,
使用mybatis让开发人员集中精神写sql就可以了,不必关心Connection,Statement,ResultSet
的创建,销毁,sql的执行。
第二章:
1 主要类的介绍
1) Resources: mybatis中的一个类, 负责读取主配置文件
InputStream in = Resources.getResourceAsStream(“mybatis.xml”);
2)SqlSessionFactoryBuilder : 创建SqlSessionFactory对象,
     SqlSessionFactoryBuilder builder  = new SqlSessionFactoryBuilder();
    //创建SqlSessionFactory对象
    SqlSessionFactory factory = builder.build(in);
3)SqlSessionFactory : 重量级对象, 程序创建一个对象耗时比较长,使用资源比较多。
在整个项目中,有一个就够用了。
 SqlSessionFactory:接口  , 接口实现类: DefaultSqlSessionFactory
  SqlSessionFactory作用: 获取SqlSession对象。SqlSession sqlSession = factory.openSession();

  openSession()方法说明:
   1. openSession() :无参数的, 获取是非自动提交事务的SqlSession对象
    2. openSession(boolean): openSession(true)  获取自动提交事务的SqlSession.
                             openSession(false)  非自动提交事务的SqlSession对象
4)SqlSession:
SqlSession接口 :定义了操作数据的方法 例如 selectOne() ,selectList() ,insert(),update(), delete(), commit(), rollback()
SqlSession接口的实现类DefaultSqlSession。
使用要求: SqlSession对象不是线程安全的,需要在方法内部使用, 在执行sql语句之前,使用openSession()获取SqlSession对象。
在执行完sql语句后,需要关闭它,执行SqlSession.close(). 这样能保证他的使用是线程安全的。
第三章:
动态代理: 使用SqlSession.getMapper(dao接口.class) 获取这个dao接口的对象
传入参数: 从java代码中把数据传入到mapper文件的sql语句中。
1)parameterType : 写在mapper文件中的 一个属性。 表示dao接口中方法的参数的数据类型。
例如StudentDao接口
public Student selectStudentById(Integer id)- 一个简单类型的参数:
简单类型: mybatis把java的基本数据类型和String都叫简单类型。
在mapper文件获取简单类型的一个参数的值,使用 #{任意字符}
接口:public Student selectStudentById(Integer id)
mapper:select id,name, email,age from student where id=#{studentId}- 一个简单类型的参数:
3) 多个参数,使用@Param命名参数
  接口 public List<Student> selectMulitParam(@Param("myname") String name, @Param("myage") Integer age)
  使用  @Param("参数名")  String name
 mapper文件:
     <select>
         select * from student where name=#{myname} or age=#{myage}
      </select>

4) 多个参数,使用java对象
   语法 #{属性名}
vo: value object , 放一些存储数据的类。比如说 提交请求参数, name ,age
现在想把name ,age 传给一个service 类。
vo: view object , 从servlet把数据返回给浏览器使用的类,表示显示结果的类。
pojo: 普通的有set, get方法的java类。 普通的java对象
Servlet --- StudentService( addStudent( MyParam param) )
entity(domain域): 实体类, 和数据库中的表对应的类,
5) # 和  $

  select id,name, email,age from student where id=#{studentId}
  # 的结果: select id,name, email,age from student where id=?


   select id,name, email,age from student where id=${studentId}
  $ 的结果:select id,name, email,age from student where id=1001

  String sql="select id,name, email,age from student where id=" + "1001";
  使用的Statement对象执行sql, 效率比PreparedStatement低。


  $:可以替换表名或者列名, 你能确定数据是安全的。可以使用$


  # 和 $区别
  1. #使用 ?在sql语句中做站位的, 使用PreparedStatement执行sql,效率高
  2. #能够避免sql注入,更安全。
  3. $不使用占位符,是字符串连接方式,使用Statement对象执行sql,效率低
  4. $有sql注入的风险,缺乏安全性。
  5. $:可以替换表名或者列名
mybatis的输出结果
mybatis执行了sql语句,得到java对象。1)resultType结果类型, 指sql语句执行完毕后, 数据转为的java对象, java类型是任意的。
resultType结果类型的它值 1. 类型的全限定名称 2. 类型的别名, 例如 java.lang.Integer别名是int处理方式: 1. mybatis执行sql语句, 然后mybatis调用类的无参数构造方法,创建对象。 2. mybatis把ResultSet指定列值付给同名的属性。 <select id="selectMultiPosition" resultType="com.bjpowernode.domain.Student"> select id,name, email,age from student </select> 对等的jdbc ResultSet rs = executeQuery(" select id,name, email,age from student" ) while(rs.next()){ Student student = new Student(); student.setId(rs.getInt("id")); student.setName(rs.getString("name")) }
- 定义自定义类型的别名
1)在mybatis主配置文件中定义,使定义别名
2)可以在resultType中使用自定义别名
3)resultMap:结果映射, 指定列名和java对象的属性对应关系。
1)你自定义列值赋值给哪个属性
2)当你的列名和属性名不一样时,一定使用resultMap
resultMap和resultType不要一起用,二选一
dao接口中的方法
/** |
StudentDao.xml
<!--使用ResultMap 必须先定义ResultMap |
输出:
注意:如果Dao接口使用Map作为返回结果的话 需要在ResultType中配置Map的全限定名称 而不是实体类的名称(如果返回值为List则依旧使用实体类的全限定名称) 并且返回的结果是以列名作为键 列值作为值
第四章动态sql
模糊查询:
**like:**在dao.xml配置文件中 直接使用like即可 当使用#{}拼接时 我们前面说过 他是以占位符?(即preparedStatement)所以格式为
<!--模糊查询的两种方式 |
但是使用${}时不一样它是使用Statement即字符串拼接 所以格式为
<select id="selectStudentsByLike" resultType="com.dyw.Domain.Student"> |
动态sql: sql的内容是变化的,可以根据条件获取到不同的sql语句。
主要是where部分发生变化。
动态sql的实现,使用的是mybatis提供的标签,
1)
语法
部分sql语句
<!--使用标签<if>可以判断条件 如果条件满足要求则将条件拼接在where后 可以防止sql运行时报错--> |
但这样有弊端,就是为了避免拼接错误,需要使用or 1=1, 但是这样又会导致另一个错误,那就是可以会将所有的内容都查出来,这是我们不想看到的。
2)
并去掉 if中多余的 and ,or等。
<!--使用where标签时就不会出现拼接错误现象 底层会自动判别然后进行拼接 可以自动去除and or等连接词比直接用<if>安全性好--> |
使用< where>标签就不会出现上述< if>的情况 < where>标签可以智能帮助我们去除and or 等 防止拼接错误
3)
学生id是 1001,1002,1003的三个学生
select * from student where id in (1001,1002,1003) |
<foreach collection="" item="" open="" close="" separator=""> |
4)sql代码片段, 就是复用一些语法
步骤
1.先定义
2.再使用,
第五章:
- 数据库的属性配置文件: 把数据库连接信息放到一个单独的文件中。 和mybatis主配置文件分开。
目的是便于修改,保存,处理多个数据库的信息。在resources目录中定义一个属性配置文件, xxxx.properties ,例如 jdbc.properties
在属性配置文件中, 定义数据,格式是 key=value
key: 一般使用 . 做多级目录的。
例如 jdbc.mysql.driver , jdbc.driver, mydriver
jdbc.driver=com.mysql.jdbc.Driver
jdbc.url=jdbc:mysql//…..
jdbc.username=root
jdbc.password=123456<!--指定properties文件路径 从类路径根开始查找-->
<properties resource="jdbc.properties"/>
在mybatis的主配置文件,使用
指定文件的位置
在需要使用值的地方, ${key}
<property name="driver" value="${jdbc.driver}"/> |
2.mapper文件,使用package指定路径
在MyBatis-config文件中可以指定多个mapper文件 第一个中方式直接在
注意mapper的路径从类路径的根开始(target/classes)
<!--第二种方式: 使用包名 |
第六章:PageHelper
PageHelper做数据分页的。(国人写的)
maven中添加依赖
<dependency>
      <groupId>com.github.pagehelper</groupId>
      <artifactId>pagehelper</artifactId>
      <version>5.3.0</version>
</dependency>
在MyBatis-config中配置插件
注意:MyBatis-config配置顺序如下properties, settings,plugins;<!--在<plugins>标签中配置-->
<!--配置pageHelper插件放在setting后面-->
<plugins>
<plugin interceptor="com.github.pagehelper.PageInterceptor" />
</plugins>配置完成后在使用时调用 pagehelper.startpage(页码(int),每页显示条数(int))方法 注意放在执行sql语句之前 输出会自动显示参数指定的几条
MyBatis的缓存机制
https://segmentfault.com/a/1190000041193993
缓存机制减轻数据库压力,提高数据库性能 |
一级缓存:
一级缓存为 sqlsession 缓存,缓存的数据只在 SqlSession 内有效。在操作数据库的时候需要先 创建 SqlSession 会话对象,在对象中有一个 HashMap 用于存储缓存数据,此 HashMap 是当前 会话对象私有的,别的 SqlSession 会话对象无法访问。
具体流程:
第一次执行 select 完毕会将查到的数据写入 SqlSession 内的 HashMap 中缓存起来
第二次执行(可能多次) select 会从缓存中查数据,如果 select 同传参数一样,那么就能从缓存中返回数据,不用去数据库了,从而提高了效率
注意:
1、如果 在同一个SqlSession 执行了 DML 操作(insert、update、delete),并 commit 了,那么 mybatis 就会清空当前 SqlSession 缓存中的所有缓存数据,这样可以保证缓存中的存的数据永远和数据库中一致,避免出现差异
2、当一个 SqlSession 结束后那么他里面的一级缓存也就不存在了, mybatis 默认是开启一级缓存且默认作用范围时SESSION,也可以手动配置为STATEMENT(让一级缓存仅针对当前执行的SQL语句生效;),不需要配置二级缓存默认时没有开启的为false 需要手动在Mybatis-config中配置(
3、 mybatis 的缓存是基于 [namespace:sql语句:参数] 来进行缓存的,意思就是, SqlSession 的 HashMap 存储缓存数据时,是使用 [namespace:sql:参数] 作为 key ,查询返回的语句作为 value 保存的,**即{key=namespace:sql:参数,value=查询到的数据}**。
4. 不同会话持有不同的一级缓存,本会话内的操作不会影响其它会话内的一级缓存。
二级缓存
二级缓存是 mapper 级别的缓存,也就是同一个 namespace 的 mapper.xml ,当多个 SqlSession 使用同一个 Mapper 操作数据库的时候,得到的数据会缓存在同一个二级缓存区域
二级缓存默认是没有开启的。需要在 setting 全局参数中配置开启二级缓存
开启二级缓存步骤:
1、conf.xml 配置全局变量开启二级缓存
<settings> |
2、在userMapper.xml中配置
<cache eviction="LRU" type="org.apache.ibatis.cache.impl.PerpetualCache" flushInterval="60000" size="512" readOnly="true"/>当前mapper下所有语句开启二级缓存 |
这里配置了一个 LRU 缓存,并每隔60秒刷新,最大存储512个对象,而返回的对象是只读的
若想禁用当前select语句的二级缓存,添加 useCache="false"修改如下:
<select id="getCountByName" parameterType="java.util.Map" resultType="INTEGER" statementType="CALLABLE" useCache="false"> |
具体流程:
1.当一个sqlseesion执行了一次 select 后,在关闭此 session 的时候,会将查询结果缓存到二级缓存
2.当另一个sqlsession执行 select 时,(前提二级缓存开启时)首先会在他自己的二级缓存中找,如果没找到,就回去一级缓存中找,找到了就返回,就不用去数据库了,从而减少了数据库压力提高了性能
注意:
如果
SqlSession执行了 DML 操作(insert、update、delete),并commit了,那么mybatis就会清空当前mapper缓存中的所有缓存数据,这样可以保证缓存中的存的数据永远和数据库中一致,避免出现差异(如果没有commit)就不会清空mybatis中的二级缓存mybatis的缓存是基于[namespace:sql语句:参数]来进行缓存的,意思就是,SqlSession的HashMap存储缓存数据时,是使用[namespace:sql:参数]作为key,查询返回的语句作为value保存的。Mybatis中需要在映射文件中添加<cache>标签来为映射文件配置二级缓存,也可以在映射文件中添加<cache-ref>标签来引用其它映射文件的二级缓存以达到多个映射文件持有同一份二级缓存的效果。该语句可以在另一个mybatis-mapper中指定二级缓存(一个mapper拥有一个二级缓存 这里指定了缓存的指向)这样两个mapper可以共享一个二级缓存
<cache>标签如下所示。
| 属性 | 含义 | 默认值 | |||
|---|---|---|---|---|---|
| eviction | 缓存淘汰策略。LRU表示最近使用频次最少的优先被淘汰;FIFO表示先被缓存的会先被淘汰;SOFT表示基于软引用规则来淘汰;WEAK表示基于弱引用规则来淘汰 | LRU | |||
| flushInterval | 缓存刷新间隔。单位毫秒 | 空,表示永不过期 | |||
| type | 缓存的类型 | PerpetualCache(永久缓存) |
|||
| size | 最多缓存的对象个数 | 1024 | |||
| blocking | 缓存未命中时是否阻塞 | false | |||
| readOnly | 缓存中的对象是否只读。配置为true时,表示缓存对象只读,命中缓存时会直接将缓存的对象返回,性能更快,但是线程不安全;配置为false时,表示缓存对象可读写,命中缓存时会将缓存的对象克隆然后返回克隆的对象,性能更慢,但是线程安全 | false | |||
| 属性 | 含义 | ||||
|---|---|---|---|---|---|
| namespace | 其它映射文件的命名空间,设置之后则当前映射文件将和其它映射文件将持有同一份二级缓存 | ||||
MyBatis-Plus
注意:引入 MyBatis-Plus 之后请不要再次引入 MyBatis 以及 MyBatis-Spring,以避免因版本差异导致的问题。
简介
MyBatis-Plus (opens new window)(简称 MP)是一个 MyBatis (opens new window)的增强工具,在 MyBatis 的基础上只做增强不做改变,为简化开发、提高效率而生。
愿景
我们的愿景是成为 MyBatis 最好的搭档,就像 魂斗罗 中的 1P、2P,基友搭配,效率翻倍。
特性
- 无侵入:只做增强不做改变,引入它不会对现有工程产生影响,如丝般顺滑
- 损耗小:启动即会自动注入基本 CURD,性能基本无损耗,直接面向对象操作
- 强大的 CRUD 操作:内置通用 Mapper、通用 Service,仅仅通过少量配置即可实现单表大部分 CRUD 操作,更有强大的条件构造器,满足各类使用需求
- 支持 Lambda 形式调用:通过 Lambda 表达式,方便的编写各类查询条件,无需再担心字段写错
- 支持主键自动生成:支持多达 4 种主键策略(内含分布式唯一 ID 生成器 - Sequence),可自由配置,完美解决主键问题
- 支持 ActiveRecord 模式:支持 ActiveRecord 形式调用,实体类只需继承 Model 类即可进行强大的 CRUD 操作
- 支持自定义全局通用操作:支持全局通用方法注入( Write once, use anywhere )
- 内置代码生成器:采用代码或者 Maven 插件可快速生成 Mapper 、 Model 、 Service 、 Controller 层代码,支持模板引擎,更有超多自定义配置等您来使用
- 内置分页插件:基于 MyBatis 物理分页,开发者无需关心具体操作,配置好插件之后,写分页等同于普通 List 查询
- 分页插件支持多种数据库:支持 MySQL、MariaDB、Oracle、DB2、H2、HSQL、SQLite、Postgre、SQLServer 等多种数据库
- 内置性能分析插件:可输出 SQL 语句以及其执行时间,建议开发测试时启用该功能,能快速揪出慢查询
- 内置全局拦截插件:提供全表 delete 、 update 操作智能分析阻断,也可自定义拦截规则,预防误操作
#支持数据库
任何能使用
mybatis进行 CRUD, 并且支持标准 SQL 的数据库,具体支持情况如下,如果不在下列表查看分页部分教程 PR 您的支持。
- mysql,oracle,db2,h2,hsql,sqlite,postgresql,sqlserver,Phoenix,Gauss ,clickhouse,Sybase,OceanBase,Firebird,cubrid,goldilocks,csiidb
- 达梦数据库,虚谷数据库,人大金仓数据库,南大通用(华库)数据库,南大通用数据库,神通数据库,瀚高数据库
#框架结构
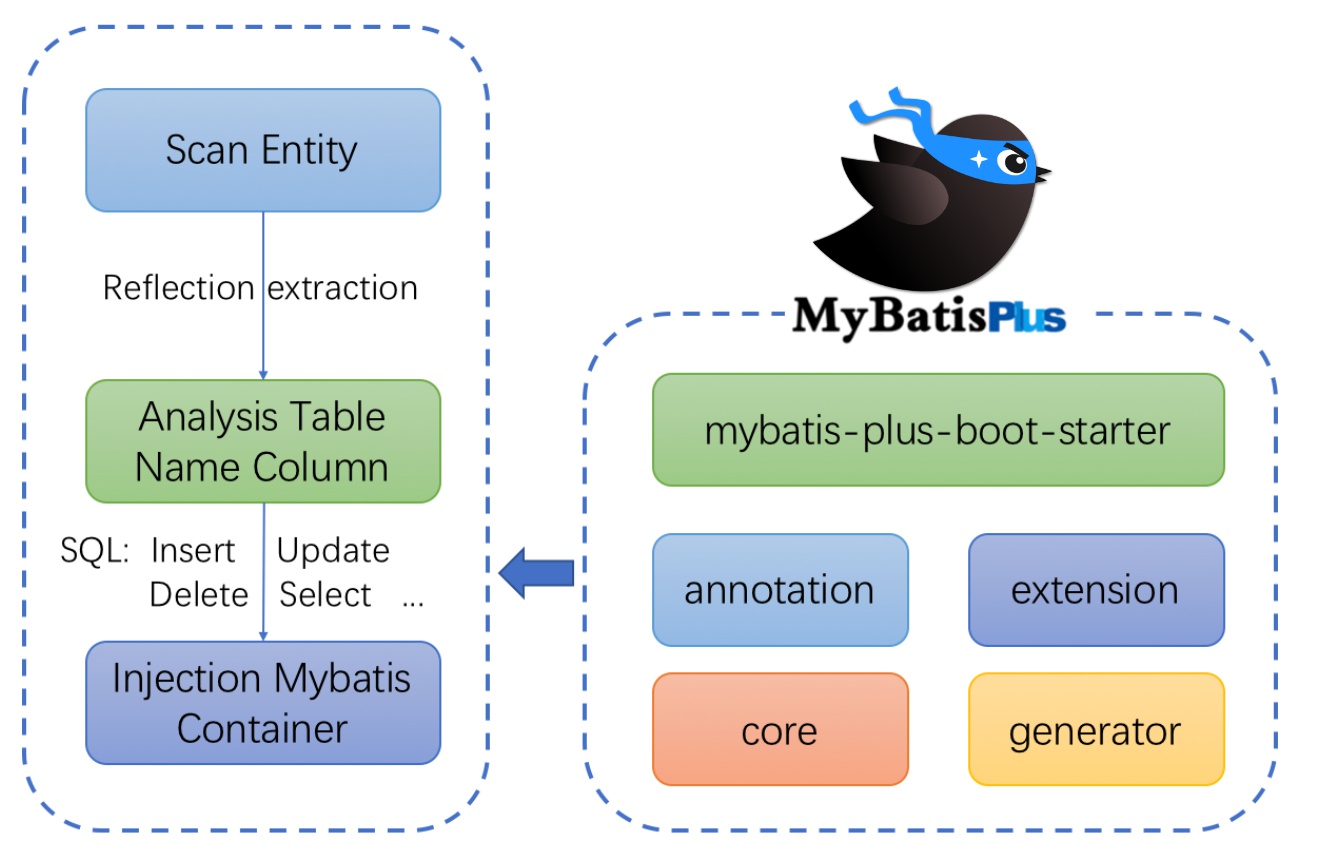
就是在mybatis的基础上再次简化操作 让原来需要程序员写的curd代码都节省了 同时还优化了性能
快速开始
一:创建一个boot工程(SpringBoot Initializr)
勾选SQL中的MySQL Driver
二:引入mybatis-plus相关依赖
引入 Spring Boot Starter 父工程:
<parent> |
引入 spring-boot-starter、spring-boot-starter-test、mybatis-plus-boot-starter 、mysql-connector-java、lombok依赖
<dependency> |
三:配置
- 在application.yml中配置数据库连接的相关信息
spring: |
- 在 Spring Boot 启动类中添加
@MapperScan注解,扫描 Mapper 文件夹:
|
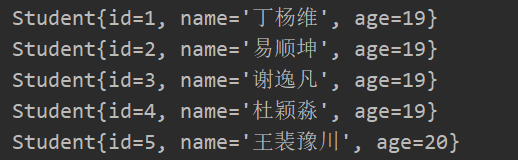
- 借助lombok插件编写实体类 Student.java
|
- 编写Mapper接口
StudentMapper.java
/** |
- 测试类 测试
|
小结
* 通过以上几个简单的步骤,我们就实现了 Student 表的 CRUD 功能,甚至连 XML 文件都不用编写!
* 从以上步骤中,我们可以看到集成MyBatis-Plus非常的简单,只需要引入 starter 工程,并配置 mapper 扫描路径即可。
* 对于mapper的扫描可以选择在启动类中写@MapperScan() 也可以在mapper接口上加@mapper 前者适合mapper接口多的情况 后者则书写更方便。
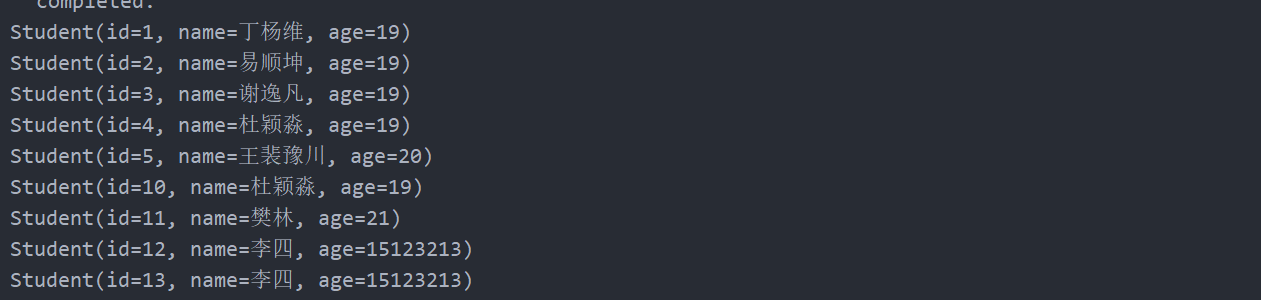
* 在执行插入操作时 执行成功后 会将结果返回到传入的对象中(例如我们可以通过传入的对象获得主键自增长的主键值)
|
可以看到我们没有对传入的对象的主键赋值(自动增长)但我们通过执行操作后的对象获得了插入到表中的该行数据的主 键 证实了上述结论
Spring整合Mybatis-Plus
- 上面的快速开始我们介绍了通过SpringBoot整合MyBatis-Plus
添加依赖
加入Spring依赖和数据库JDBC依赖后还需要加入Mybatis-Plus的依赖
引入 MyBatis-Plus 之后请不要再次引入 MyBatis 以及 MyBatis-Spring,以避免因版本差异导致的问题。
<dependency> |
配置
MyBatis-Plus 的配置异常的简单,我们仅需要一些简单的配置即可使用 MyBatis-Plus 的强大功能!
配置 MapperScan spring.xml
<bean class="org.mybatis.spring.mapper.MapperScannerConfigurer"> |
日志
要想使用mybatis-plus的日志功能 需要在application.yml中添加如下语句
mybatis-plus: |
CRUD接口
Service CRUD 接口
说明:
通用 Service CRUD 封装IService (opens new window)接口,进一步封装 CRUD 采用
get 查询单行remove 删除list 查询集合page 分页前缀命名方式区分Mapper层避免混淆,泛型
T为任意实体对象建议如果存在自定义通用 Service 方法的可能,请创建自己的
IBaseService继承Mybatis-Plus提供的基类对象
Wrapper为 条件构造器```java
@SuppressWarnings(“all”)
public interface BookService extends IService{
//boolean save(Book book);
//boolean update(Book book);
//boolean delete(Integer id);
//Book getById(Integer id);
ListgetAll();
}
- 可以追加自定义操作 需要自己编写方法实体 模板如下

- ```java
  @Service
  @SuppressWarnings("all")
  public class BookServiceImpl extends ServiceImpl<BookMapper,Book> implements BookService{
      @Autowired
      private BookMapper mapper;


      @Override
      public List<Book> getAll() {
          return null;
      }
  }
Mapper CRUD 接口
说明:
- 通用 CRUD 封装BaseMapper (opens new window)接口,为
Mybatis-Plus启动时自动解析实体表关系映射转换为Mybatis内部对象注入容器- 泛型
T为任意实体对象- 参数
Serializable为任意类型主键Mybatis-Plus不推荐使用复合主键约定每一张表都有自己的唯一id主键- 对象
Wrapper为 条件构造器
以下是Mapper接口中的CRUD方法介绍
一:查询
- selectById() 通过单个主键值查询 只需要传入主键值即可 SELECT id,name FROM people WHERE id=?
/** |
如果id值对应的行不存在 会返回空 所以一般使用会判断是否为空 再做其他操作
- selectBatchIds() 批处理查询 通过多个主键值的一个集合 来查询满足条件的数据 返回值是一个集合 如果没有满足条件的数据 则返回null SELECT id,name FROM people WHERE id IN ( ? , ? , ? )
/** |
- selectByMap() 通过将多条件字段字段封装到map中 通过读取map中的值来拼接条件 来实现 SELECT id,name FROM people WHERE name = ? AND id = ?
/** |
4.selectList() 通过传入实体类 更具实体类中的字段值解析为条件 查询
……
注意: 当select操作条件为null时默认查询表中全部数据
二:更新
- updateById(实体类对象);
通过传入实体类对象根据实体类对象中的声明主键的值, 自动生成where条件 where id=? , 然后以实体类中的其他非null属性的值对表中的数据进行修改(注意:包装类的默认值是null 而基本数据类型默认值不一定是null 如int类型默认值是0)
/** |
三:删除
- deleteById 通过传入的实体类中声明的主键值 来生成where条件 delete from tablename where id = ? 也可以直接传入一个id值
int i = peopleMapper.deleteById(3); |
- deleteByMap 将字段条件通过键值对的方式封装到map中 再调用deleteByMap方法 将map中的值读取填入where之后 多个字段以and方式连接 DELETE FROM people WHERE name = ? AND id = ?
/** |
- deleteBatchIds 通过id批量删除 是通过in关键字 填入where条件关键字之后 DELETE FROM people WHERE id IN ( ? , ? )
deleteBatchIds() 批处理方式:使用多个主键值,删除数据
参数:Collection<? extends Serializable>
返回值删除的记录数
/** |
新知识:可以通过Stream.Of().collect(Collectors.toList())的方式创建List集合
List<?> list = Stream.of(Object,Object....).collect(Collectors.toList()); |
四:插入
- insert() 通过创建一个实体对象 再调用mapper的insert方法即可完成插入 INSERT INTO people ( name ) VALUES ( ? )
People people1 = new People(null, "fan"); |
AR操作
ActiveRecord简介:
- 每一个数据库表对应创建一个类,类的每一个对象实例对应于数据库中表的一行记录;通常表的每个字段在类中都有相应的Field;
- ActiveRecord 负责把自己持久化,在ActiveRecord中封装了对数据库的访问,通过对象自己实现CRUD,实现优雅的数据库操作
- ActiveRecord也封住给你了部分业务逻辑.可以作为业务对象使用
快速开始
- 创建表
- 创建springboot整合mybatis-plus项目 与前面操作一致
- 编写实体类 继承Model
(这个Model时Mybatis-plus中的 这个Model中封装了很多crud方法实现机制 也是mybatis中的sqlsession)
entity.People.java
/** |
- 编写Mapper接口继承BaseMapper
加上@Mapper注解
注意:我们后续使用不使用该mapper而是使用实体类的对象(继承了Model的原因 实体类对象已经具有了对数据库表的crud操作) 该mapper是不需要使用的,MP需要使用该mapper获取数据库的表的信息
/** |
AR的CRUD操作
Insert
- 创建一个实体对象 设置属性 再使用该对象调用继承来的insert方法 就可以完成插入操作
- 返回值是一个boolean值
People people = new People(); |
Delete
- deleteById() 创建一个实体对象 只需要设置属性主键值(也可不设置 直接在方法参数上写) 再调用该方法 就会识别主键值 并根据主键值进行删除操作 DELETE FROM people WHERE id=?
- 返回值是boolean(注意与其他操作不同 这里的删除操作只要语句正确就不会为false)
People people = new People(); |
Select
- selectById() 创建一个实体对象 只需要设置属性主键值(也可不设置 直接在方法参数上写) 再调用该方法 就会识别主键值 并根据主键值进行查询操作 SELECT id,name FROM people WHERE id=?
- 有记录返回值是一个Object 如果在创建实体类时继承Model设置了泛型那么返回值就是实体类的类型 无记录就是一个null
People people = new People(); |
还有如下方法

Update
- updateById() 创建一个实体对象 设置属性主键值 和其他属性 调用对象的updateById()方法 它会自动识别主键值(前面我们创建类时 设置了主键信息)并 修改 默认修改对象中非空的值
- 返回值是boolean
People people = new People(); |
主键类型
public enum IdType { |
通过上述枚举类型 我们可以知道共有五种主键类型
IdType 对于自动填充 只有当插入对象ID 为空,才自动填充。
- 0.NONE : 没有主键类型
- 1.AUTO : 自动增长 前提是确保数据库设置了 ID自增 否则无效
- 2.INPUT : 手工输入
- 3.ASSIGN_ID :
分配ID (主键类型为number或string)
默认实现类 {@link com.baomidou.mybatisplus.core.incrementer.DefaultIdentifierGenerator}(雪花算法)
- 4.ASSIGN_UUID :
分配UUID (主键类型为 string)
默认实现类 {@link com.baomidou.mybatisplus.core.incrementer.DefaultIdentifierGenerator}(UUID.replace(“-“,””))
IdType.AUTO
- 表中建表使用数字作为主键, 设置主键id自增
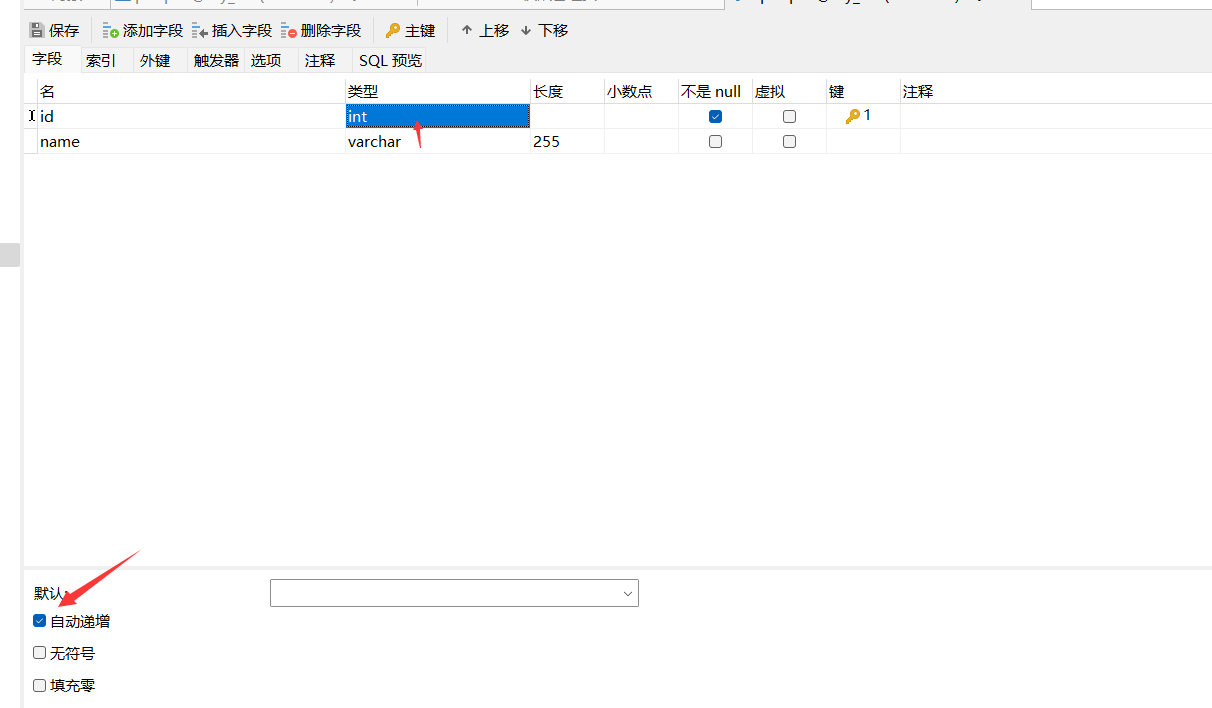
- 实体类表中主键值也要为数字类型 并添加注解@TableId 设置主键以及主键类型
|
IdType.ASSIGN_ID
- 使用时需要在数据库表中 需要取消主键自动增长 并且设置主键类型时bigint 因为这个主键的值很大 int类型大小不够 还可以使用varchar(50)类型
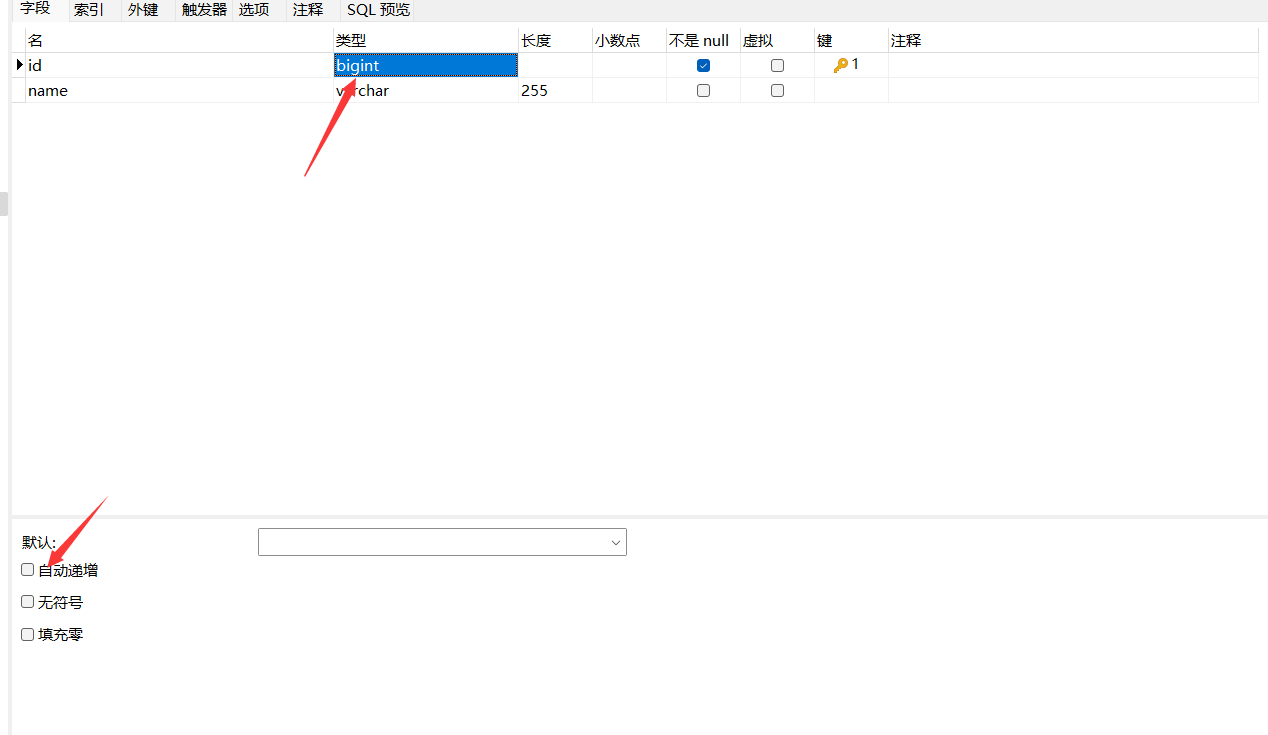
- 实体类中将主键类型设置为Long原因与上述一样 并且设置注解@TableId中type的值为IdType.ASSIGN_ID 如果数据库中主键使用varchar(50)那么相应的实体类中的主键类型也应当为String类型
|


IdType.ASSIGN_UUID
- 使用时需要在数据库表中, 将主键类型设置为varchar(50)类型

- 实体类中的主键类型设置为String类型 并且注解@TableId中需要将type设置为IdType.ASSIGN_UUID
|

分布式中推荐使用 IdType.ASSIGN_ID 它可以生成数字而且长度更短更有规律
指定表名
- 定义实体类,默认的表名和实体类同名; 如果不一致,在实体类上面使用@TableName说明表名称
- 例如: @TableName(value=”数据库表名”)
- 使用: 在实体类的上方
|
指定列名
- 在实际开发中, 不能完全出现实体类中的属性名与 数据库表中的列名完全一致; 如果不一致,在实体类上面使用@TableField完成两者之间的映射关系
- 例如:@TableField(value=”数据库表中的列名”) 查询时需要将结果封装成一个一个的对象时 需要在@TableName中设置autoResultMap = true 否则在使用了@TableField后可能会出现控制的情况
- 使用: 在实体类中的属性的上方
//定义属性,属性名和表的列名一样 |
驼峰命名
上述 在开发中使用@TableField指定属性与表中的列名的映射关系十分麻烦
一般在设计数据库表时采用下划线的方式命名 如user_name
这就引申出Mybatis-plus的另一个特性 驼峰命名 即: 列名使用下划线,属性名时驼峰命名的方式.Mybatis-plus默认支持这种规则. (即列名为: user_name 属性名为:userName 不需要使用@TableField Mybatis-plus同样能够识别)
列名: people_name |
自定义mapper
自定义mapper
与mybatis一样 需要在创建一个接口写入自定义的方法 然后再编写一个mapper.xml文件 声明namespace 方法标签 resultType 和自定义方法
|
做完一切之后可以选择再mapper接口上加上@Mapper注解 或者 在启动类上加上@MapperScan(value=”mapper接口路径”) 用来指明mapper的位置
|
最后在application.yml中声明mapper.xml的路径
mybatis-plus: |
这样的方法也同样适用于Springboot+mybatis(@Mapper/@MapperScan+mapper.xml)
还有一种方法 @Mapper/@MapperScan+@crud操作 也同样适用于mybatis 或者说正是因为mybatis有 所以mybatis-plus也支持
@Mapper |
@Mapper和@MapperScan作用 告诉了程序mapper接口在哪
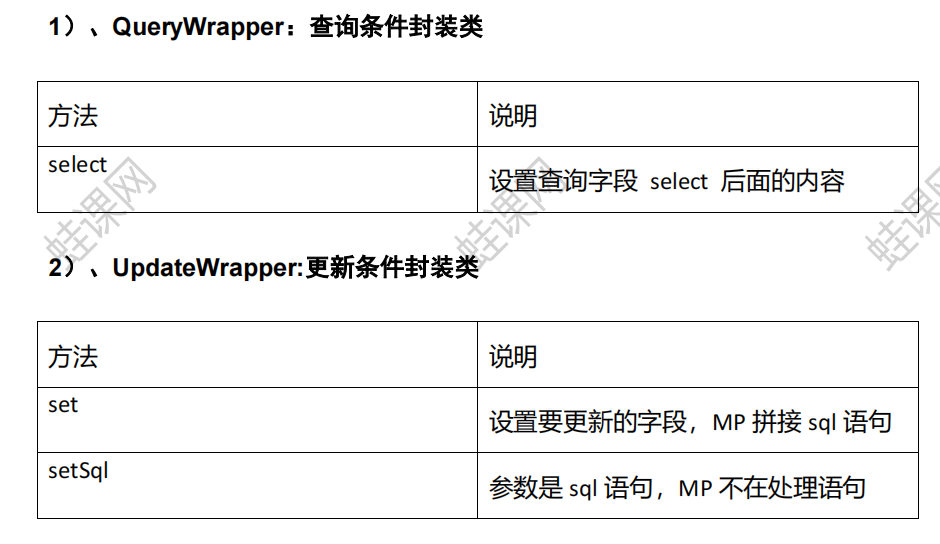
条件构造器
条件构造器: Wrapper
QueryWrapper(LambdaQueryWrapper) 和 UpdateWrapper(LambdaUpdateWrapper)的父类 用于生成sql的where条件,entity属性也用于生成sql的where条件,MP3.0开始支持lambda表达式, LambdaQueryWrapper, LambdaUpdateWrapper 支持lambda表达式的构造查询条件
注意: entity 生成的 where 条件与 使用各个 api 生成的 where 条件没有任何关联行为


使用时根据不同的crud操作选择不同的条件封装类
实际使用的例子都在官方文档中可以查看条件构造器
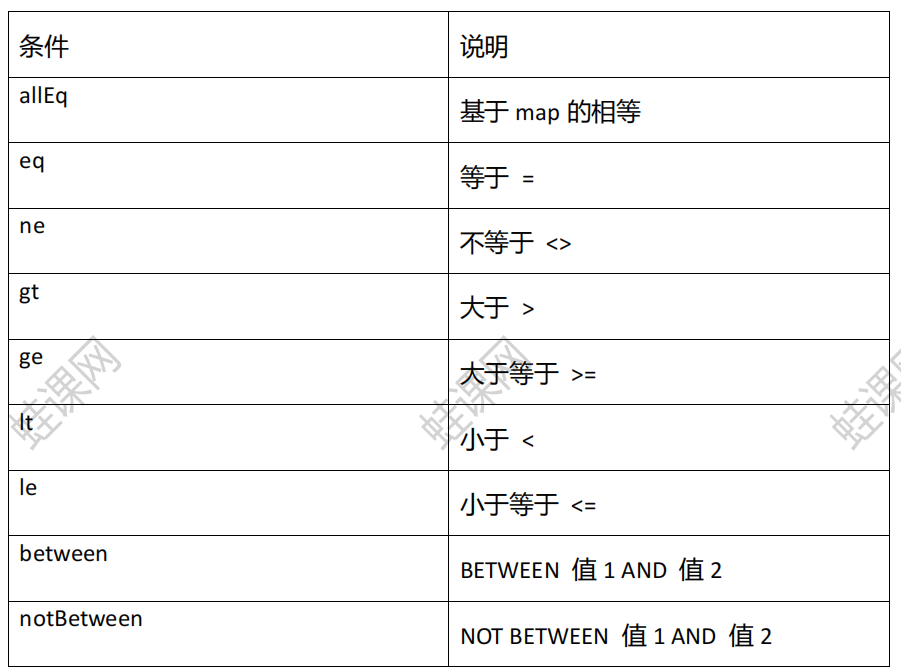
具体使用
allEq
1. allEq(Map<R, V> params)
- 根据不同的crud选择不同的条件封装类 创建相应的条件封装类实体
- 由于要使用allEq(Map<R, V> params)方法, 它的参数是一个map 所以需要新建一个map, map中的键值对 就是条件 用and连接
- 再调用mapper的方法将封装类实体传入
/** |

2. allEq(Map<R, V> params,boolean null2IsNull)
后面的boolean值是用来处理传入的map中的value空值的.
true: 将map中value控制用is 拼接
false: 忽略空value和key 不对该字段进行拼接


eq: 封装单个条件
eq(R column, Object val): 列名,值
使用条件封装类的实体类的eq方法 调用直接填入列名和相应的值即可 是使用的’=’连接
SELECT pid,people_name FROM people WHERE (pid = ?)
/** |
ne:不等于
ne(R column, Object val) 表示<> 和 !=
- 使用列名, 值 通过<> 拼接
Preparing: SELECT pid,people_name FROM people WHERE (pid <> ?)
/** |
gt:大于
gt(R column, Object val) 表示 >
- 使用列名, 值 通过> 拼接
SELECT pid,people_name FROM people WHERE (pid > ?)
ge:大于等于
ge(R column, Object val) 表示 >=
- 使用列名, 值 通过>= 拼接
SELECT pid,people_name FROM people WHERE (pid >= ?)
lt:小于
lt(R column, Object val) 表示 <
- 使用列名, 值 通过< 拼接
SELECT pid,people_name FROM people WHERE (pid < ?)
le:小于等于
lt(R column, Object val) 表示 <=
- 使用列名, 值 通过<= 拼接
SELECT pid,people_name FROM people WHERE (pid <= ?)
between: 两个值范围之间(>= and <=)
1.between(R column, Object val1, Object val2) 列名 值1 值2
通过列名相同的两个值 来创建两个值范围之间的条件 通过between拼接
SELECT pid,people_name FROM people WHERE (pid BETWEEN ? AND ?)
/** |
2. notBetween(R column, Object val1, Object val2) 列名 值1 值2
通过列名相同的两个值 来创建两个值范围之间的条件 通过between拼接
SELECT pid,people_name FROM people WHERE (pid NOT BETWEEN ? AND ?)
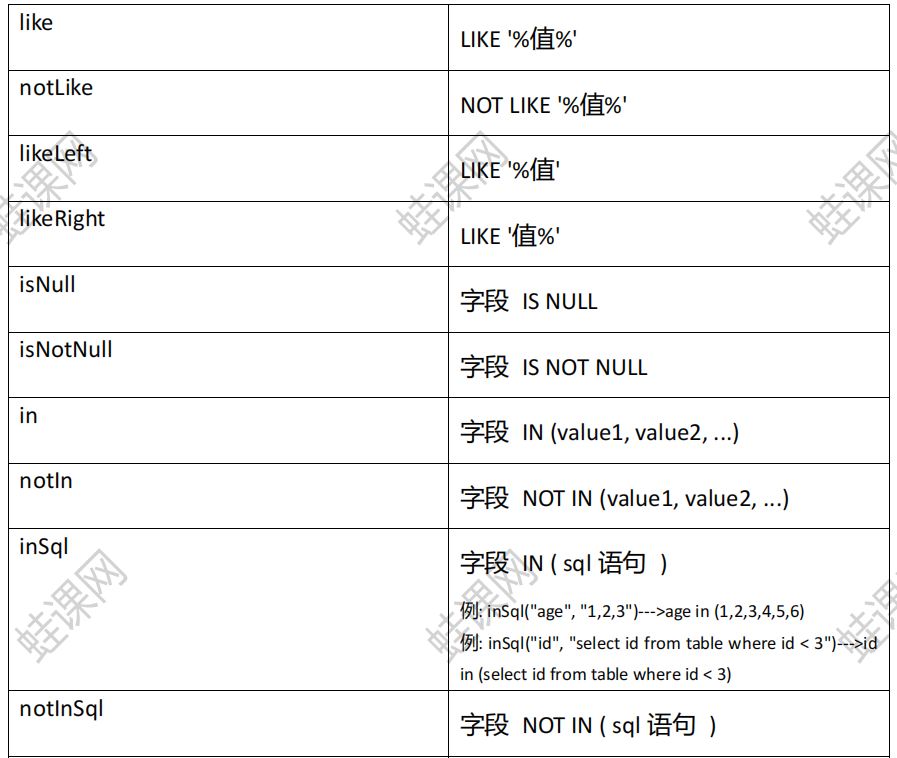
like 模糊查询
1. like(R column, Object val) 列名 值
- like模糊查询 在值的前后都是用%拼接( %val% ) 查询之中存在val的数据
SELECT pid,people_name FROM people WHERE (people_name LIKE ?) Parameters: %k%(String)
/** |
2. notLike(R column, Object val) 列名 值
- notLike模糊查询 在值的前后都是用%拼接( %val%) 查询之中不存在val的数据
SELECT pid,people_name FROM people WHERE (people_name NOT LIKE ?) Parameters: %k%(String)
3. likeLeft(R column, Object val) 列名 值
- likeLeft模糊查询 在值的左边用%拼接( %val) 查询以val结尾的的数据
SELECT pid,people_name FROM people WHERE (people_name LIKE ?) Parameters: %k(String)
4. likeLeft(R column, Object val) 列名 值
- likeLeft模糊查询 在值的右边用%拼接( val%) 查询以val开头的的数据
SELECT pid,people_name FROM people WHERE (people_name LIKE ?) Parameters: k%(String)
null: 判空
1.isNull(R column) 列名
- 判断所指列名为空的情况 以 is null 连接
SELECT pid,people_name FROM people WHERE (people_name IS NULL)
/** |
1.isNull(R column) 列名
- 判断所指列名为不为空的情况 以 is not null 连接
SELECT pid,people_name FROM people WHERE (people_name IS NOT NULL)
in 集合查询
1. in(R column, Object… values) 列名,值1….. 也可以传入一个集合
- in查询 将值封装到一个集合中 底层是or连接 查询满足集合范围中条件的数据
SELECT pid,people_name FROM people WHERE (pid IN (?,?,?))
2. notIn(R column, Object… values) 列名,值1….. 也可以传入一个集合
- in查询 将值封装到一个集合中 底层是or连接 查询不符合集合范围中条件的数据
SELECT pid,people_name FROM people WHERE (pid NOT IN (?,?,?))
inSql 子查询
1. inSql(R column, String inValue) 列名, 子查询语句
- 类型于in(), 前面的列名用来筛选子查询结果中符合条件的值 将其放在in()的集合中 后续步骤与in查询一致
SELECT pid,people_name FROM people WHERE (people_name IN (select people_name from people where pid = 1))
/** |
2. notInSql(R column, String inValue) 列名, 子查询语句
- 类型于notIn(), 前面的列名用来筛选子查询结果中符合条件的值 将其放在in()的集合中 后续步骤与notIn查询一致
SELECT pid,people_name FROM people WHERE (people_name NOT IN (select people_name from people where pid = 1))
groupBy 分组函数
1. groupBy(R column): 列名
在使用分组函数之前 需要调用Wrapper的select方法 指定要输出的参数 例如
select("people_name, count(*)");按指定的列名进行分组
SELECT people_name, count(*) FROM people GROUP BY people_name
/** |
orderBy 排序
1. orderByAsc(R column) 列名
按列名字段升序排序 还可以设置多个列名字段 来作为第二排序字段 也可以是集合
SELECT pid,people_name FROM people ORDER BY pid ASC
/** |
2. orderByDesc(R column) 列名
按列名字段降序排序 还可以设置多个列名字段 来作为第二排序字段 也可以是集合
SELECT pid,people_name FROM people ORDER BY pid DESC
3. orderBy(boolean condition, boolean isAsc, R column) 条件 是否升序 列名字段
按列isAsc来判断是否是升序 还是降序排序 还可以设置多个列名字段 来作为第二排序字段 也可以是集合
SELECT pid,people_name FROM people ORDER BY pid ASC/DESC
/** |
4. 多字段不同排序规则排序
可以在上述的方法后再调用orderBy()相关方法 完成多字段不同排序规则排序 可拼接多个
qw.orderBy(true,true,"pid").orderBy(true,false,"people_name");SELECT pid,people_name FROM people ORDER BY pid ASC,people_name DESC
/** |
or and 连接词
1. and
- 与or() 有关 再显式调用or()方法时 时使用or来连接 不调用or()方法连接 默认使用and连接
qw.eq("pid",1).eq("people_name","k");SELECT pid,people_name FROM people WHERE (pid = ? AND people_name = ?)
2.or() 无参
- 在单个条件方法后面使用 or() 再拼接另一个条件 以此类推 可拼接多个
qw.eq("pid",1).or().eq("people_name","k");SELECT pid,people_name FROM people WHERE (pid = ? OR people_name = ?)
/** |
还有or 和 and 的嵌套用法 再官方文档可以了解or and 的嵌套
last 末尾拼接
1. last(String lastSql) 拼接的sql语句
- 无视优化规则直接拼接到 sql 的最后
- 会将参数中的sql语句 拼接到末尾 可以调用了方法之后调用
qw.gt("pid",1).last("limit 1,10");SELECT pid,people_name FROM people WHERE (pid > ?) limit 1,10
这种方法存在sql注入风险
**注意: **只能调用一次,多次调用以最后一次为准 有sql注入的风险,请谨慎使用
exists
1. exists(String existsSql) sql语句
- 判断参数中的sql语句 是否成立 符合条件即成立
qw.exists("select pid from people where pid > 7");SELECT pid,people_name FROM people WHERE (EXISTS (select pid from people where pid > 7))
1. notExists(String existsSql) sql语句
- 判断参数中的sql语句 是否成立 不符合条件即成立
qw.notExists("select pid from people where pid <0 ");SELECT pid,people_name FROM people WHERE (NOT EXISTS (select pid from people where pid <0 ))
注意:
方法参数boolean condition (可以防止条件判断例如name!=null)决定后面该条件是否添加 true:添加 false:不添加
分页
InnerInterceptor插件
我们提供的插件都将基于此接口来实现功能
目前已有的功能:
- 自动分页: PaginationInnerInterceptor
- 多租户: TenantLineInnerInterceptor
- 动态表名: DynamicTableNameInnerInterceptor
- 乐观锁: OptimisticLockerInnerInterceptor
- sql性能规范: IllegalSQLInnerInterceptor
- 防止全表更新与删除: BlockAttackInnerInterceptor
前提: 配置分页插件,实现物理分页. 默认是内存分页
spring-boot
|
SpringBoot中创建配置上述配置类 @Configuration @Bean
将MybatisPlusInterceptor组件交给SpringBoot容器
再在使用的时候创建IPage接口对象
IPage<Person> page = new Page<>();//也可使用有参构造 |
设置完参数过后 使用mapper对象的selectPage方法 返回一个Ipage对象
IPage<Person> personIPage = peopleMapper.selectPage(page, qw); |
通过该对象 可以获得分页相关的信息(包括查询的记录)
QueryWrapper<Person> qw = new QueryWrapper<>(); |
会根据指定的数据库选择分页操作(mysql是limit)
SELECT pid,people_name FROM people WHERE (pid >= ?) LIMIT ? |
mybatis-config.xml
<plugins> |
代码生成器
优点:
AutoGenerator 是 MyBatis-Plus 的代码生成器,通过 AutoGenerator 可以快速生成 Entity、Mapper、Mapper XML、Service、Controller 等各个模块的代码,极大的提升了开发效率。
特别说明:
自定义模板有哪些可用参数?Github (opens new window)AbstractTemplateEngine 类中方法 getObjectMap 返回 objectMap 的所有值都可用。
使用:
添加依赖
// 注意!!当前包未传递依赖 mp 包,需要自己引入 |
在工程包下建立一个实体类(启动类)如下 修改相应的信息即可
public class Generator { |
拓展
逻辑删除
简介: 通过在数据库中设定的逻辑删除字段 达到并未真正删除 而是逻辑删除的效果
说明:
只针对Mybatis-plus自动注入的sql语句起效(即 自定义的sql不能享受)
插入: 不做限制
查找: 会在where条件后面过滤掉已删除数据,且使用wrapper.entity生产的where条件会忽略此字段(如有特殊要求 需要查询历史所有字段 需要自定义sql语句)
更新: 会追加where条件防止更新到已删除的数据, 且使用wrapper.entity生产的where条件会忽略此字段
删除: 转变为更新(即将逻辑删除字段设置为逻辑删除属性)
例如:
- 删除(实际sql):
update user set deleted=1 where id = 1 and deleted = 0 - 查找(实际sql):
select id,name,deleted from user where deleted = 0
字段类型支持说明:
- 支持所有数据类型(推荐使用
Integer,Boolean,LocalDateTime) - 如果数据库字段使用
datetime,逻辑未删除值和已删除值支持配置为字符串null,另一个值支持配置为函数来获取值如now()
附录:
- 逻辑删除是为了方便数据恢复和保护数据本身价值等等的一种方案,但实际就是删除。
- 如果你需要频繁查出来看就不应使用逻辑删除,而是以一个状态去表示。
使用(pringBoot):
- 配置 application.yml文件
global-config:
db-config:
# logic-delete-field: flag # 全局逻辑删除的实体字段名(since 3.3.0,配置后可以忽略不配置步骤2)
logic-delete-value: 1 # 逻辑已删除值(默认为 1)
logic-not-delete-value: 0 # 逻辑未删除值(默认为 0)
- 在实体类的逻辑删除字段上添加@TableLogic注解(加上此字段可以不用配置logic-delete-field)
* 给逻辑删除字段加上@TableLogic注解 使其生效
*/
private Integer deleted;
- 配置完成后 正常调用mybatis-plus自动注入的sql语句即可
注意: 数据库中的逻辑删除字段不要设置为 delete 敏感字段会报错
通用枚举
简介: 使用mybatis-plus 通用枚举功能 可以在存储是存储value 查询自动显示为desc
使用:
- 方式一: 使用@EnumValue注解枚举属性
PRIMARY(1, "小学"), SECONDORY(2, "中学"), HIGH(3, "高中");
GradeEnum(int code, String descp) {
this.code = code;
this.descp = descp;
}
//标记数据库存的值是code
private final int code;
private final String descp;
public String toString(){
return this.descp;
}
}
- 方式二: 枚举属性,实现IEnum接口
ONE(1, "一岁"),
TWO(2, "二岁"),
THREE(3, "三岁");
private int value;
private String desc;
public Integer getValue() {
return this.value;
}
//一定重写toString
public String toString(){
return this.desc;
}
}
配置扫描通用枚举(SpringBoot):
# 支持统配符 * 或者 ; 分割 通用枚举所在包
typeEnumsPackage: com.baomidou.springboot.entity.enums
....或是使用配置类配置
public class MybatisPlusAutoConfiguration {
public MybatisPlusPropertiesCustomizer mybatisPlusPropertiesCustomizer() {
return properties -> {
GlobalConfig globalConfig = properties.getGlobalConfig();
globalConfig.setBanner(false);
MybatisConfiguration configuration = new MybatisConfiguration();
configuration.setDefaultEnumTypeHandler(MybatisEnumTypeHandler.class);
properties.setConfiguration(configuration);
};
}
}
自动填充功能
原理:
- 实现元对象处理器接口:com.baomidou.mybatisplus.core.handlers.MetaObjectHandler
- 注解填充字段
@TableField(.. fill = FieldFill.INSERT)生成器策略部分也可以配置!
自定义实现类 MyMetaObjectHandler
public class MyMetaObjectHandler implements MetaObjectHandler {
/**
* 在这里配置insert时填充的字段
* @param metaObject
*/
public void insertFill(MetaObject metaObject) {
setFieldValByName("sex", UserSexEnum.MAN,metaObject);
}
/**
* 这里配置update时填充的字段
* @param metaObject
*/
public void updateFill(MetaObject metaObject) {
}
}- 配置好了之后 只要指定字段再插入/更新时 为null 就能自动填充
注意:
- 填充原理是直接给
entity的属性设置值!!!- 注解则是指定该属性在对应情况下必有值,如果无值则入库会是
nullMetaObjectHandler提供的默认方法的策略均为:如果属性有值则不覆盖,如果填充值为null则不填充- 字段必须声明
TableField注解,属性fill选择对应策略,该声明告知Mybatis-Plus需要预留注入SQL字段- 填充处理器
MyMetaObjectHandler在 Spring Boot 中需要声明@Component或@Bean注入- 要想根据注解
FieldFill.xxx和字段名以及字段类型来区分必须使用父类的strictInsertFill或者strictUpdateFill方法- 不需要根据任何来区分可以使用父类的
fillStrategy方法- update(T t,Wrapper updateWrapper)时t不能为空,否则自动填充失效