Spring Cloud-Hystrix
Spring Cloud-Hystrix
前言
分布式系统面临的问题
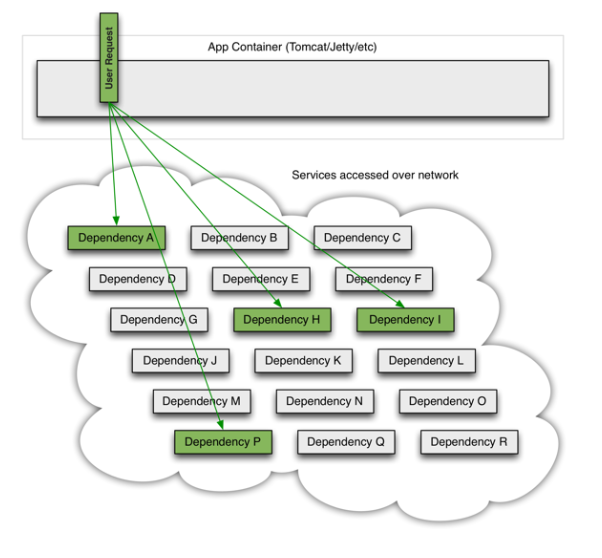
复杂分布式体系结构中的应用有数十个依赖关系,每个依赖关系在某些时候将不可避免地失败。
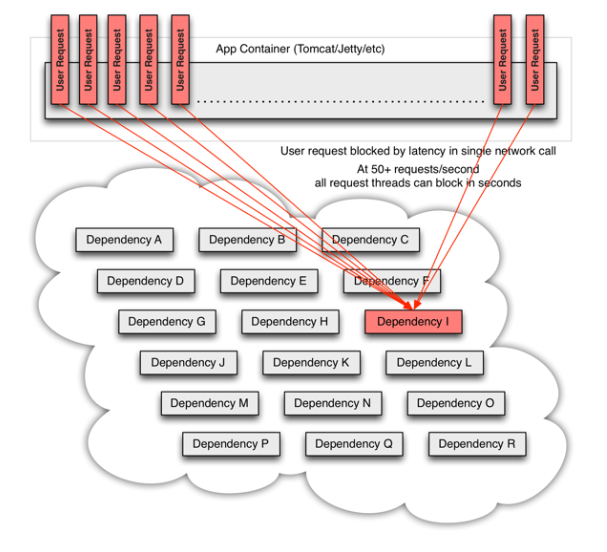
服务雪崩
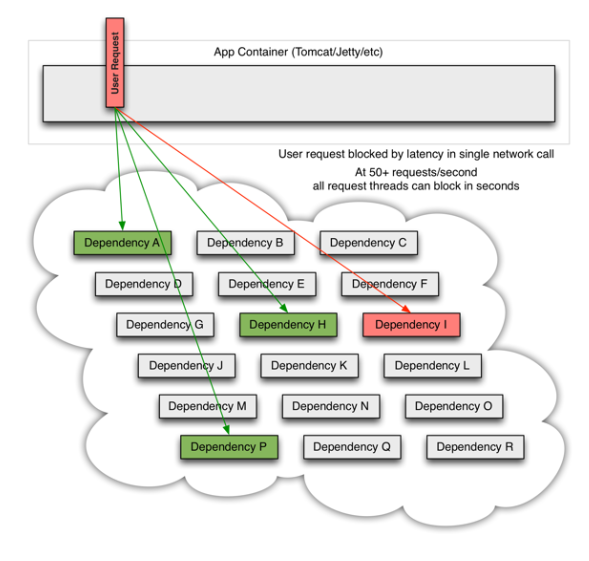
多个微服务之间调用的时候,假设微服务A调用微服务B和C,微服务B和微服务C又调用其他的微服务,这就是所谓的“扇出”。如果扇出的链路上某个微服务的调用响应时间过长或者不可用,对微服务A的调用就会占用越来越多的系统资源,进而引起系统崩溃,所谓的“雪崩效应”。
对于高流量的应用来说,单一的后端依赖可能会导致所有服务器上的所有资源都在几秒钟内饱和。比失败更糟糕的时,这些应用程序还可能导致服务之间的延迟增加,备份队列,线程和其他系统资源紧张,导致整个系统发生更多的级联故障。这些都表示需要对故障和延迟进行隔离和管理,以便单个依赖关系的失败,不能取消整个应用或系统。
所以,
通常当你发现一个模块下的某个实例失败后,这时候这个模块依然还会接收流量,然后这个有问题得模块还调用了其他得模块,这样就会发生级联故障,或者叫雪崩。
简介
Hystrix是一个用于处理分布式系统的延迟和容错的开源库,在分布式系统里,许多依赖不可避免的会调用失败,比如超时、异常等,Hystrix能够保障在一个依赖出现问题下,不会导致整体服务失败,避免级联故障,以提高分布式提供的弹性。
“断路器”本身是一种开关装置,当某个服务单元发生故障后,通过断路器的故障监控(类似熔断保险丝),向调用发那个返回一个符合预期的,可处理的备选响应(FallBack),而不是长时间的等待或者抛出调用方无法处理的异常,这样就保证了服务调用方的线程不会被长时间、不必要地占用,从而避免了故障在分布式系统中的蔓延,乃至雪崩。
Github官网:Netflix/Hystrix
目前Hystrix已经停止维护了,但其的思想是非常超前的,非常值得学习的,后续Spring Cloud大力推广的作为服务熔断的组件也都有借鉴Hystrix的思想。
服务熔断
熔断这一概念来源于电子工程中的断路器(Circuit Breaker)。
在互联网系统中,当下游服务因访问压力过大而响应变慢或失败,上游服务为了保护系统整体的可用性,可以暂时切断对下游服务的调用。
这种牺牲局部,保全整体的措施就叫做熔断。
就是保险丝。服务的降级->进而熔断->恢复调用链路
服务降级
服务器忙,请稍后再试,不让客户端等待并立刻返回一个友好提示,fallback
服务降级在业务中就是指正常流程跑不通,先记录下来,然后再用程序去根据这些数据做补救
那些情况会触发降级?
程序运行异常、超时、服务熔断触发服务降级、线程池/信号量打满也会导致服务降级。
服务限流
秒杀高并发等操作,严禁一窝蜂的过来拥挤,大家排队,一秒钟N个,有序进行。
案例
新建父工程
创建工程
Cloud-06-Hystrix添加依赖
<project xmlns="http://maven.apache.org/POM/4.0.0"
xmlns:xsi="http://www.w3.org/2001/XMLSchema-instance"
xsi:schemaLocation="http://maven.apache.org/POM/4.0.0 http://maven.apache.org/xsd/maven-4.0.0.xsd">
<modelVersion>4.0.0</modelVersion>
<groupId>org.example</groupId>
<artifactId>Cloud-06-Hystrix</artifactId>
<version>1.0-SNAPSHOT</version>
<properties>
<maven.compiler.source>8</maven.compiler.source>
<maven.compiler.target>8</maven.compiler.target>
<project.build.sourceEncoding>UTF-8</project.build.sourceEncoding>
<junit.version>4.12</junit.version>
<lombok.version>1.18.10</lombok.version>
<log4j.version>1.2.17</log4j.version>
<mysql.version>8.0.28</mysql.version>
<druid.version>1.2.11</druid.version>
<mybatis.spring.boot.version>2.1.1</mybatis.spring.boot.version>
<mybatis-plus>3.5.2</mybatis-plus>
</properties>
<!--子模块继承之后,提供作用:锁定版本+子module不用谢groupId和version-->
<dependencyManagement>
<dependencies>
<dependency>
<groupId>org.apache.maven.plugins</groupId>
<artifactId>maven-project-info-reports-plugin</artifactId>
<version>3.2.2</version>
</dependency>
<!--spring boot 2.2.2-->
<dependency>
<groupId>org.springframework.boot</groupId>
<artifactId>spring-boot-dependencies</artifactId>
<version>2.3.12.RELEASE</version>
<type>pom</type>
<scope>import</scope>
</dependency>
<!--spring cloud Hoxton.SR1-->
<dependency>
<groupId>org.springframework.cloud</groupId>
<artifactId>spring-cloud-dependencies</artifactId>
<version>Hoxton.SR1</version>
<type>pom</type>
<scope>import</scope>
</dependency>
<!--spring cloud 阿里巴巴-->
<dependency>
<groupId>com.alibaba.cloud</groupId>
<artifactId>spring-cloud-alibaba-dependencies</artifactId>
<version>2.1.0.RELEASE</version>
<type>pom</type>
<scope>import</scope>
</dependency>
<!--mysql-->
<dependency>
<groupId>mysql</groupId>
<artifactId>mysql-connector-java</artifactId>
<version>${mysql.version}</version>
<scope>runtime</scope>
</dependency>
<!-- druid-->
<dependency>
<groupId>com.alibaba</groupId>
<artifactId>druid-spring-boot-starter</artifactId>
<version>${druid.version}</version>
</dependency>
<!--mybatis-->
<dependency>
<groupId>org.mybatis.spring.boot</groupId>
<artifactId>mybatis-spring-boot-starter</artifactId>
<version>${mybatis.spring.boot.version}</version>
</dependency>
<dependency>
<groupId>com.baomidou</groupId>
<artifactId>mybatis-plus-boot-starter</artifactId>
<version>${mybatis-plus}</version>
</dependency>
<!--junit-->
<dependency>
<groupId>org.springframework.boot</groupId>
<artifactId>spring-boot-starter-test</artifactId>
<version>2.6.8</version>
</dependency>
<!--log4j-->
<dependency>
<groupId>log4j</groupId>
<artifactId>log4j</artifactId>
<version>${log4j.version}</version>
</dependency>
</dependencies>
</dependencyManagement>
<build>
<finalName>SpringCloud-Hello-01</finalName>
<plugins>
<plugin>
<groupId>org.springframework.boot</groupId>
<artifactId>spring-boot-maven-plugin</artifactId>
<configuration>
<fork>true</fork>
<addResources>true</addResources>
</configuration>
</plugin>
</plugins>
</build>
</project>
创建子工程–服务生产者
创建工程
Cloud-provider-hystrix-payment8001添加依赖
<project xmlns="http://maven.apache.org/POM/4.0.0"
xmlns:xsi="http://www.w3.org/2001/XMLSchema-instance"
xsi:schemaLocation="http://maven.apache.org/POM/4.0.0 http://maven.apache.org/xsd/maven-4.0.0.xsd">
<parent>
<artifactId>Cloud-06-Hystrix</artifactId>
<groupId>org.example</groupId>
<version>1.0-SNAPSHOT</version>
</parent>
<modelVersion>4.0.0</modelVersion>
<artifactId>Cloud-provider-hystrix-payment8001</artifactId>
<properties>
<maven.compiler.source>8</maven.compiler.source>
<maven.compiler.target>8</maven.compiler.target>
<project.build.sourceEncoding>UTF-8</project.build.sourceEncoding>
</properties>
<dependencies>
<dependency>
<groupId>org.springframework.cloud</groupId>
<artifactId>spring-cloud-starter-netflix-hystrix</artifactId>
</dependency>
<dependency>
<groupId>org.springframework.cloud</groupId>
<artifactId>spring-cloud-starter-netflix-eureka-client</artifactId>
</dependency>
<dependency>
<groupId>org.springframework.boot</groupId>
<artifactId>spring-boot-starter-web</artifactId>
</dependency>
<dependency>
<groupId>org.springframework.boot</groupId>
<artifactId>spring-boot-starter-actuator</artifactId>
</dependency>
<dependency>
<groupId>com.dyw</groupId>
<artifactId>Cloud-api-commons</artifactId>
<version>1.0-SNAPSHOT</version>
</dependency>
<dependency>
<groupId>org.springframework.boot</groupId>
<artifactId>spring-boot-devtools</artifactId>
</dependency>
<dependency>
<groupId>org.springframework.boot</groupId>
<artifactId>spring-boot-starter-test</artifactId>
</dependency>
</dependencies>
</project>主启动类
public class HystrixPaymentMain8001 {
public static void main(String[] args) {
SpringApplication.run(HystrixPaymentMain8001.class,args);
}
}service接口
public class PaymentService {
/**
* 调用正常的方法
* @param id
* @return
*/
public String paymentInfo_OK(Integer id){
return "线程池: "+Thread.currentThread().getName()+"paymentInfo_OK,id: "+id+"\t"+"O(∩_∩)O哈哈~";
}
/**
* 调用延时的方法 用于后续根据延迟而发生服务熔断等
* @param id
* @return
*/
public String paymentInfo_Timeout(Integer id){
int timeNumber = 3;
try {
TimeUnit.SECONDS.sleep(timeNumber);
} catch (InterruptedException e) {
throw new RuntimeException(e);
}
return "线程池: "+Thread.currentThread().getName()+" paymentInfo_Timeout,id: "+id+"\t"+"O(∩_∩)O哈哈~"+"耗时:(秒) "+timeNumber;
}
}Controller控制器类
public class PaymentController {
PaymentService paymentService;
private String serverPort;
public String paymentInfo_OK( Integer id){
String result = paymentService.paymentInfo_OK(id);
log.info("****result: {}",result);
return result;
}
public String paymentInfo_Timeout( Integer id){
String result = paymentService.paymentInfo_Timeout(id);
log.info("****result: {}",result);
return result;
}
}启动测试
http://localhost:8001/payment/hystrix/timeout/1线程池: http-nio-8001-exec-2 paymentInfo_Timeout,id: 1 O(∩_∩)O哈哈~耗时:(秒) 3
http://localhost:8001/payment/hystrix/ok/1线程池: http-nio-8001-exec-3paymentInfo_OK,id: 1 O(∩_∩)O哈哈~
以上述为根基平台,从正确->错误->降级熔断->恢复
JMeter高并发测压
上述代码中我们有一个接口会在3秒中之后才会访问,我们并发量较小的时候访问,服务器是可以正常响应得,但是在分布式微服务的场景中会有大量得请求访问,此时会有大量得请求都会聚集在该接口等待3秒,请求量大又有大量得请求正在执行,就容易导致服务崩溃扛不住压力,所以这里我们用JMeter来测压演示一下。
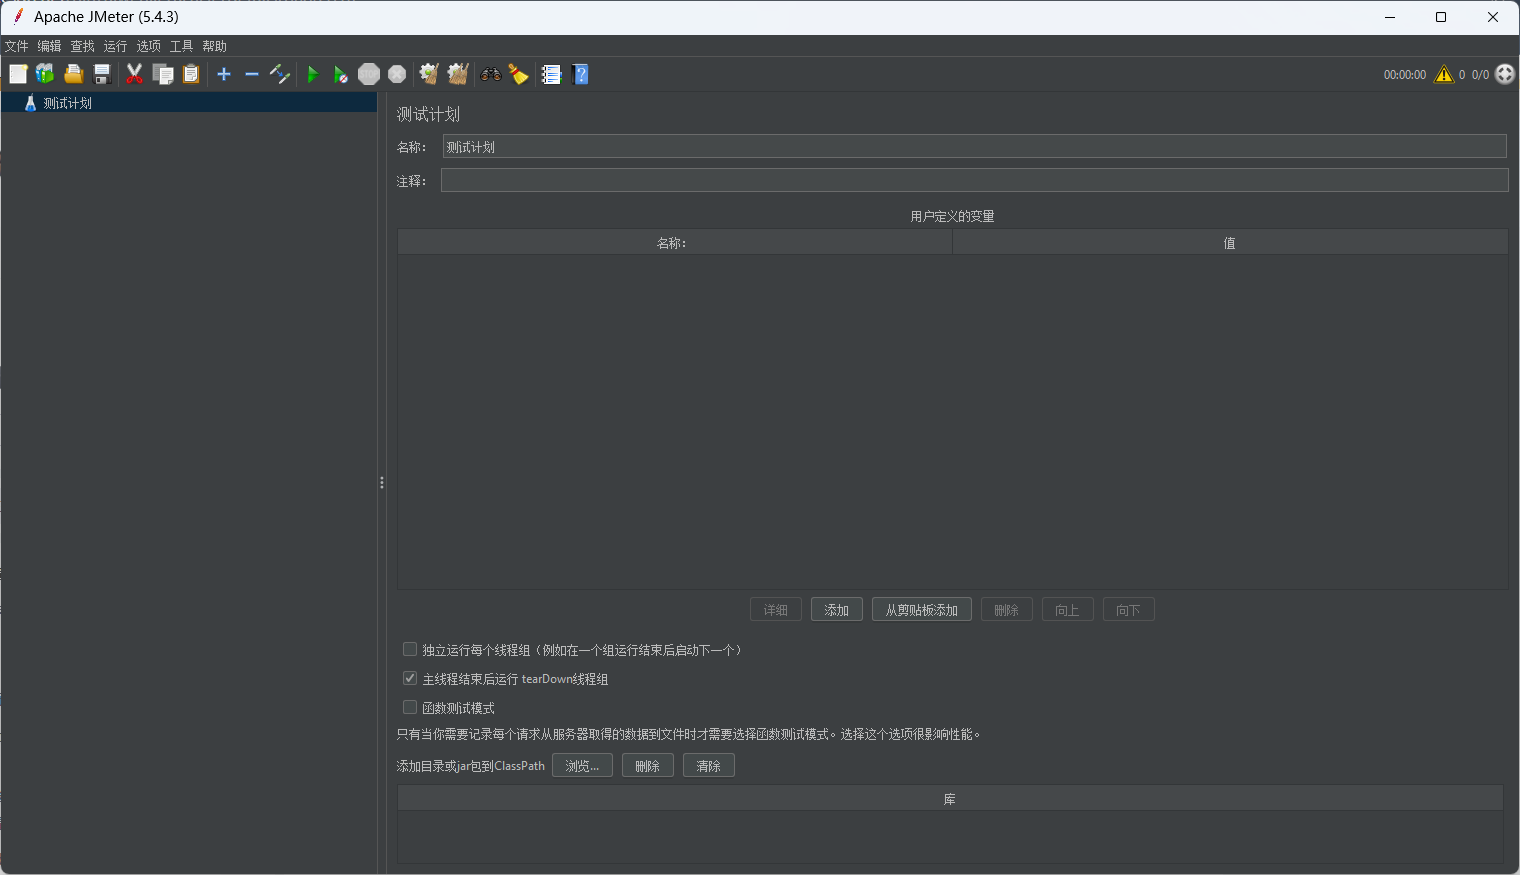
创建线程组
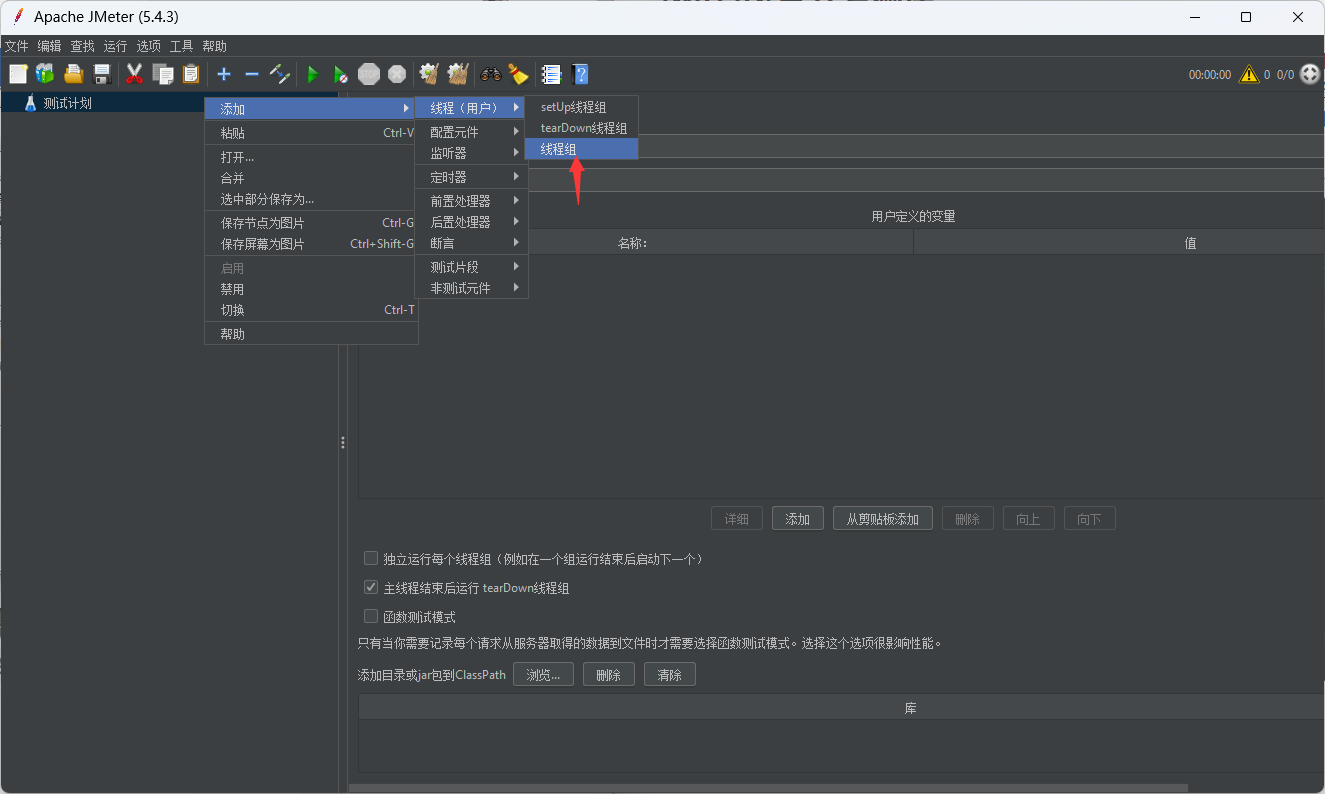
配置线程组得参数
创建Http请求取样器

设置请求参数
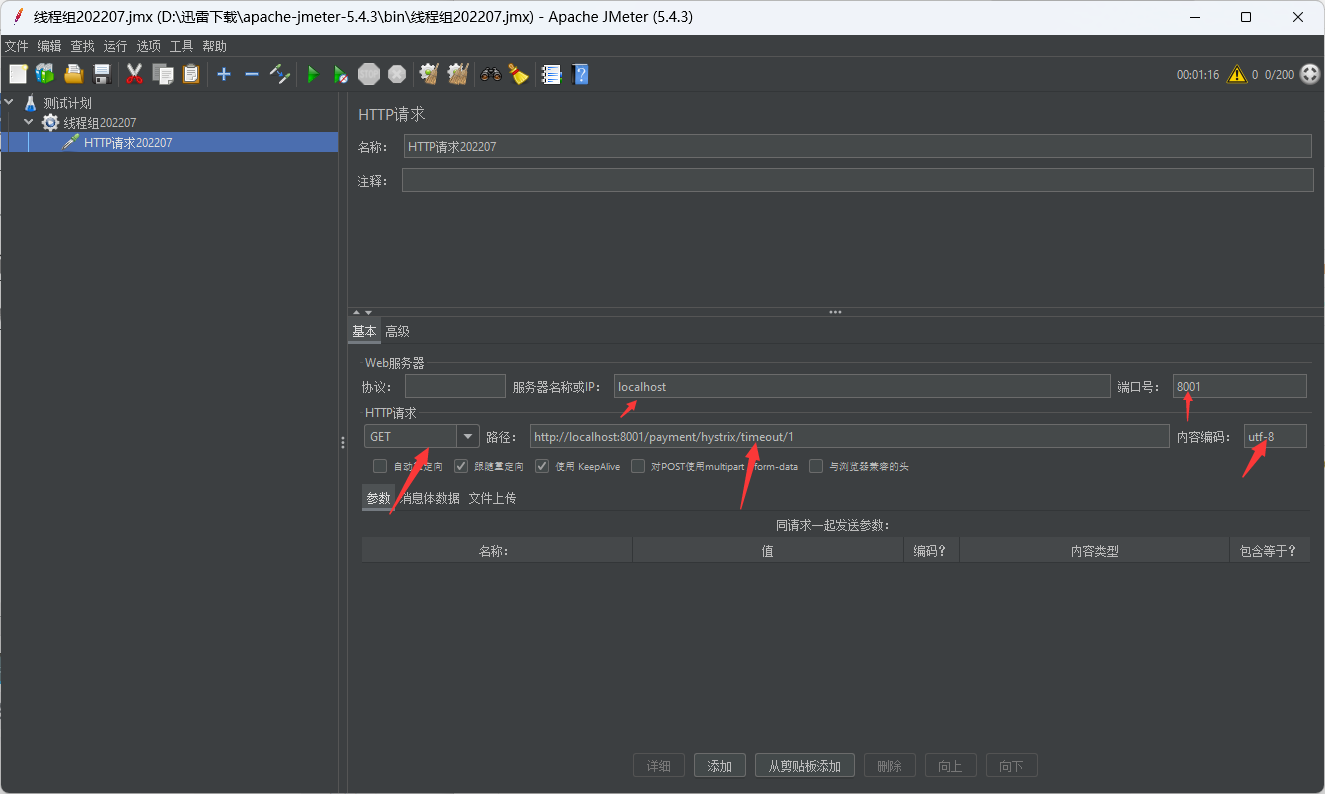
启动
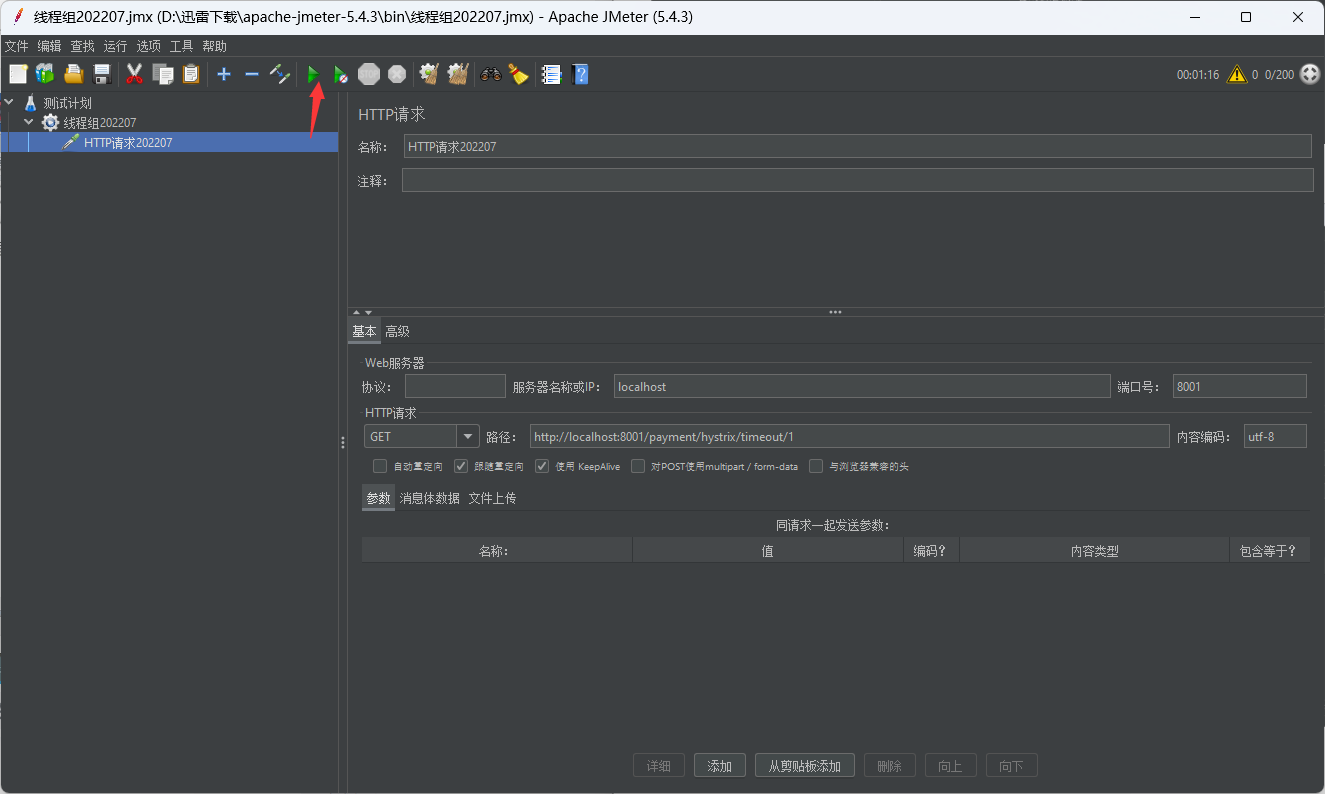
此时我们再去访问另一个接口http://localhost:8001/payment/hystrix/ok/1,会发现访问这个接口响应会有明显得延迟。
这是因为tomcat得默认工作线程数被打满了,没有多余得线程来分解压力和处理。
Tomcat默认线程池有十个线程。
结论
上面那个服务提供者8001自己测试,加入此时外部得消费者80也来访问,那消费者只能干等,最终导致消费端80不满意,服务端8001直接被拖死,
创建子工程–服务消费者
将消费者加入正在进行压测的服务调用。
新建工程
Cloud-consumer-feign-hystrix-order80添加依赖
<project xmlns="http://maven.apache.org/POM/4.0.0"
xmlns:xsi="http://www.w3.org/2001/XMLSchema-instance"
xsi:schemaLocation="http://maven.apache.org/POM/4.0.0 http://maven.apache.org/xsd/maven-4.0.0.xsd">
<parent>
<artifactId>Cloud-06-Hystrix</artifactId>
<groupId>org.example</groupId>
<version>1.0-SNAPSHOT</version>
</parent>
<modelVersion>4.0.0</modelVersion>
<artifactId>Cloud-consumer-feign-hystrix-order80</artifactId>
<properties>
<maven.compiler.source>8</maven.compiler.source>
<maven.compiler.target>8</maven.compiler.target>
<project.build.sourceEncoding>UTF-8</project.build.sourceEncoding>
</properties>
<dependencies>
<dependency>
<groupId>org.springframework.cloud</groupId>
<artifactId>spring-cloud-starter-openfeign</artifactId>
</dependency>
<dependency>
<groupId>org.springframework.cloud</groupId>
<artifactId>spring-cloud-starter-netflix-eureka-client</artifactId>
</dependency>
<dependency>
<groupId>org.springframework.boot</groupId>
<artifactId>spring-boot-starter-test</artifactId>
</dependency>
<dependency>
<groupId>org.springframework.boot</groupId>
<artifactId>spring-boot-devtools</artifactId>
</dependency>
<dependency>
<groupId>org.springframework.boot</groupId>
<artifactId>spring-boot-starter-web</artifactId>
</dependency>
<dependency>
<groupId>org.springframework.boot</groupId>
<artifactId>spring-boot-starter-actuator</artifactId>
</dependency>
<dependency>
<groupId>com.dyw</groupId>
<artifactId>Cloud-api-commons</artifactId>
<version>1.0-SNAPSHOT</version>
</dependency>
<dependency>
<groupId>org.springframework.cloud</groupId>
<artifactId>spring-cloud-starter-netflix-hystrix</artifactId>
</dependency>
<dependency>
<groupId>org.projectlombok</groupId>
<artifactId>lombok</artifactId>
</dependency>
</dependencies>
</project>application.yml配置server:
port: 81
spring:
application:
name: cloud-order-service
eureka:
client:
# Eureka服务注册中心会将自己作为客户端来尝试注册它自己
register-with-eureka: false
# 我们要访问注册中心的服务所以这里必须为true 获取注册中心的服务列表信息
fetch-registry: true
service-url:
#设置与Eureka Server交互的地址查询服务和注册服务都需要依赖这个地址
defaultZone: http://eureka7001.com:7001/eureka/
feign:
client:
config:
default:
connectTimeout: 5000 #连接超时的最大时限
readTimeout: 5000 #访问服务的最大时限 访问服务超过这个时间就会报错主启动类
public class OrderHystrixMain80 {
public static void main(String[] args) {
SpringApplication.run(OrderHystrixMain80.class,args);
}
}Feign接口
public interface PaymentHystrixService {
public String paymentInfo_OK( Integer id);
public String paymentInfo_Timeout( Integer id);
}Controller类
public class OderHystrixController {
private PaymentHystrixService paymentHystrixService;
public String paymentInfo_OK( Integer id){
return paymentHystrixService.paymentInfo_OK(id);
}
public String paymentInfo_Timeout( Integer id){
return paymentHystrixService.paymentInfo_Timeout(id);
}
}启动测试+服务生产者端得压力测试
服务消费者端调用服务会有明显的延迟,甚至可能出现超时的报错,这在分布式微服务的生产环境中是不允许出现的。
解决
解决的要求
超时导致服务器变慢–>超时不再等待
出错(宕机或程序运行出错)–>出错要有兜底
解决
对方服务(8001)超时了,调用者(80)不能一直卡死等待,必须有服务降级
对方服务(8001)down机了,调用者(80)不能一直卡死等待,必须有服务降级
对方服务(8001)OK,调用者自己出故障或有自我要求(自己的等待时间小于服务提供者,自己处理降级)
服务降级
在服务的接口上新增注解@HystrixCommand
fallbackMethod:指定处理回退逻辑的方法。即如果方法出现超时或是报错就会调用的方法。
commandProperties:指定命令属性。在这里配置发生上面情况才会调用fallbackMethod中的方法处理
@HystrixProperty:用于配置commandProperties中的属性。降级处理超时时间设置execution.isolation.thread.timeoutInMilliseconds,value = 3000表示超过三秒就会进行降级处理(默认1秒)。
@HystrixProperty全部配置
/* defaults */ |
生产者降级保护
为了防止大量请求调用生产者端发生超时或者报错导致服务宕机,从而进行服务端的降级保护
对服务生产者Service接口进行改造Cloud-provider-hystrix-payment8001
|
主启动类添加注解@EnableCircuitBreaker激活Hystrix
|
重新启动服务 演示超时降级
服务消费者调用访问接口http://localhost:80/consumer/payment/hystrix/timeout/1
线程池: hystrix-PaymentService-6 运行报错请稍后再试,id: 1 ┭┮﹏┭┮耗时:(秒) |
将服务接口的延时注释掉,添加 int age = 10/0; 使其调用时会抛出异常导致报错
|
重新启动服务 演示报错降级
服务消费者调用访问接口http://localhost:80/consumer/payment/hystrix/timeout/1
线程池: hystrix-PaymentService-1 运行报错请稍后再试,id: 1 ┭┮﹏┭┮耗时:(秒) |
降级成功
消费者降级保护
服务消费者(对于用户而言仍然是消费者),为了可以更好的保护自己,也可以依样画葫芦的对客户端降级保护。(一般将Hystrix防在客户端)
application.yml配置openfeign对hystrix的支持。feign:
hystrix:
enabled: true主启动类添加注解
@EnableHystrix激活Hystrix特性
//激活Hystrix
public class OrderHystrixMain80 {
public static void main(String[] args) {
SpringApplication.run(OrderHystrixMain80.class,args);
}
}Controller类中配置Hystrix接口
public class OderHystrixController {
private PaymentHystrixService paymentHystrixService;
......
public String paymentInfo_Timeout( Integer id){
return paymentHystrixService.paymentInfo_Timeout(id);
}
public String paymentTimeoutFallbackMethod( Integer id){
return "线程池: "+Thread.currentThread().getName()+" 我是消费者80对方支付系统繁忙请10秒后再试或者自己运行出错检查自己,┭┮﹏┭┮"+"耗时:(秒) ";
}
}启动调用测试接口
线程池: hystrix-OderHystrixController-1 我是消费者80对方支付系统繁忙请10秒后再试或者自己运行出错检查自己,┭┮﹏┭┮耗时:(秒)
测试成功
全局服务降级配置
为了防止为每一个服务都配置一个单独的降级方法导致的代码量上升,于是有了全局服务降级配置。
@DefaultProperties(defaultFallback = "")
**1:1**: 每个方法配置一个服务降级方法,技术可以,实际上傻X
**1:N**:除了个别重要核心业务有专属方法,其他平台的可以通过@DefaultProperties(defaultFallback="")统一跳转到统一处理结果页面。
通用的和独享的各自分开,避免了代码膨胀,合理减少了代码量。
//全局fallback |
配置全局fallback
//配置全局fallback |
注释接口上原有的fallback配置,使其受到全局fallback影响
// @HystrixCommand(fallbackMethod = "paymentTimeoutFallbackMethod",commandProperties = { |
启动服务测试接口http://localhost:80/consumer/payment/hystrix/timeout/1
Global异常处理信息, 请稍后再试, ┭┮﹏┭┮ |
测试成功
解耦
无论是为每一个服务都配置一个单独的服务降级方法,还是创建一个全局服务降级方法,都会导致大量代码耦合到Controller。
本次案例服务降级处理是在客户端80实现完成的,与服务端8001没有关系
只需要为Feign客户端定义的接口添加一个服务降级处理的实现类即可实现解耦
新建类实现Feign接口
//实现了Feign接口 实现其的方法就相当于为每个接口内服务提供了fallback方法 |
再将该类配置到Feign接口中
@FeignClient(value = "CLOUD-PROVIDER-HYSTRIX-PAYMENT", fallback = PaymentFallbackService.class)
@FeignClient注解中的fallback参数是用来配置服务降级处理的实现类的
这样CLOUD-PROVIDER-HYSTRIX-PAYMENT服务下的Feign接口方法就会被处理降级的实现类来管理了。
|
启动测试 注意:这里我们访问的接口是http://localhost:80/consumer/payment/hystrix/ok/1,该接口并没有带上@HystrixCommand所以并不会收到原本我们Controller中配置的全局降级处理。
----------------PaymentHystrixService fall back-PaymentInfo_OK,┭┮﹏┭┮ |
测试成功。
全局降级处理 > Feign接口的配置处理降级实现类
服务熔断
熔断机制概述
熔断机制是应对雪崩效应的一种微服务链路保护机制。当扇出链路的某个微服务出错不可用或者响应时间太长时,会进行服务的降级,进而熔断该节点微服务的调用,快速返回错误的响应信息。
当检测到节点微服务调用响应正常后,恢复调用链路。
在Spring Cloud框架里,熔断机制通过Hystrix实现。Hystrix会监控微服务间调用的状态,当失败的调用到一定阈值,缺省是5秒内20次调用失败,就会启动熔断机制。熔断机制的注解是@HystrixCommand。

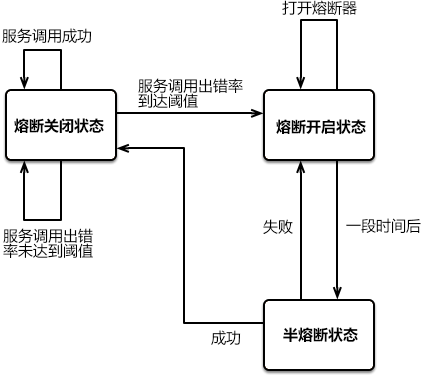
This simple circuit breaker avoids making the protected call when the circuit is open, but would need an external intervention to reset it when things are well again. This is a reasonable approach with electrical circuit breakers in buildings, but for software circuit breakers we can have the breaker itself detect if the underlying calls are working again. We can implement this self-resetting behavior by trying the protected call again after a suitable interval, and resetting the breaker should it succeed.
翻译:
这个简单的断路器避免了在电路打开时进行受保护的调用,但是当一切恢复正常时需要外部干预来重置它。对于建筑物中的电气断路器,这是一种合理的方法,但对于软件断路器,我们可以让断路器本身检测底层调用是否再次工作。我们可以通过在适当的时间间隔后再次尝试受保护的调用来实现这种自重置行为,并在成功时重置断路器。
服务熔断三种状态:关,半开,全开
实操
修改Cloud-provider-hystrix-payment8001
PaymentService 新增方法配置服务熔断相关项
|
Controller类新增接口
//====服务熔断 |
启动服务访问
我们先疯狂使用负数去访问使得的服务调用报错,服务调用失败,只要我们在十次请求之中服务失败率超过了我们设置的60%,断路器就会打开。
http://localhost:8001/payment/circuit/-1
id 不能为负数,请稍后再试 ┭┮﹏┭┮ id: -1 |
在外面疯狂访问下服务调用失败率已经远远大于60%
此时我们使用正常数据去访问接口,检测是否断路器打开。
http://localhost:8001/payment/circuit/1
id 不能为负数,请稍后再试 ┭┮﹏┭┮ id: 1 |
可以发现我们使用了正常的数据去访问服务,服务依旧是调用了服务降级的处理方法返回了一个服务报错才会返回的字符串,说明此时服务已经熔断。在服务窗口期过后短路器由全开转到半开,此时会释放一次请求访问,如果请求成功,断路器就会有半开转到关闭(恢复调用链路),否则断路器继续打开,重新计时。
原理
熔断打开
请求不再进行调用当前服务,内部设置时钟一般为MTR(平均故障处理时间),当打开时长达到所设时钟则进入半熔断状态
熔断关闭
熔断关闭不会对服务进行熔断
熔断半开
部分请求根据规则调用当前服务,如果请求成功且符合规则则认为当前服务恢复正常,关闭熔断(恢复调用链路)。
断路器在什么情况下起作用
,//请求次数 10次
,//时间窗口期单位毫秒(ms) 此属性设置在电路跳闸后拒绝请求的时间量,然后再允许尝试确定电路是否应再次闭合。
//失败率达到多少 发生断路
上述配置涉及到断路器的三个重要参数:快照时间窗、请求总数阈值、错误百分比阈值。
- 快照时间窗:此属性设置在电路跳闸后拒绝请求的时间量,超过该事件进入电路半跳闸状态,然后再允许尝试确定电路是否应再次闭合。
- 请求总数阈值:在快照时间窗内,必须满足请求总数阈值才有资格熔断。默认20,意味着在10秒内,如果该
Hystrix命令的调用次数不足20次,即使所有的请求都超时或其他原因失败,断路器都不会打开。 - 错误百分比阈值:当请求总数在快照时间窗内超过了阈值,比如发生了30次调用,如果在这30次调用中,有15次发生了超时异常,也就是超过50%错误百分比,在默认设定50%阈值情况下,这时候就会将断路器打开。
断路器开启或关闭的条件
开启条件
- 当满足一定的阈值的时候(默认10秒内超过20个请求次数)
- 当失败率达到一定的时候(默认10秒内超过50%的请求次数)
当开启的时候,所有请求都不会进行转发
关闭条件
- 一段时间之后(默认是5秒),这个时候断路器是半开状态,会让其中一个请求进行转发。如果成功,断路器会关闭,若失败,继续开启。开启状态参考上述,后过一段时间又会进入半开状态。
断路器打开之后
再有请求调用的时候,将不会调用主逻辑,而是直接调用降级fallback。通过断路器,实现了自动地发现错误并将降级逻辑切换为主逻辑,减少响应延迟的效果。
原来的主逻辑要如何恢复呢?
对于这一问题,hystrix也为我们实现了自动恢复功能。
当断路器打开,对主逻辑进行熔断之后,
hystrix会启动一个休眠时间窗,在这个时间窗内,降级逻辑是临时的成为主逻辑,当休眠时间窗到期,断路器将进入半开状态,释放一次请求到原来的主逻辑上,如果此次请求正常返回,那么断路器将继续闭合,主逻辑恢复如果这次请求依然有问题,断路器继续进入打开状态,休眠时间窗重新计时。
配置
以下配置在HystrixCommandProperties中都有对应。
Command Properties(指令参数)
以下属性控制HystrixCommand行为:
Execution(执行)
隔离策略
- execution.isolation.strategy
隔离策略决定Hystrix命令执行的时候采用什么类型的策略进行依赖隔离。
| 项 | 值 |
|---|---|
| 默认值 | THREAD (见ExecutionIsolationStrategy.THREAD) |
| 可选值 | THREAD,SEMAPHORE |
| 默认全局配置 | hystrix.command.default.execution.isolation.strategy |
| 实例配置 | hystrix.command.[HystrixCommandKey].execution.isolation.strategy |
执行隔离策略到底选择线程池(THREAD)还是信号量(SEMAPHORE)?文档中给出的建议是:
使用
HystrixCommand的时候建议用THREAD策略,使用HystrixObservableCommand的时候建议使用SEMAPHORE策略。
使用
THREAD策略让HystrixCommand在线程中执行可以提供额外的保护层,以防止因为网络超时导致的延时失败。
一般情况下,只有这种特殊例子下
HystrixCommand会搭配SEMAPHORE策略使用:调用的频次太高(例如每个实例每秒数百次调用),这种情况如果选用THREAD策略有可能导致超过线程隔离的上限(有可能需要太多的线程或者命令太多线程不足够用于隔离请求),这种情况一般是非网络请求调用。
笔者想说的是:建议选用默认值,因为目前很少遇到使用信号量隔离的场景。
是否允许超时
- execution.timeout.enabled
决定HystrixCommand#run()执行时是否允许超时,只有设置为true的时候,下面提到的“超时时间上限”才会有效。
| 项 | 值 |
|---|---|
| 默认值 | true |
| 可选值 | true,false |
| 默认全局配置 | hystrix.command.default.execution.timeout.enabled |
| 实例配置 | hystrix.command.[HystrixCommandKey].execution.timeout.enabled |
| 建议(笔者备注) | 保持选用默认值 |
超时时间上限
- execution.isolation.thread.timeoutInMilliseconds
HystrixCommand执行时候超时的最大上限,单位是毫秒,如果命令执行耗时超过此时间值那么会进入降级逻辑。这个配置生效的前提是hystrix.command.default.execution.timeout.enabled或者hystrix.command.[HystrixCommandKey].execution.timeout.enabled为true。
| 项 | 值 |
|---|---|
| 默认值 | 1000 |
| 可选值 | - |
| 默认全局配置 | hystrix.command.default.execution.isolation.thread.timeoutInMilliseconds |
| 实例配置 | hystrix.command.[HystrixCommandKey].execution.isolation.thread.timeoutInMilliseconds |
| 建议(笔者备注) | 保持选用默认值 |
超时是否中断
此配置项决定HystrixCommand#run()执行的时候调用超时的情况下是否中断。
| 项 | 值 |
|---|---|
| 默认值 | true |
| 可选值 | true、false |
| 默认全局配置 | hystrix.command.default.execution.isolation.thread.interruptOnTimeout |
| 实例配置 | hystrix.command.[HystrixCommandKey].execution.isolation.thread.interruptOnTimeout |
| 建议(笔者备注) | 保持选用默认值 |
取消是否中断
- execution.isolation.thread.interruptOnCancel
此配置项决定HystrixCommand#run()执行的时候取消调用的情况下是否中断。
| 项 | 值 |
|---|---|
| 默认值 | false |
| 可选值 | true、false |
| 默认全局配置 | hystrix.command.default.execution.isolation.thread.interruptOnCancel |
| 实例配置 | hystrix.command.[HystrixCommandKey].execution.isolation.thread.interruptOnCancel |
| 建议(笔者备注) | 保持选用默认值 |
最大并发请求上限(SEMAPHORE)
- execution.isolation.semaphore.maxConcurrentRequests
此配置项决定使用HystrixCommand#run()方法和ExecutionIsolationStrategy.SEMAPHORE隔离策略下并发请求数量的最高上限。
| 项 | 值 |
|---|---|
| 默认值 | 10 |
| 可选值 | - |
| 默认全局配置 | hystrix.command.default.execution.isolation.semaphore.maxConcurrentRequests |
| 实例配置 | hystrix.command.[HystrixCommandKey].execution.isolation.semaphore.maxConcurrentRequests |
| 建议(笔者备注) | 必须根据实际情况设定此值 |
命令降级(fallback)配置
命令降级配置控制HystrixCommand#getFallback()的执行逻辑,所有命令降级配置对策略ExecutionIsolationStrategy.THREAD或者ExecutionIsolationStrategy.SEMAPHORE都生效。
最大并发降级请求处理上限
- fallback.isolation.semaphore.maxConcurrentRequests
这个属性用于控制一个HystrixCommand#getFallback()实例方法在执行线程中调用的最大上限,如果超过此上限,降级逻辑不会执行并且会抛出一个异常。
| 项 | 值 |
|---|---|
| 默认值 | 10 |
| 可选值 | - |
| 默认全局配置 | hystrix.command.default.fallback.isolation.semaphore.maxConcurrentRequests |
| 实例配置 | hystrix.command.[HystrixCommandKey].fallback.isolation.semaphore.maxConcurrentRequests |
| 建议(笔者备注) | 必须根据实际情况设定此值 |
是否开启降级
- fallback.enabled
此属性控制当HystrixCommand执行失败之后是否调用HystrixCommand#getFallback()。
| 项 | 值 |
|---|---|
| 默认值 | true |
| 可选值 | false、true |
| 默认全局配置 | hystrix.command.default.fallback.enabled |
| 实例配置 | hystrix.command.[HystrixCommandKey].fallback.enabled |
| 建议(笔者备注) | 建议保持默认值 |
断路器(circuit breaker)配置
断路器配置用于控制HystrixCircuitBreaker实例的行为。
是否启用断路器
- circuitBreaker.enabled
此属性确定断路器是否用于跟踪健康状况,以及当断路器打开的时候是否用于短路请求(使请求快速失败进入降级逻辑)。
| 项 | 值 |
|---|---|
| 默认值 | true |
| 可选值 | false、true |
| 默认全局配置 | hystrix.command.default.circuitBreaker.enabled |
| 实例配置 | hystrix.command.[HystrixCommandKey].circuitBreaker.enabled |
| 建议(笔者备注) | 建议保持默认值 |
断路器请求量阈值
- circuitBreaker.requestVolumeThreshold
此属性设置将使断路器打开的滑动窗口中的最小请求数量。
例如,如果值是20,那么如果在滑动窗口中只接收到19个请求(比如一个10秒的窗口),即使所有19个请求都失败了,断路器也不会打开。
| 项 | 值 |
|---|---|
| 默认值 | 20 |
| 可选值 | - |
| 默认全局配置 | hystrix.command.default.circuitBreaker.requestVolumeThreshold |
| 实例配置 | hystrix.command.[HystrixCommandKey].circuitBreaker.requestVolumeThreshold |
| 建议(笔者备注) | 建议保持默认值,如果部分接口不能容忍默认阈值可以单独配置 |
断路器等待窗口时间
- circuitBreaker.sleepWindowInMilliseconds
此属性设置断路器打开后拒绝请求的时间量,每隔一段时间(sleepWindowInMilliseconds,单位是毫秒)允许再次尝试(也就是放行一个请求)确定是否应该关闭断路器。
| 项 | 值 |
|---|---|
| 默认值 | 5000 |
| 可选值 | - |
| 默认全局配置 | hystrix.command.default.circuitBreaker.sleepWindowInMilliseconds |
| 实例配置 | hystrix.command.[HystrixCommandKey].circuitBreaker.sleepWindowInMilliseconds |
| 建议(笔者备注) | 建议保持默认值 |
断路器错误百分比阈值
- circuitBreaker.errorThresholdPercentage
此属性设置一个错误百分比,当请求错误率超过设定值,断路器就会打开。
| 项 | 值 |
|---|---|
| 默认值 | 50 |
| 可选值 | - |
| 默认全局配置 | hystrix.command.default.circuitBreaker.errorThresholdPercentage |
| 实例配置 | hystrix.command.[HystrixCommandKey].circuitBreaker.errorThresholdPercentage |
| 建议(笔者备注) | 建议保持默认值 |
注意:
- 配置项
circuitBreaker.requestVolumeThreshold针对错误请求数量。 - 配置项
circuitBreaker.errorThresholdPercentage针对错误请求百分比。
是否强制打开断路器
- circuitBreaker.forceOpen
此属性控制断路器是否强制打开,强制打开断路器会使所有请求直接进入降级逻辑,也就是包裹在HystrixCommand#run()的逻辑不会执行。circuitBreaker.forceOpen属性和circuitBreaker.forceClosed属性互斥。
| 项 | 值 |
|---|---|
| 默认值 | false |
| 可选值 | false、true |
| 默认全局配置 | hystrix.command.default.circuitBreaker.forceOpen |
| 实例配置 | hystrix.command.[HystrixCommandKey].circuitBreaker.forceOpen |
| 建议(笔者备注) | 建议保持默认值 |
是否强制关闭断路器
- circuitBreaker.forceClosed
此属性控制断路器是否强制关闭,强制关闭断路器会导致所有和断路器相关的配置和功能都失效,HystrixCommand#run()抛出异常会正常进入降级逻辑。circuitBreaker.forceClosed属性和circuitBreaker.forceOpen属性互斥。
| 项 | 值 |
|---|---|
| 默认值 | false |
| 可选值 | false、true |
| 默认全局配置 | hystrix.command.default.circuitBreaker.forceClosed |
| 实例配置 | hystrix.command.[HystrixCommandKey].circuitBreaker.forceClosed |
| 建议(笔者备注) | 建议保持默认值 |
度量统计(metrics)配置
度量统计配置会对HystrixCommand或者HystrixObservableCommand执行时候的统计数据收集动作生效。
滑动窗口持续时间
- metrics.rollingStats.timeInMilliseconds
| 项 | 值 |
|---|---|
| 默认值 | 10000 |
| 可选值 | - |
| 默认全局配置 | hystrix.command.default.metrics.rollingStats.timeInMilliseconds |
| 实例配置 | hystrix.command.[HystrixCommandKey].metrics.rollingStats.timeInMilliseconds |
| 建议(笔者备注) | 建议保持默认值 |
滑动窗口Bucket总数
- metrics.rollingStats.numBuckets
| 项 | 值 |
|---|---|
| 默认值 | 10 |
| 可选值 | 需要满足metrics.rollingStats.timeInMilliseconds % metrics.rollingStats.numBuckets == 0,要尽量小,否则有可能影响性能 |
| 默认全局配置 | hystrix.command.default.metrics.rollingStats.numBuckets |
| 实例配置 | hystrix.command.[HystrixCommandKey].metrics.rollingStats.numBuckets |
| 建议(笔者备注) | 建议保持默认值 |
是否启用百分数计算
- metrics.rollingPercentile.enabled
| 项 | 值 |
|---|---|
| 默认值 | true |
| 可选值 | true、false |
| 默认全局配置 | hystrix.command.default.metrics.rollingPercentile.enabled |
| 实例配置 | hystrix.command.[HystrixCommandKey].metrics.rollingPercentile.enabled |
| 建议(笔者备注) | 建议保持默认值 |
百分数计算使用的滑动窗口持续时间
- metrics.rollingPercentile.timeInMilliseconds
| 项 | 值 |
|---|---|
| 默认值 | 60000 |
| 可选值 | - |
| 默认全局配置 | hystrix.command.default.metrics.rollingPercentile.timeInMilliseconds |
| 实例配置 | hystrix.command.[HystrixCommandKey].metrics.rollingPercentile.timeInMilliseconds |
| 建议(笔者备注) | 建议保持默认值 |
百分数计算使用的Bucket总数
- metrics.rollingPercentile.numBuckets
| 项 | 值 |
|---|---|
| 默认值 | 6 |
| 可选值 | 满足metrics.rollingPercentile.timeInMilliseconds % metrics.rollingPercentile.numBuckets == 0,要尽量小,否则有可能影响性能 |
| 默认全局配置 | hystrix.command.default.metrics.rollingPercentile.numBuckets |
| 实例配置 | hystrix.command.[HystrixCommandKey].metrics.rollingPercentile.numBuckets |
| 建议(笔者备注) | 建议保持默认值 |
百分数计算使用的Bucket容量
- metrics.rollingPercentile.bucketSize
| 项 | 值 |
|---|---|
| 默认值 | 100 |
| 可选值 | - |
| 默认全局配置 | hystrix.command.default.metrics.rollingPercentile.bucketSize |
| 实例配置 | hystrix.command.[HystrixCommandKey].metrics.rollingPercentile.bucketSize |
| 建议(笔者备注) | 建议保持默认值 |
健康状态快照收集的周期
- metrics.healthSnapshot.intervalInMilliseconds
| 项 | 值 |
|---|---|
| 默认值 | 500 |
| 可选值 | - |
| 默认全局配置 | hystrix.command.default.metrics.healthSnapshot.intervalInMilliseconds |
| 实例配置 | hystrix.command.[HystrixCommandKey].metrics.healthSnapshot.intervalInMilliseconds |
| 建议(笔者备注) | 建议保持默认值 |
请求上下文配置
请求上下文属性主要涉及到HystrixRequestContext和HystrixCommand的使用。
是否启用请求缓存
- requestCache.enabled
| 项 | 值 |
|---|---|
| 默认值 | true |
| 可选值 | true、false |
| 默认全局配置 | hystrix.command.default.requestCache.enabled |
| 实例配置 | hystrix.command.[HystrixCommandKey].requestCache.enabled |
| 建议(笔者备注) | 建议保持默认值 |
是否启用请求日志
- requestLog.enabled
| 项 | 值 |
|---|---|
| 默认值 | true |
| 可选值 | true、false |
| 默认全局配置 | hystrix.command.default.requestLog.enabled |
| 实例配置 | hystrix.command.[HystrixCommandKey].requestLog.enabled |
| 建议(笔者备注) | 建议保持默认值 |
请求合成器配置(Collapser Properties)
请求合成器配置主要控制HystrixCollapser的行为。
请求合成的最大批次量
- maxRequestsInBatch
| 项 | 值 |
|---|---|
| 默认值 | Integer.MAX_VALUE |
| 可选值 | - |
| 默认全局配置 | hystrix.collapser.default.maxRequestsInBatch |
| 实例配置 | hystrix.collapser.[HystrixCollapserKey].maxRequestsInBatch |
| 建议(笔者备注) | 建议保持默认值 |
延迟执行时间
- timerDelayInMilliseconds
| 项 | 值 |
|---|---|
| 默认值 | 10 |
| 可选值 | - |
| 默认全局配置 | hystrix.collapser.default.timerDelayInMilliseconds |
| 实例配置 | hystrix.collapser.[HystrixCollapserKey].timerDelayInMilliseconds |
| 建议(笔者备注) | 建议保持默认值 |
是否启用请求合成缓存
- requestCache.enabled
| 项 | 值 |
|---|---|
| 默认值 | true |
| 可选值 | true、false |
| 默认全局配置 | hystrix.collapser.default.requestCache.enabled |
| 实例配置 | hystrix.collapser.[HystrixCollapserKey].requestCache.enabled |
| 建议(笔者备注) | 建议保持默认值 |
线程池配置
Hystrix使用的是JUC线程池ThreadPoolExecutor,线程池相关配置直接影响ThreadPoolExecutor实例。Hystrix的命令执行选用了线程池策略,那么就是通过线程池隔离执行的,最好为每一个分组设立独立的线程池。笔者在生产实践的时候,一般把HystrixCommandGroupKey和HystrixThreadPoolKey设置为一致。
核心线程数
- coreSize
| 项 | 值 |
|---|---|
| 默认值 | 10 |
| 可选值 | - |
| 默认全局配置 | hystrix.threadpool.default.coreSize |
| 实例配置 | hystrix.threadpool.[HystrixThreadPoolKey].coreSize |
| 建议(笔者备注) | 根据真实情况自行配置和调整 |
最大线程数
- maximumSize
此属性只有在allowMaximumSizeToDivergeFromCoreSize为true的时候才生效。
| 项 | 值 |
|---|---|
| 默认值 | 10 |
| 可选值 | - |
| 默认全局配置 | hystrix.threadpool.default.maximumSize |
| 实例配置 | hystrix.threadpool.[HystrixThreadPoolKey].maximumSize |
| 建议(笔者备注) | 根据真实情况自行配置和调整 |
最大任务队列容量
- maxQueueSize
此属性配置为-1时使用的是SynchronousQueue,配置为大于1的整数时使用的是LinkedBlockingQueue。
| 项 | 值 |
|---|---|
| 默认值 | -1 |
| 可选值 | -1或者大于0的整数 |
| 默认全局配置 | hystrix.threadpool.default.maxQueueSize |
| 实例配置 | hystrix.threadpool.[HystrixThreadPoolKey].maxQueueSize |
| 建议(笔者备注) | 根据真实情况自行配置和调整 |
任务拒绝的任务队列阈值
- queueSizeRejectionThreshold
当maxQueueSize配置为-1的时候,此配置项不生效。
| 项 | 值 |
|---|---|
| 默认值 | 5 |
| 可选值 | 大于0的整数 |
| 默认全局配置 | hystrix.threadpool.default.queueSizeRejectionThreshold |
| 实例配置 | hystrix.threadpool.[HystrixThreadPoolKey].queueSizeRejectionThreshold |
| 建议(笔者备注) | 根据真实情况自行配置和调整 |
非核心线程存活时间
- keepAliveTimeMinutes
当allowMaximumSizeToDivergeFromCoreSize为true并且maximumSize大于coreSize时此配置才生效。
| 项 | 值 |
|---|---|
| 默认值 | 1 |
| 可选值 | 大于0的整数 |
| 默认全局配置 | hystrix.threadpool.default.keepAliveTimeMinutes |
| 实例配置 | hystrix.threadpool.[HystrixThreadPoolKey].keepAliveTimeMinutes |
| 建议(笔者备注) | 根据真实情况自行配置和调整 |
是否允许最大线程数生效
- allowMaximumSizeToDivergeFromCoreSize
| 项 | 值 |
|---|---|
| 默认值 | false |
| 可选值 | true、false |
| 默认全局配置 | hystrix.threadpool.default.allowMaximumSizeToDivergeFromCoreSize |
| 实例配置 | hystrix.threadpool.[HystrixThreadPoolKey].allowMaximumSizeToDivergeFromCoreSize |
| 建议(笔者备注) | 根据真实情况自行配置和调整 |
线程池滑动窗口持续时间
- metrics.rollingStats.timeInMilliseconds
| 项 | 值 |
|---|---|
| 默认值 | 10000 |
| 可选值 | - |
| 默认全局配置 | hystrix.threadpool.default.metrics.rollingStats.timeInMilliseconds |
| 实例配置 | hystrix.threadpool.[HystrixThreadPoolKey].metrics.rollingStats.timeInMilliseconds |
| 建议(笔者备注) | 建议使用默认值 |
线程池滑动窗口Bucket总数
- metrics.rollingStats.numBuckets
| 项 | 值 |
|---|---|
| 默认值 | 10 |
| 可选值 | 满足metrics.rollingStats.timeInMilliseconds % metrics.rollingStats.numBuckets == 0,值要尽量少,否则会影响性能 |
| 默认全局配置 | hystrix.threadpool.default.metrics.rollingStats.numBuckets |
| 实例配置 | hystrix.threadpool.[HystrixThreadPoolKey].metrics.rollingStats.numBuckets |
| 建议(笔者备注) | 建议使用默认值 |
Hystrix工作流程
官网图例
下图显示HystrixCommand或HystrixObservableCommand如何与HystrixCircuitBreaker及其逻辑和决策流程交互,包括计数器在断路器中的行为。
首先我们看一下上方的这张图,这个图完整的描述了Hystrix的工作流程:
- 每次调用都会创建一个
HystrixCommand - 执行
execute或是queue做同步异步调用 - 查看启用缓存,是缓存击中返回缓存中的响应结果,否则进入步骤4
- 判断熔断器是否打开,如果打开跳到步骤9,否则进入步骤5
- 判断线程池/信号量是否饱满,如果跑满进入步骤9,否则进入步骤6
- 调用
HystrixCommand的run方法,如果调用超时进入步骤9 - 判断是否调用成功,返回成功调用结构,如果失败进入步骤9
- 计算熔断器状态,,所有的运行状态(成功,失败,拒绝,超时)上报给熔断器,用于统计从而判断熔断器状态
- 降级处理逻辑
- 返回执行结果
服务监控HystrixDashBoard
除了隔离依赖服务的调用以外,Hystrix还提供了准实时的服务调用监控(Hystrix Dashboard),Hystrix会持续地记录所有通过Hystrix发起的请求的执行信息,并以统计报表和图形的心是展示给用户,包括每秒执行多少请求多少成功,多少失败等。Netflix通过hystrix-metricx-event-stream项目实现了对以上指标的监控。Spring Cloud也提供了Hystrix Dashboard的整合,对监控内容转化成可视化界面。
创建工程
cloud-consuemr-hystrix-dashboard9001添加依赖
<project xmlns="http://maven.apache.org/POM/4.0.0"
xmlns:xsi="http://www.w3.org/2001/XMLSchema-instance"
xsi:schemaLocation="http://maven.apache.org/POM/4.0.0 http://maven.apache.org/xsd/maven-4.0.0.xsd">
<parent>
<artifactId>Cloud-06-Hystrix</artifactId>
<groupId>org.example</groupId>
<version>1.0-SNAPSHOT</version>
</parent>
<modelVersion>4.0.0</modelVersion>
<artifactId>cloud-consuemr-hystrix-dashboard9001</artifactId>
<properties>
<maven.compiler.source>8</maven.compiler.source>
<maven.compiler.target>8</maven.compiler.target>
<project.build.sourceEncoding>UTF-8</project.build.sourceEncoding>
</properties>
<dependencies>
<dependency>
<groupId>org.springframework.cloud</groupId>
<artifactId>spring-cloud-starter-netflix-hystrix-dashboard</artifactId>
</dependency>
<dependency>
<groupId>org.springframework.boot</groupId>
<artifactId>spring-boot-starter-actuator</artifactId>
</dependency>
<dependency>
<groupId>org.springframework.boot</groupId>
<artifactId>spring-boot-devtools</artifactId>
</dependency>
<dependency>
<groupId>org.projectlombok</groupId>
<artifactId>lombok</artifactId>
</dependency>
<dependency>
<groupId>org.springframework.boot</groupId>
<artifactId>spring-boot-starter-test</artifactId>
</dependency>
</dependencies>
</project>application.yml配置server:
port: 9001主启动类
HystrixDashboardMain9001
//启动监控图形化界面的关键注解
public class HystrixDashboardMain9001 {
public static void main(String[] args) {
SpringApplication.run(HystrixDashboardMain9001.class,args);
}
}需要被监控的服务都必须依赖这个包
spring-boot-starter-actuator<!--actuator监控信息完善-->
<dependency>
<groupId>org.springframework.boot</groupId>
<artifactId>spring-boot-starter-actuator</artifactId>
</dependency>启动工程
访问如下网址
http://localhost:9001/hystrix出现以下界面表示成功。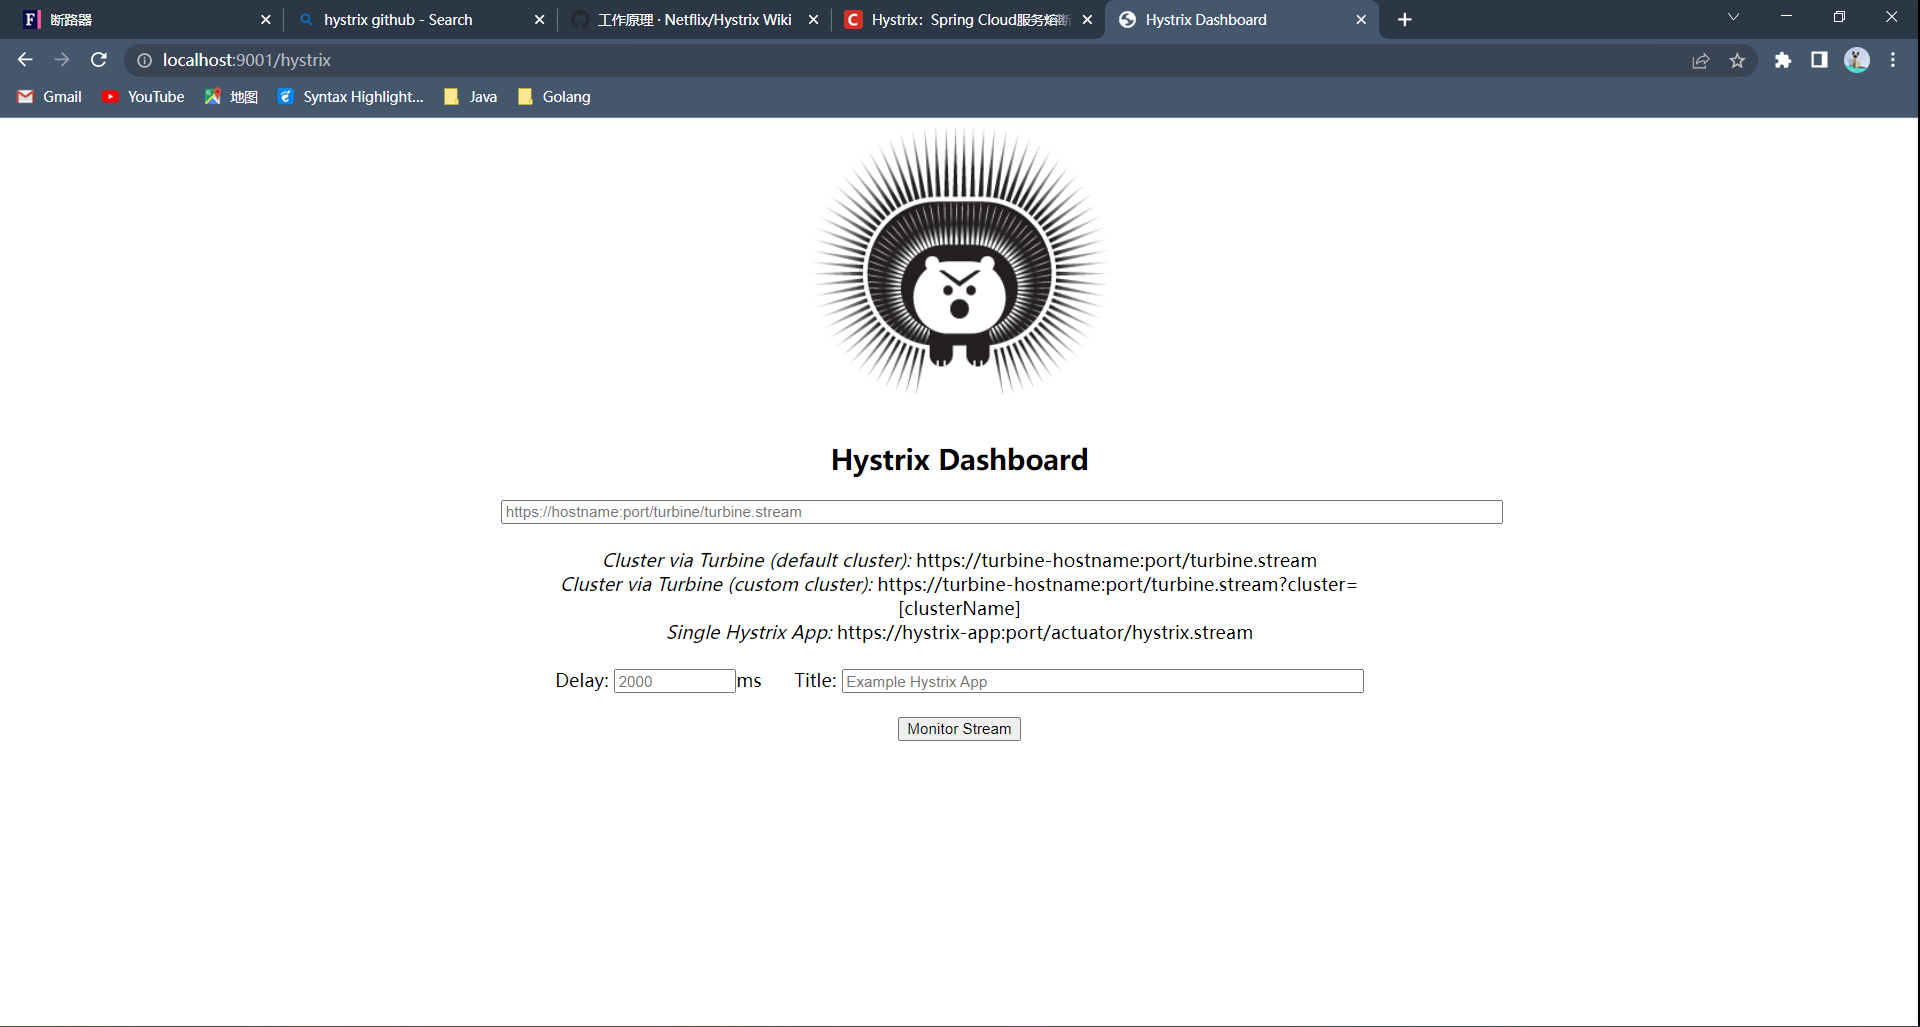
Hystrix监控演示
被监控的服务不仅要添加spring-boot-starter-actuator依赖
还需要再主启动类中新增配置
还需要再application.yml中配置如下
# 暴露hystrix端点 |
重启服务端点
启动监控
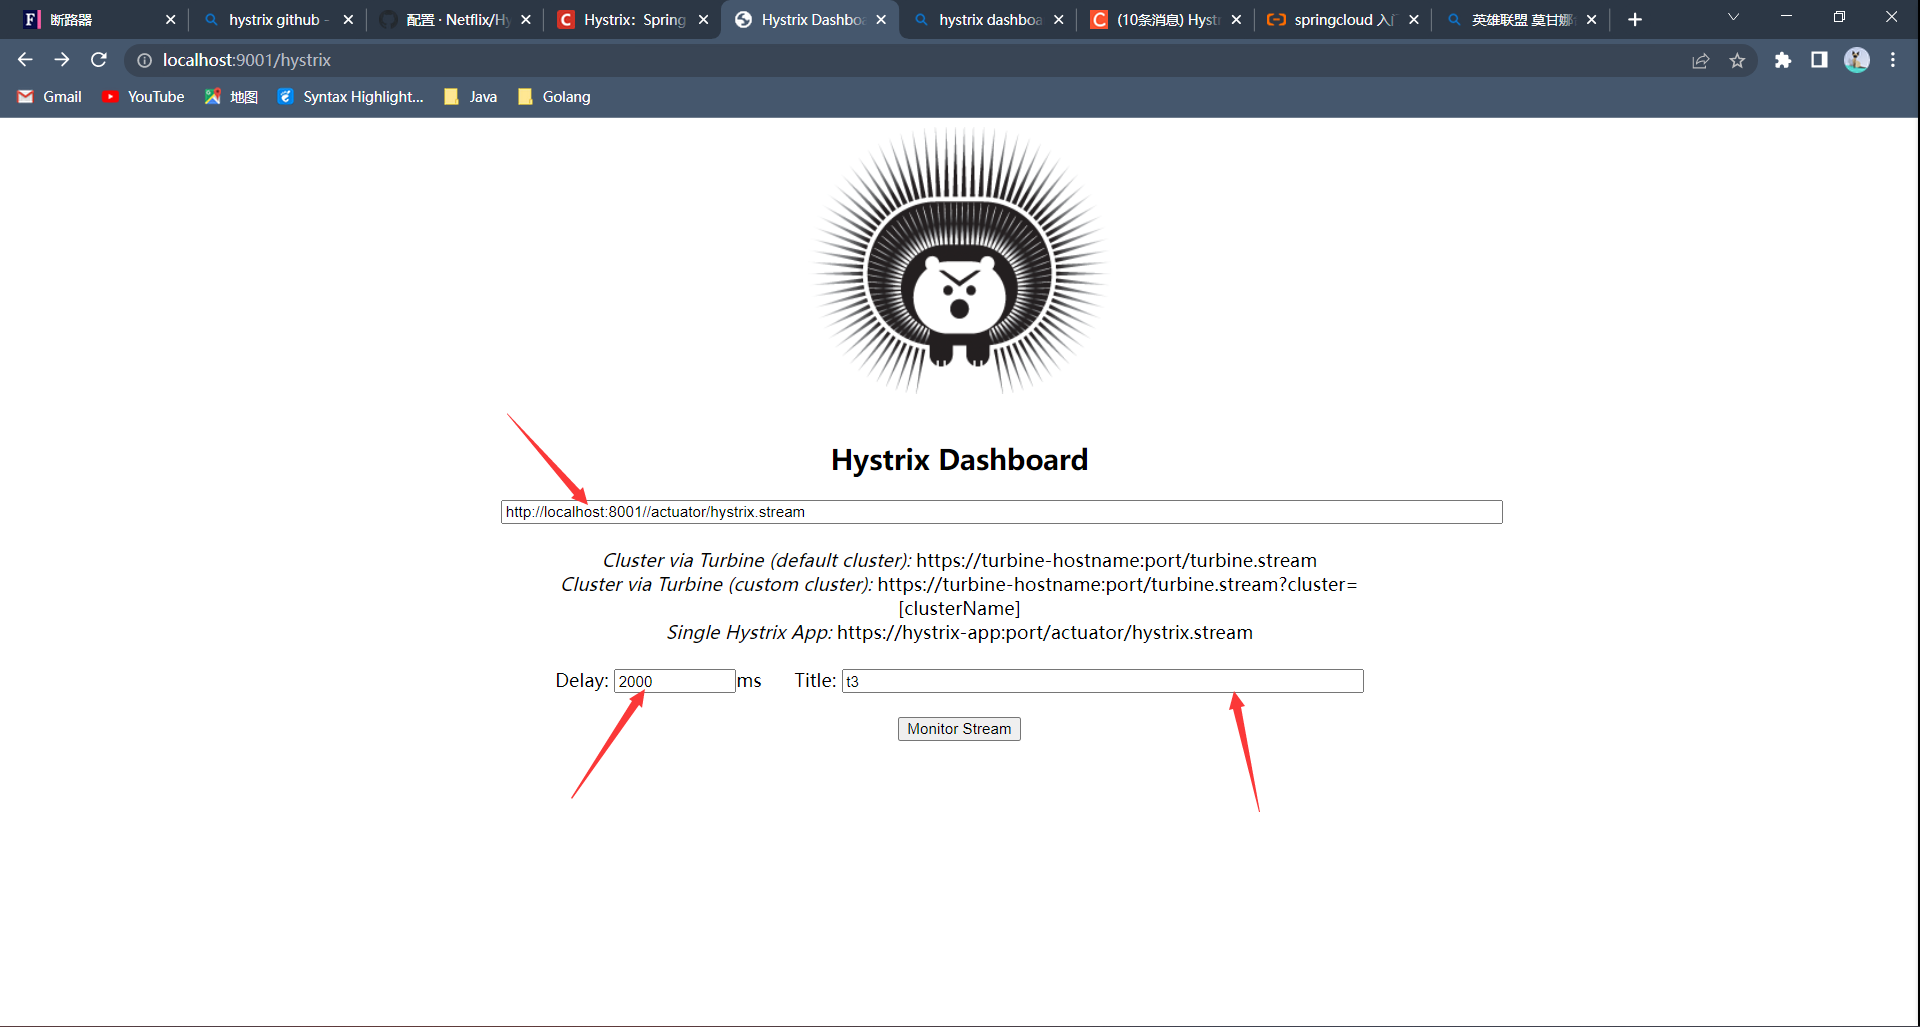
参数配置
在Hystrix Dashboard中输入服务暴露的hystrix流地址http://ip地址:端口/actuator/hystrix.stream
Delay:获取信息的频率
Title:名称
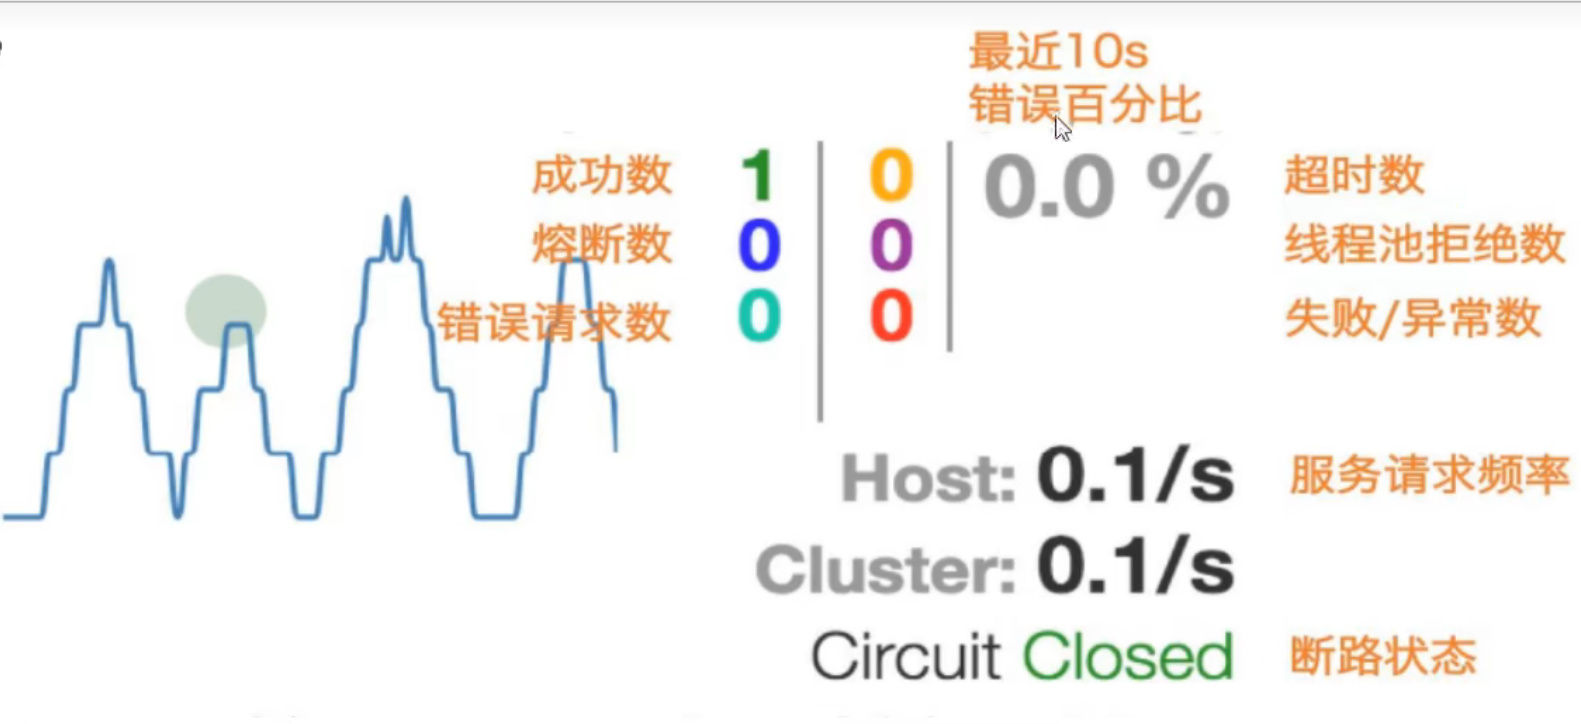
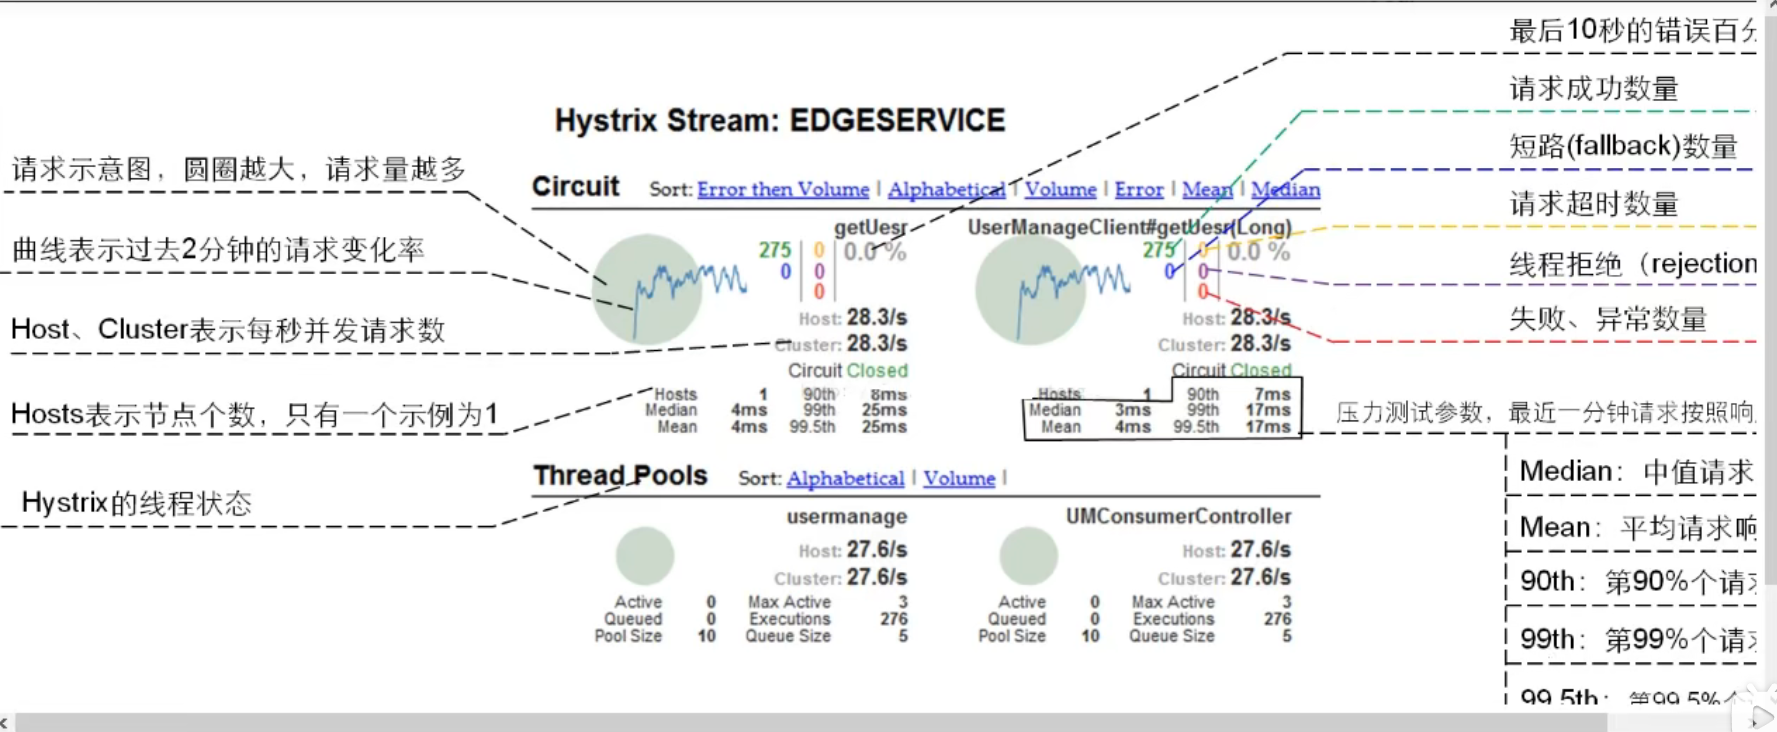
监控界面 可以观察到线程池的情况、断路器的开闭、服务调用的失败率等。
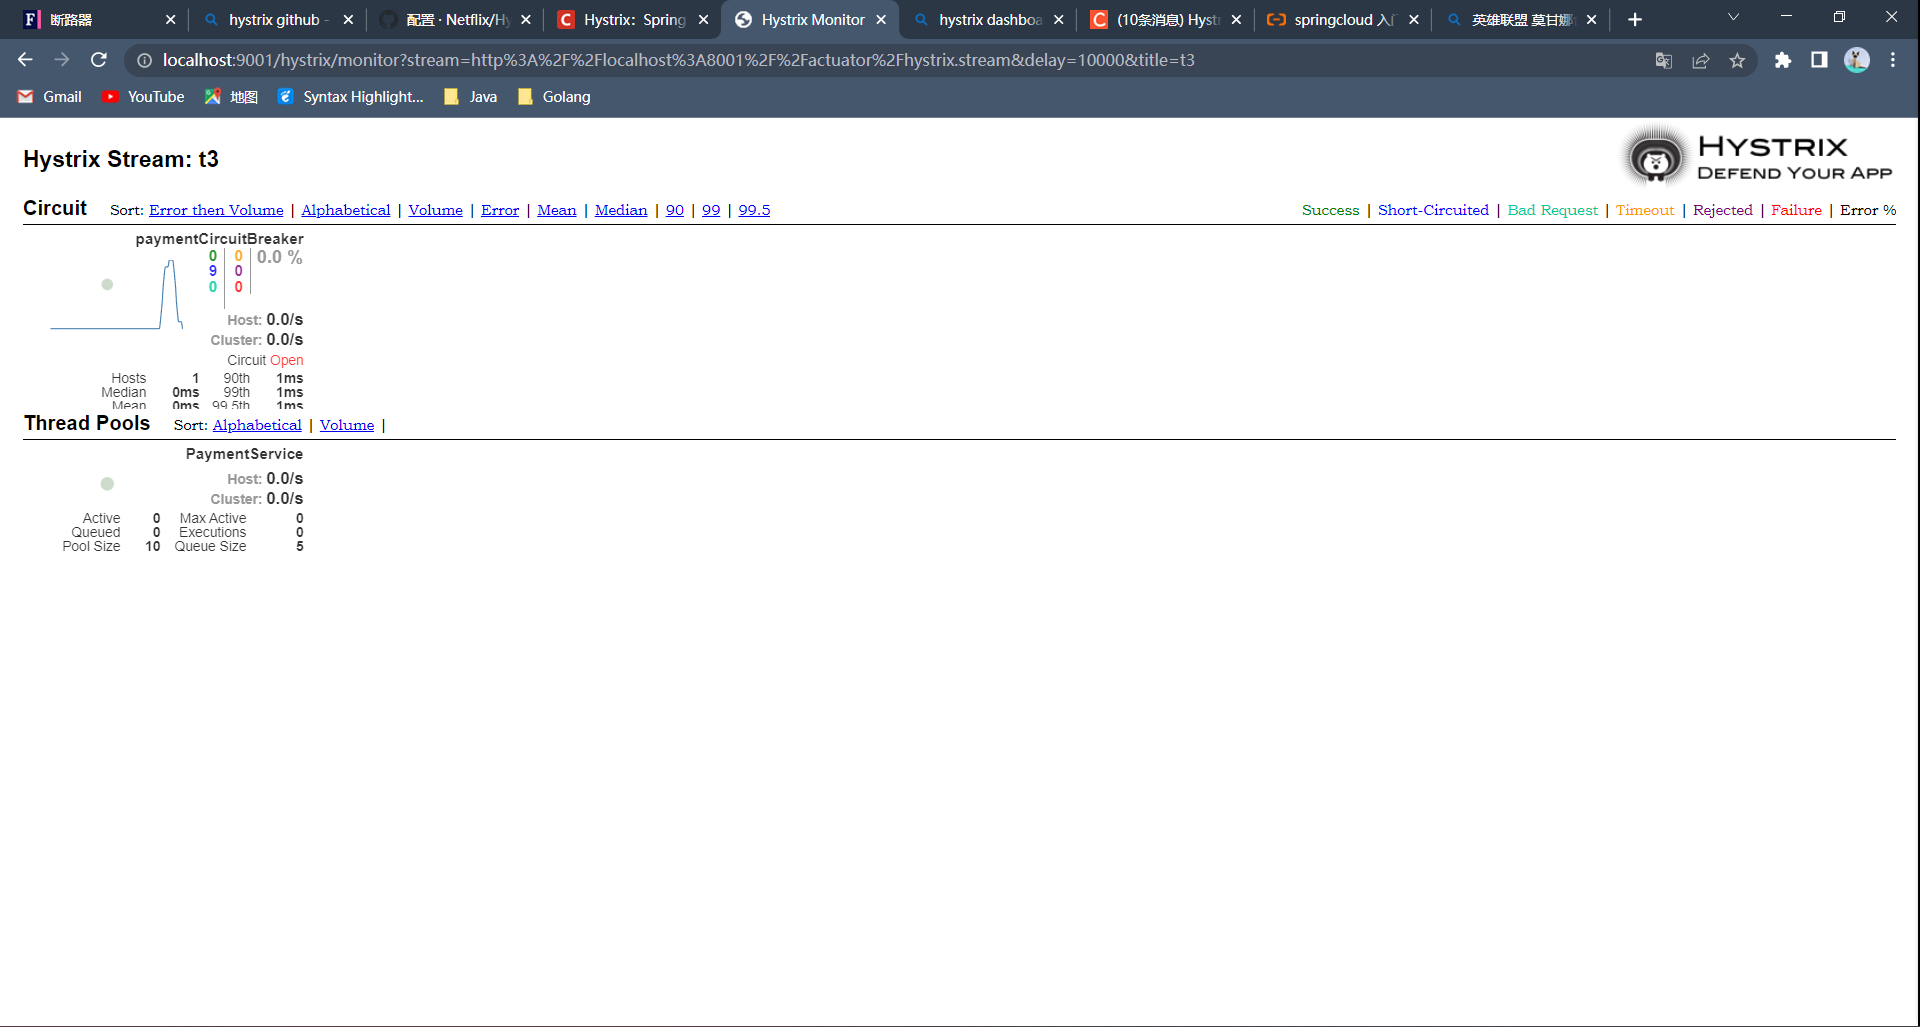
实心圆:共有两种含义。它通过颜色的变化代表了实例的监控程度,它的健康度从 绿色<黄色<橙色<红色 递减。
该实心圆除了颜色的变化之外,它的大小也会根据实例的请求流量发生改变,流量越大该实现圆就越大。所以通过该实心圆的展示,就可以再大量的实例中快速的发现故障实例和高压力实例。
曲线:用来记录两分钟内流量的相对变化,可以通过它来观察到流量的上升和下降趋势。
